Event Countdown Timer Setup: Complete Guide for Beginners

Event countdown timers keep events on schedule by showing the remaining time for speeches, transitions, or segments. They’re essential for conferences, webinars, live broadcasts, church services, and performances — ensuring smooth coordination between speakers, production teams, and audiences.
This guide covers hardware selection, software configuration with Stagetimer, and troubleshooting for setups ranging from small meetings to multi-room productions.
Hardware and Display Setup
Your hardware choice depends on event size, venue layout, and budget. Getting hardware right is critical before configuring software.
SDI vs. HDMI Connections
SDI connections maintain signal quality over long cable runs (up to 300 feet), making them ideal for large venues where the control station is far from stage monitors. SDI cables feature locking connectors that prevent accidental disconnections. Pair them with a multiview system and video mixer to monitor multiple feeds.
HDMI connections work well for simpler setups with shorter cable runs (under 50 feet). They’re widely compatible and easy to use. For longer distances, HDMI extenders over Cat6 Ethernet can reach up to 150 feet. Keep spare cables on hand — HDMI is often the first thing to fail.
Display Options for Timer Screens
Laptop: Open the Stagetimer URL in a browser. Ideal for on-stage confidence monitors, backstage crew displays, or projection screens in smaller venues. Portable and straightforward.
Amazon Fire TV Stick: Plug directly into a display’s HDMI port, connect to venue WiFi, and load the timer in Silk Browser. Simple setup that reduces accidental disruptions — works well for venues needing multiple fixed displays.
Raspberry Pi: Configure to boot directly into a browser in kiosk mode, displaying the timer automatically even after power interruptions. Use wired Ethernet for reliability in areas with inconsistent WiFi.
For complex venues, combine options: a laptop at the main control station, Fire TV Sticks in breakout rooms, and Raspberry Pis on backstage monitors. Keep a backup device ready.
Software Setup with Stagetimer
Stagetimer runs directly in your browser — no installation needed. Create a timer room, add timers matching your event schedule, and generate output links for your team.
Creating and Naming Timers
Create a new room and name it clearly (e.g., “Annual Conference 12/08/2025” or “Sunday Service Morning”). Inside the room, click ”+ Add Timer” to create timers. Name each descriptively: “Opening Keynote”, “Panel Discussion”, “Worship Set”, “Q&A Session.”
Stagetimer offers three timer types:
- Countdown timer for sessions with fixed duration
- Count-up timer to track elapsed time without an endpoint
- Time-of-day timer to show time remaining until a specific clock time
Arrange timers in sequence by dragging them. The order becomes your shared agenda.

Configuring Timer Settings
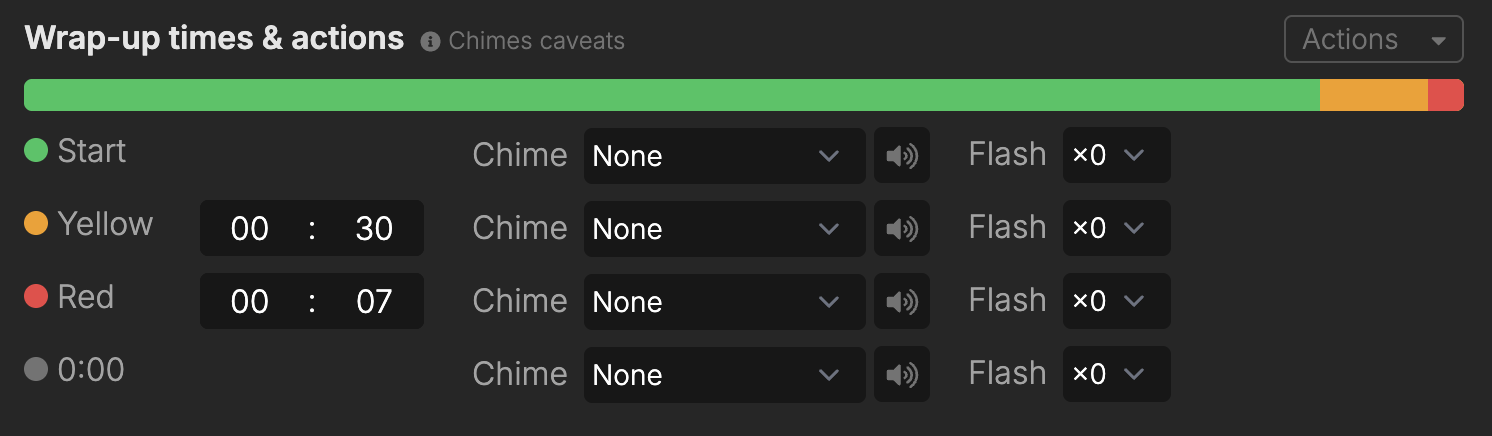
Set each timer’s duration in the configuration panel (e.g., 00:30:00 for 30 minutes). Add wrap-up times to help speakers stay on track — for example, yellow warning at 5 minutes remaining, red alert at 1 minute.
Customize font size based on viewing distance. Use the messaging feature to send discreet on-screen cues like “Wrap up your final point” or “Take questions from the audience.”
Setting Up Multiple Outputs
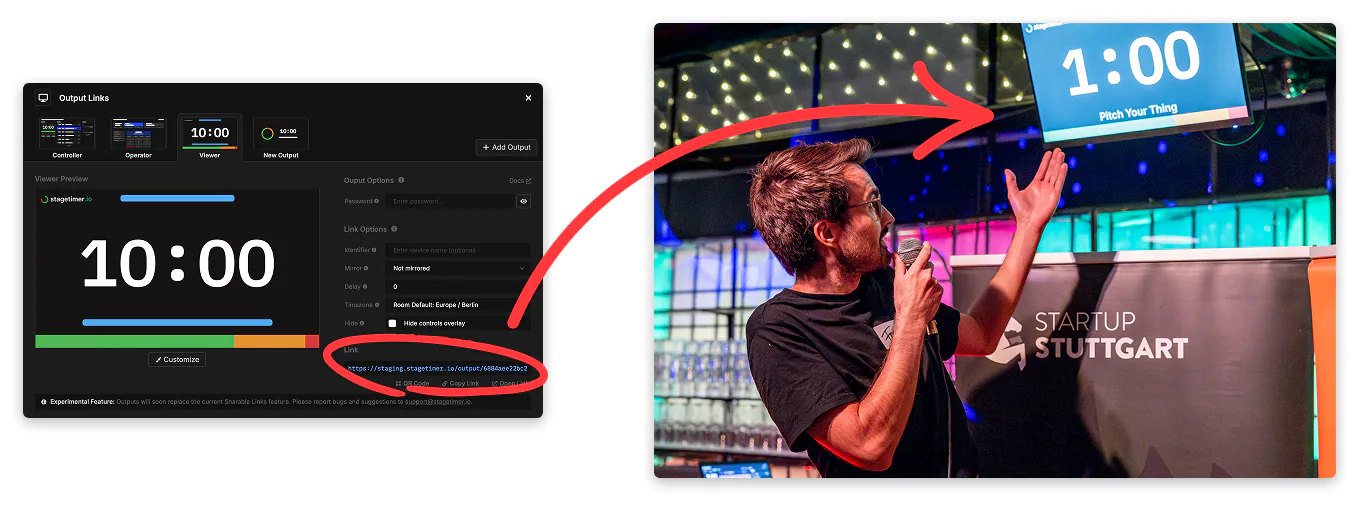
Click “Room” in the top-right menu and select “Output Links” to create customized views for different roles.
Default outputs include:
- Viewer: Clean fullscreen display for confidence monitors and projections — shows active timer, messages, and agenda without controls
- Operator: Simplified interface with large control buttons for show callers or technical directors
- Controller: Full access to all timers, settings, and messages for trusted production staff
Premium users can create custom outputs with adjusted layouts, element sizes, fonts, colors, and displayed information. Configure Link Options to add device identifiers, mirrored displays for teleprompters, synchronization delays, or timezone overrides.
Each output can be opened on any device — laptop, Fire TV Stick, Raspberry Pi, tablet, or phone. Generate a QR code for quick access. Enable password protection for security.
Setup Examples by Event Size
Small Meeting (10–50 people)
Connect a laptop running Stagetimer to a projector via HDMI. Add a second HDMI output for a presenter confidence monitor. Standard WiFi handles two or three devices. Position the confidence monitor 15–20 feet from the presenter.
Medium Conference (100–500 people)
Set up a laptop at the production booth as the controller. Connect Fire TV Sticks to main displays via HDMI. Equip your technical director with Operator Output on a tablet. Stage managers can monitor Controller Output on their phones for upcoming timers and messaging.
Create a dedicated WiFi SSID for production equipment, separate from attendee WiFi. Test all connections at least two hours before the event.
Large Multi-Room Event (500+ people)
Use SDI connections for long cable runs. Run Stagetimer on a dedicated computer with multiple outputs. Use an HDMI-to-SDI converter and route SDI cables to main stage displays, breakout rooms, green rooms, and broadcast feeds.
For multi-room events, create separate timer rooms for each space. Equip breakout rooms with Raspberry Pis showing their specific timers. The main production team uses Controller Output while room coordinators access Operator Outputs on tablets.
Ensure solid network infrastructure — hardwired connections for production computers and enterprise-grade WiFi access points with dedicated VLANs for production traffic.
See pricing for plan details and device limits.
Troubleshooting
Timer Not Displaying or Updating
If a timer screen shows blank or frozen, open the developer console (F12) to check for errors. Refreshing often resolves temporary glitches.
For timers that appear but don’t count down, verify the timer type and duration in Controller Output. Ensure time-of-day timers target a future time. If a display fails mid-event, test its network connection by loading another website.
Network Connectivity Issues
For venues with unreliable internet, the Stagetimer desktop app runs as a local web server on one computer. Other devices connect via browser to that machine’s IP address on the local network — no internet required once setup is loaded.
For WiFi devices like Fire Sticks or Raspberry Pis, position them within 30 feet of an access point, away from metal structures. Ask venue IT to reserve IP addresses for production equipment. For larger events, request a separate SSID to isolate production traffic.
Display Visibility Problems
For every 10 feet of viewing distance, characters should be at least 1 inch tall. A confidence monitor 15 feet away needs text at least 1.5 inches high. Adjust font sizes in Output Link settings and test from the presenter’s position.
Stage lights create glare — tilt monitors slightly downward or use a hood. For bright stages, maximize screen brightness and use high-contrast colors (white text on black background).
Place confidence monitors in presenters’ natural line of sight. Color-coded warnings (yellow at 5 minutes, red at 1 minute) grab attention.
HDMI Cable Length Limitations
Standard HDMI works up to 50 feet. For longer distances, use HDMI extenders over Cat6 (up to 150 feet) or switch to SDI. For remote displays, plug a Fire Stick directly into the screen.
When HDMI issues arise, swap the cable first. Always keep spares.
Synchronization Delays
Timers appearing out of sync often result from network latency or device processing differences. Stagetimer includes a synchronization delay setting in Output Link options. Apply a negative delay to lagging displays. For broadcast feeds, add positive delay to match video processing latency (typically 2–5 seconds).
During rehearsals, test synchronization by starting a timer and observing all displays simultaneously. Gradual drift suggests a device clock issue — ensure all devices sync time automatically via NTP.
Conclusion
Event countdown timers require careful planning, appropriate hardware, and proper software configuration. Start with your event’s scale: laptop and projector for small meetings, SDI and dedicated network infrastructure for large productions.
Test your system at least two hours before the event. Check all displays, network connections, and device synchronization. Run the timer and monitor all displays simultaneously.
For offline reliability, use the desktop app as a local server. When troubleshooting, start simple: refresh the browser, check cables, verify network access.
With everything running smoothly, Stagetimer handles the countdown while you focus on delivering a successful event.