How to Add a Countdown Timer to Your Microsoft Teams Meeting: A Step-by-Step Guide

Nowadays, most business meetings, conferences, and events are conducted online. But there is an annoying problem that comes with this. There are no well-designed and highly customizable timers built into platforms like Microsoft Teams to help you regulate the meeting or event. The presenters end up taking too little or too much time with their presentation because they don’t have any way to see how much time they have left. In a traditional event or meeting, you can install a physical timer clock to let the presenter know how much time they have left.
But in an online setting, this isn’t usually a possibility. Thankfully, there is a way to add timers even to your online meetings on Microsoft Teams. To do so, all you need is some technical know-how and two free software tools called Stagetimer and OBS Studio. With a timer helping you regulate the flow, you will surely have a much easier time managing the meeting or event. In this guide, we will tell you exactly how you can add Stagetimer to your Teams meetings easily.
Prefer to watch a video instead of reading an article? Check out the video below:
What Is Stagetimer
Stagetimer is a timer app that is perfect for professional events and meetings. Since it is a browser-based app, it doesn’t need lengthy downloads or setups. Instead, the timer can be shared via a link or a QR code easily. Stagetimer is full of useful features that can help you better schedule and manage your meetings.
It allows you to build a complete rundown of your event or agenda of the meeting. You can link timers to auto-start and create a timeline, with the addition of many more handy features, such as in-depth customization and message delivery. Its intuitive user interface and easy shareability make it the best way to add a timer to your Teams meetings. Stagetimer is a free app that also offers you Pro and Premium features for professional events or meetings.

How to Add a Stagetimer to Microsoft Teams Live Events
To add a Stagetimer to Microsoft Teams Live, you will need to install OBS on your computer. Installing OBS is pretty simple, as all you have to do is follow the on-screen instructions, and the installation should go smoothly. You will also need a Microsoft Teams account, which you can make in minutes. Lastly, you will need Stagetimer opened in a browser tab. You can use Stagetimer’s free version or the paid version as per your preferences and meeting management needs.
Once you have all three of these apps set up, you can follow these instructions to set up a stage timer for any Teams event or meeting:
Set Up Your Timer on Stagetimer
The first thing you need to do is set up your timer on Stagetimer. The timer you set up can have various sub-sections for each presenter. Creating a timer is very easy. All you have to do is create as many timer sections as you want and give each section a duration. You can select the timer to start automatically at a set time or have it start when you press the play button manually. Each timer section can be renamed for easier recognition as well.
Furthermore, the timer’s appearance can be further customized by changing how its color-coded bar looks. Chimes and flashes can be set to go off with each timer as well. You can add other useful information to the timer, such as the time of day or important notes.
Take your time and customize the timer as much as you want, as there are tons of features to explore. Once you have created a whole timeline for your event or meeting, be sure to check out its preview, which is available on the controller page. Now, it’s time to create a sharing link for the finished timer.
The sharing link can be generated by clicking on the green button near the top left that says “Links.” You will see a window to select what link type you want. For setting up the timer for your Teams meeting, you can simply select the “Viewer” link generation option. Copy the link that is generated and save it.
If you want, you can share this link with others whom you want to be able to see the timer. But to use the timer on their own, they will need a second screen where the timer can be displayed, which can be a phone or a tablet. However, by using the method discussed in this guide, you will be able to display the timer right in the Microsoft Teams meeting app. For this method, you won’t have to share the link with anyone else.
Add Stagetimer to OBS
The next step toward adding a countdown timer to your Microsoft Teams live event is to add the Stagetimer link you acquired to the OBS Studio app. To do so, first, add a new scene to OBS and call it a name that’s easily recognizable, like “timer.” Next, add a new source. Since we are using a link as our source for the timer feed, the source you select will be a “Browser” source.
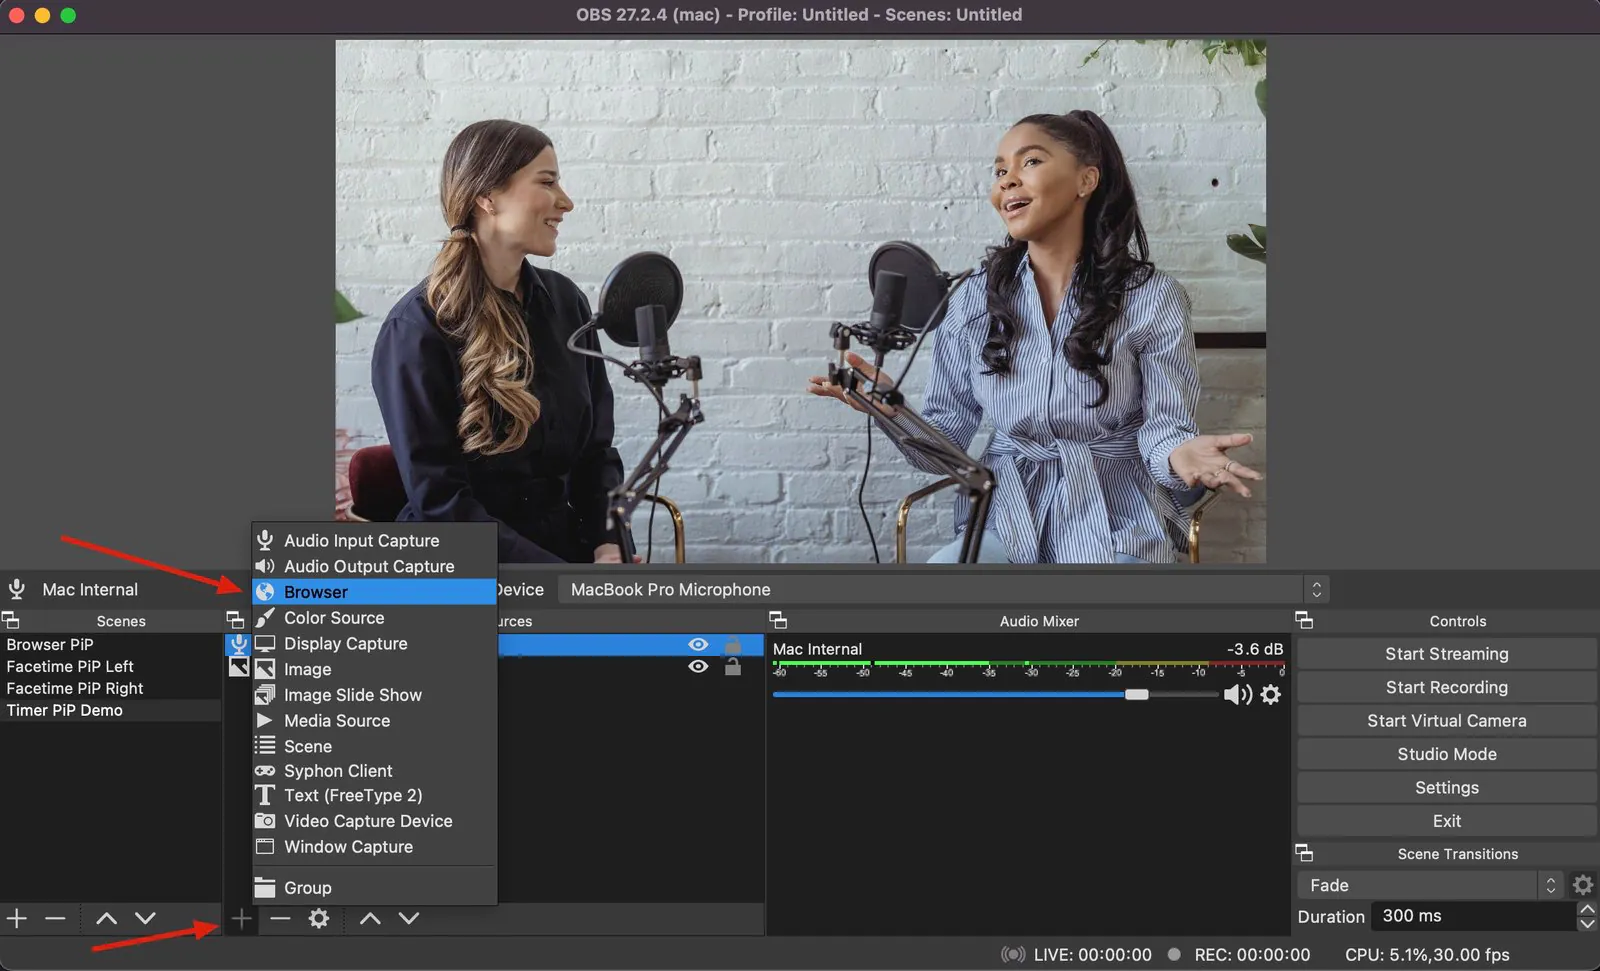
Name this new source a recognizable name as well, such as “Stagetimer.” In the window that opens when you add the new browser source, paste the Stagetimer link you got from the method mentioned above. This view-only link needs to be pasted in the given prompt, and you will also need to provide the length and width of the screen you want to display. Finally, click on the “Start Virtual Camera” option in the OBS window.
You can learn more about how to use Stagetimer with OBS in this Step-by-Step Guide.
Use the OBS Virtual Camera in Teams Live
The reason we added the Stagetimer link into the OBS as a virtual camera is that doing so will make the timer screen be displayed as if it was a feed from your camera. So when you join the Microsoft Times event, your camera will show the timer instead of your face.
Now to continue setting up the countdown timer for your Microsoft Teams event, create and join a meeting as the organizer. When joining, be sure to change your camera input device from your webcam to the virtual OBS studio camera. Now the timer will show on your screen. If the timer looks inverted, simply turn on the “Mirror My Device” option on Stagetimer to un-mirror it, and it will go back to normal.
Once your presenters have joined the Microsoft Teams event meeting, they will see the timer displayed on their screen instead of your webcam. What the presenters can do is minimize the Microsoft Teams window so the timer displayed on their screen goes automatically into picture-in-picture mode.
When the timer is in picture-in-picture mode, it will still show up on the screen of the presenter in a smaller window, but it won’t be displayed to the audience watching the presentation. So the presenter can know how much time they have left on the same screen on which they have their presentation opened.
You can now customize the live feed from the presentation however you want and send it to the audience to watch. Once the event or meeting has started, all you have to do is click play on the Stagetimer controller page, where you created the timer, and you are good to go. Now your presenters for the event can stay on pace during their presentation thanks to the handy timer on their screen.
Additional Stagetimer Features You Can Use
Linking Timers
Stagetimer allows you to link timers with each other. This is really helpful for making your stage timer on a Microsoft Teams event work on its own without any input from you. After each timer ends, the next linked timer will start automatically. So you don’t have to start each one individually.

Sending Direct Messages to the Speaker
Since, through the method mentioned above, the countdown timer will be showing on the presenter’s screen directly, you can take advantage of the direct message feature of Stagetimer. Through this feature, you can send any message you want to the timer screen for every connected individual. You can tell the presenters to wrap up, slow down, or inform them of how many questions are remaining. All this can help improve communication with your presenters during a live Microsoft Teams event. Plus, you can flash the message when needed so it is more noticeable.

Submit Questions Link
Stagetimer provides a convenient method for audience members to submit their questions effortlessly. By simply clicking on the “Submit Questions Link” button within your controller page, a unique link is generated for you to share with your audience. Upon clicking the link, a window opens up, allowing attendees to ask their questions promptly. These questions are then displayed as messages on both the controller and moderator view, which can sort through the messages. Questions can then be shown on the presenter’s timer screen, ensuring seamless integration into the event.

Try Stagetimer
Stagetimer is a pretty useful app for those who struggle to keep their online events on time. And by integrating this amazing software with Microsoft Teams through the method mentioned above, you can better share it with all your presenters with ease. No longer will you have to deal with a presenter taking ages on their presentation, reducing the time available for others. Best of all, you can customize the timer in real time.
With Stagetimer you are always ready for any unexpected absences or additions to the event. Adding Stagetimer to Microsoft Teams using OBS Studio is also completely free. So if you are organizing an online event while on a budget, this could help you save money for something more important. Try Stagetimer by creating your own timer. No sign-in or credit card information is required. Start anytime for free.