How to Run Stagetimer on a Raspberry Pi
Why use a Raspberry Pi?
A Raspberry Pi is a small, affordable single-board computer — roughly the size of a credit card. It’s a popular choice for running Stagetimer as a dedicated display because it’s inexpensive, silent, and can be tucked behind a monitor or mounted directly to a screen.
Common setups include:
- A confidence monitor on stage showing presenters their countdown
- A permanent timer display in a studio, church, or meeting room
- A portable production kit — Pi, screen, and power supply in a small case
- A broadcast overlay source feeding into an ATEM, OBS, or vMix setup
Since a Raspberry Pi can run headless (without keyboard or mouse), it’s ideal for “set it and forget it” timer displays that just need to show a fullscreen countdown.
Which approach to use
There are two ways to run Stagetimer on a Raspberry Pi:
Web version (online): Open stagetimer.io in a browser. Requires an internet connection, but there’s nothing to install beyond the operating system. Best for venues with reliable WiFi or ethernet.
Desktop app (offline): Install the Stagetimer desktop app directly on the Pi. Runs a local server that other devices on the same network can connect to — no internet required. Best for venues with unreliable or restricted internet, or when you want full control over the setup.
Both approaches display the same timer interface. The desktop app simply removes the dependency on an internet connection.
Hardware requirements
Stagetimer has been tested on hardware as low as a Raspberry Pi 2 Model B+, so virtually any Pi will work. That said, newer models provide a smoother experience.
Recommended:
- Raspberry Pi 4 Model B (2 GB RAM or more) or Raspberry Pi 5
- MicroSD card (16 GB or larger) with Raspberry Pi OS installed
- Power supply (USB-C for Pi 4/5)
- HDMI cable and a display (monitor, TV, or projector)
- Ethernet or WiFi connection (for the web version)
Optional:
- A case with passive cooling (the Pi can run warm during extended use)
- Keyboard and mouse for initial setup (can be removed afterward)
Setting up the Raspberry Pi
If you’re starting from scratch, follow the official Raspberry Pi setup guide: Getting Started with Raspberry Pi
In short:
- Download and run the Raspberry Pi Imager on another computer
- Flash Raspberry Pi OS (64-bit) onto your microSD card
- Insert the card into the Pi, connect a display, keyboard, and power
- Follow the on-screen setup — set your password, connect to WiFi, and let it update
Once your Pi boots to the desktop, you’re ready to set up Stagetimer.
Option 1: Web version
The simplest approach — just open a browser.
- Open Chromium (pre-installed on Raspberry Pi OS) from the taskbar or by running
chromium-browserin the terminal - Navigate to your Stagetimer viewer link (e.g.,
https://stagetimer.io/r/YOURROOM/) - Press F11 to go fullscreen
That’s it. The timer syncs in real-time with whoever is controlling the room from another device. Stagetimer uses very little bandwidth (2–3 MB for an entire show), so even a basic WiFi connection works fine.
To get your viewer link, open Output Links on the controller page, select the Viewer output, and copy the link. You can also scan the QR code directly from another device. See Output Links for details.
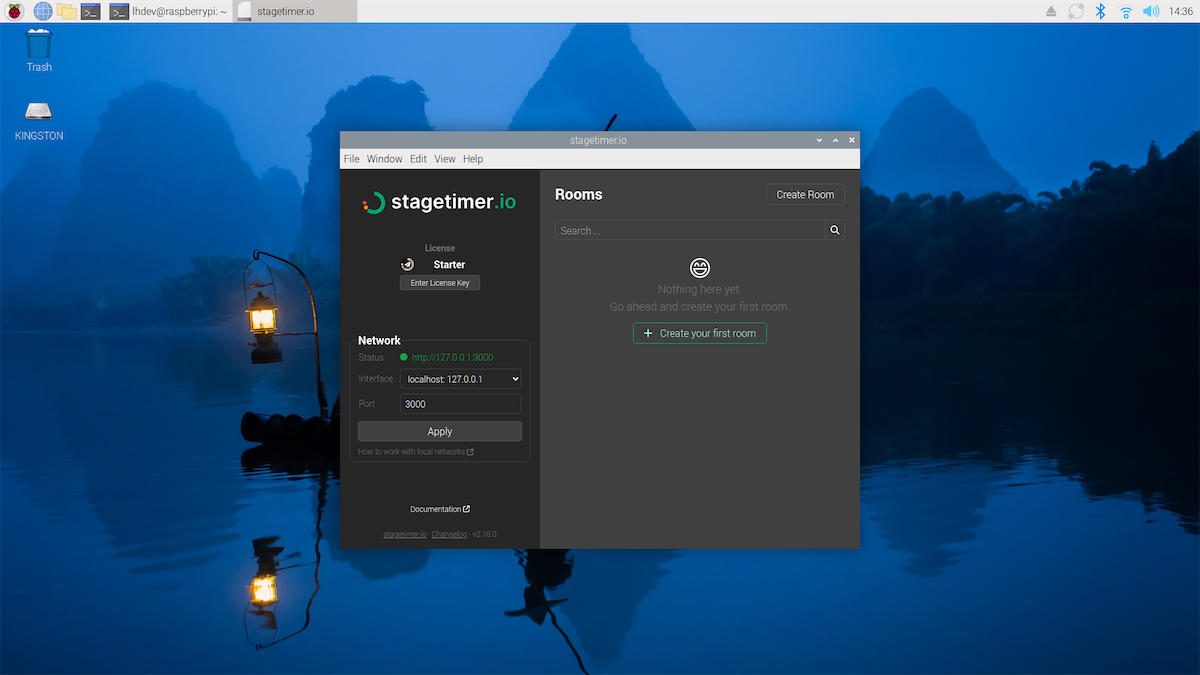
Option 2: Desktop app
The desktop app turns the Pi into a self-contained timer server. No internet needed — other devices connect to it over the local network.
Installation
- Download the Linux arm64 .deb package from the desktop app page
- Install it using one of these methods:
GUI: Right-click the downloaded .deb file and select “Package Install”
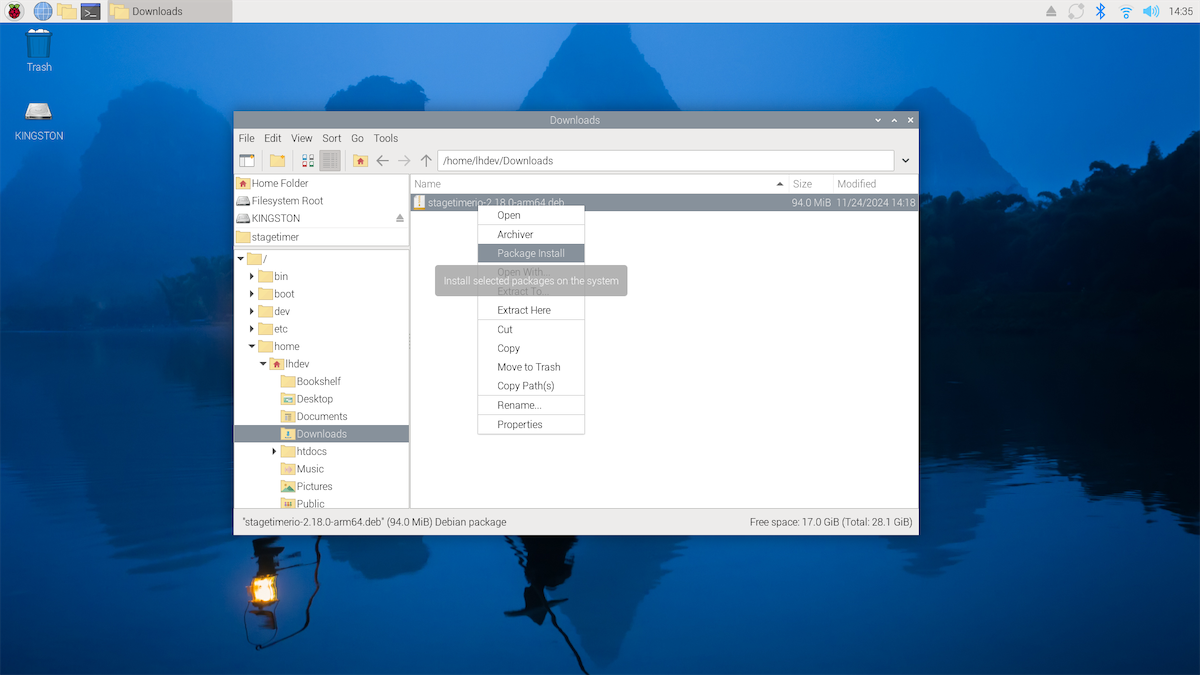
Terminal:
sudo dpkg -i stagetimer.io-*-arm64.deb- Launch by running
stagetimerioin a terminal
Connecting other devices
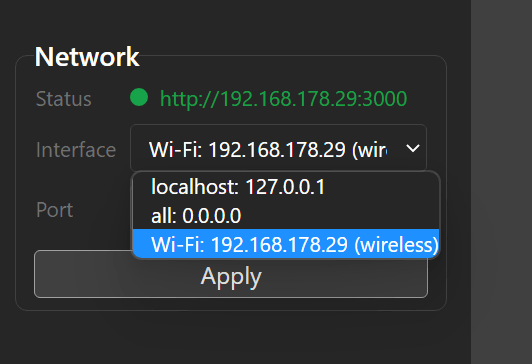
The desktop app runs a local web server. Other devices on the same network can access it by opening the URL shown in the app (e.g., http://192.168.1.100:3000).
- In the app, go to network settings and select your Pi’s network interface (not
127.0.0.1) - Open a room and note the URL in the address bar
- On any other device connected to the same network, open that URL in a browser
For full setup details including license keys, data exchange, and troubleshooting, see the Desktop App documentation.
Kiosk mode (auto-start on boot)
For a dedicated timer display, you’ll want the Pi to boot directly into a fullscreen Stagetimer viewer — no desktop, no taskbar, no manual interaction needed. This is called kiosk mode.
Basic approach
The simplest method is to configure Chromium to launch automatically in kiosk mode on boot. On Raspberry Pi OS (Bookworm), which uses the Wayfire or labwc window manager:
- Make sure your Pi is set to auto-login to the desktop:
sudo raspi-configNavigate to System Options → Boot / Auto Login → Desktop Autologin.
- Create a kiosk launch script:
nano ~/kiosk.shAdd the following (replace the URL with your actual viewer link):
#!/bin/bash
# Disable screen blanking
xset -dpms 2>/dev/null
xset s off 2>/dev/null
xset s noblank 2>/dev/null

# Wait for desktop to fully load
sleep 5

# Launch Chromium in kiosk mode
chromium-browser \
  --kiosk \
  --noerrdialogs \
  --disable-infobars \
  --disable-session-crashed-bubble \
  --disable-features=TranslateUI \
  "https://stagetimer.io/r/YOURROOM/"
Make it executable:
chmod +x ~/kiosk.sh- Add the script to autostart. For labwc (newer Raspberry Pi OS):
mkdir -p ~/.config/labwc
echo "$HOME/kiosk.sh &" >> ~/.config/labwc/autostart
For Wayfire (older Bookworm releases):
echo -e "\n[autostart]\nkiosk = $HOME/kiosk.sh" >> ~/.config/wayfire.ini- Reboot and the Pi should boot directly into the fullscreen Stagetimer viewer.
chromium-browser --kiosk "http://localhost:3000/r/YOURROOM/" and add a line to start the Stagetimer server first: stagetimerio & (before the sleep command).
Hiding the cursor
For a cleaner display without a visible mouse cursor, install unclutter:
sudo apt install unclutterAdd this line to your kiosk script (before the Chromium command):
unclutter -idle 0 &Tips & troubleshooting
Screen blanking. By default, Raspberry Pi OS turns off the display after a period of inactivity. The kiosk script above disables this with xset, but if the screen still goes black, you can also disable it in raspi-config under Display Options → Screen Blanking.
Performance. Stagetimer is lightweight and runs well even on older Pi models. If you notice occasional sluggishness, close any other browser tabs or applications. The Pi 4 and 5 handle Stagetimer without any issues.
Power supply. Use the official Raspberry Pi power supply or one that provides sufficient amperage. Underpowered Pi units can behave erratically — random reboots, display glitches, or WiFi drops.
Headless setup. If you don’t have a spare keyboard and mouse, you can set up the Pi entirely over SSH. Enable SSH in the Raspberry Pi Imager’s advanced settings before flashing, then connect remotely from another computer.
Display resolution. The Stagetimer viewer automatically scales to fit any resolution. If the text looks too small or too large, adjust the display resolution in Preferences → Screen Configuration or via raspi-config.
Recovering from crashes. Chromium’s --kiosk mode can get stuck if it crashes (showing a “restore session” bar). The --disable-session-crashed-bubble flag in the kiosk script prevents this. If it still happens, delete Chromium’s session data:
rm -rf ~/.config/chromium/Default/SessionsRelated documentation: Desktop App · Viewer · System Requirements · Output Links