Controlling Stagetimer via Companion for Stream Deck - Complete Guide
Companion, an open-source software, enhances your live video production experience by allowing you to control hardware and software, such as Stagetimer, using Elgato’s Stream Deck. This user guide will walk you through the process of setting up the Companion with the Stagetimer module and explain the functions available.
Please note, you’ll need a Stagetimer account with a Pro or Premium plan to access the API, a prerequisite for Companion integration.
Prefer a video?
Matthew Hand describes how to use Stagetimer with Bitfocus Companion (26 min)
“We honestly consider Stagetimer.io the best and easiest clock to use for event production. This amazing production tool combined with Bitfocus Companion makes for a great live solution. In this video, Matt shows how to set up Stagetimer.io with their API in Bitfocus Companion. You will need at least the Pro subscription to do this.”
Getting Started
-
The first step is to acquire an Elgato Stream Deck, a budget-friendly keypad equipped with programmable LCD buttons. You can purchase it here.
Elgato Stream Deck -
Download and launch the Companion app.
-
In the GUI, add the “stagetimer.io: Stagetimer API” connection.
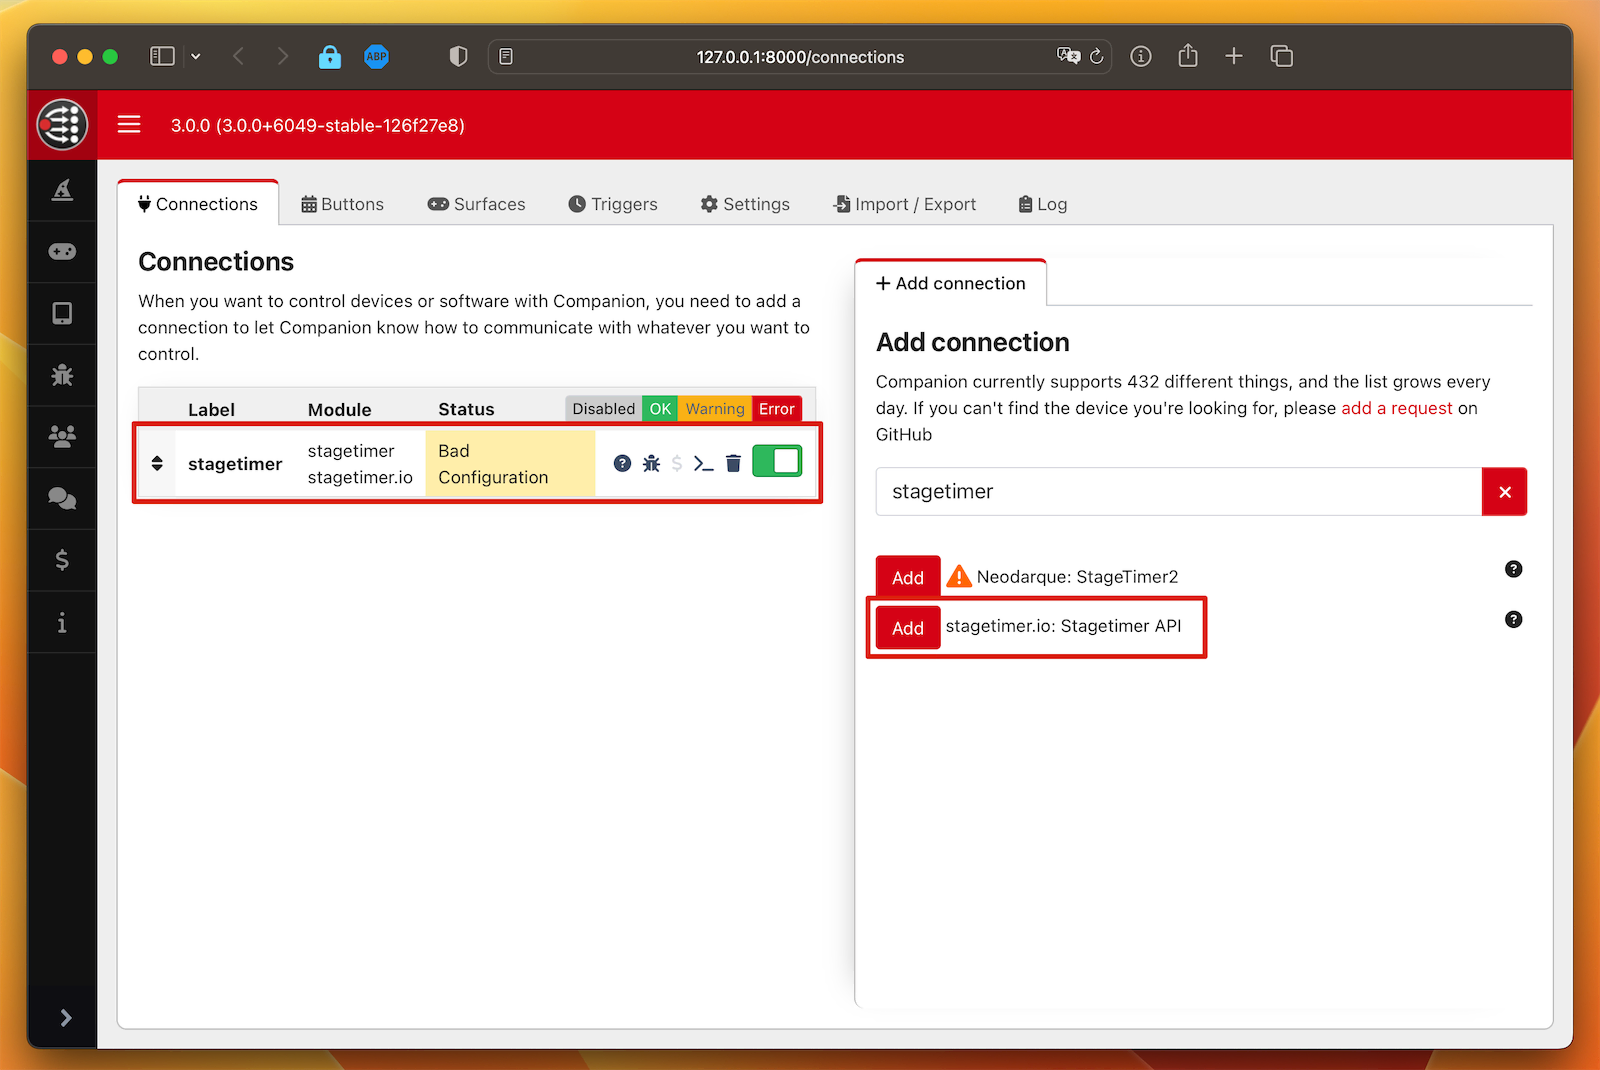
Adding the Stagetimer API connection in the Companion app -
The Companion module can control one Stagetimer room. Open the desired room to get its Room ID and API key.
Retrieving the Room ID and API key 
API key location -
Input the Room ID and API key into the Stagetimer connection on the Companion app. Click “Save” and ensure the status turns into a green checkmark, confirming successful setup.
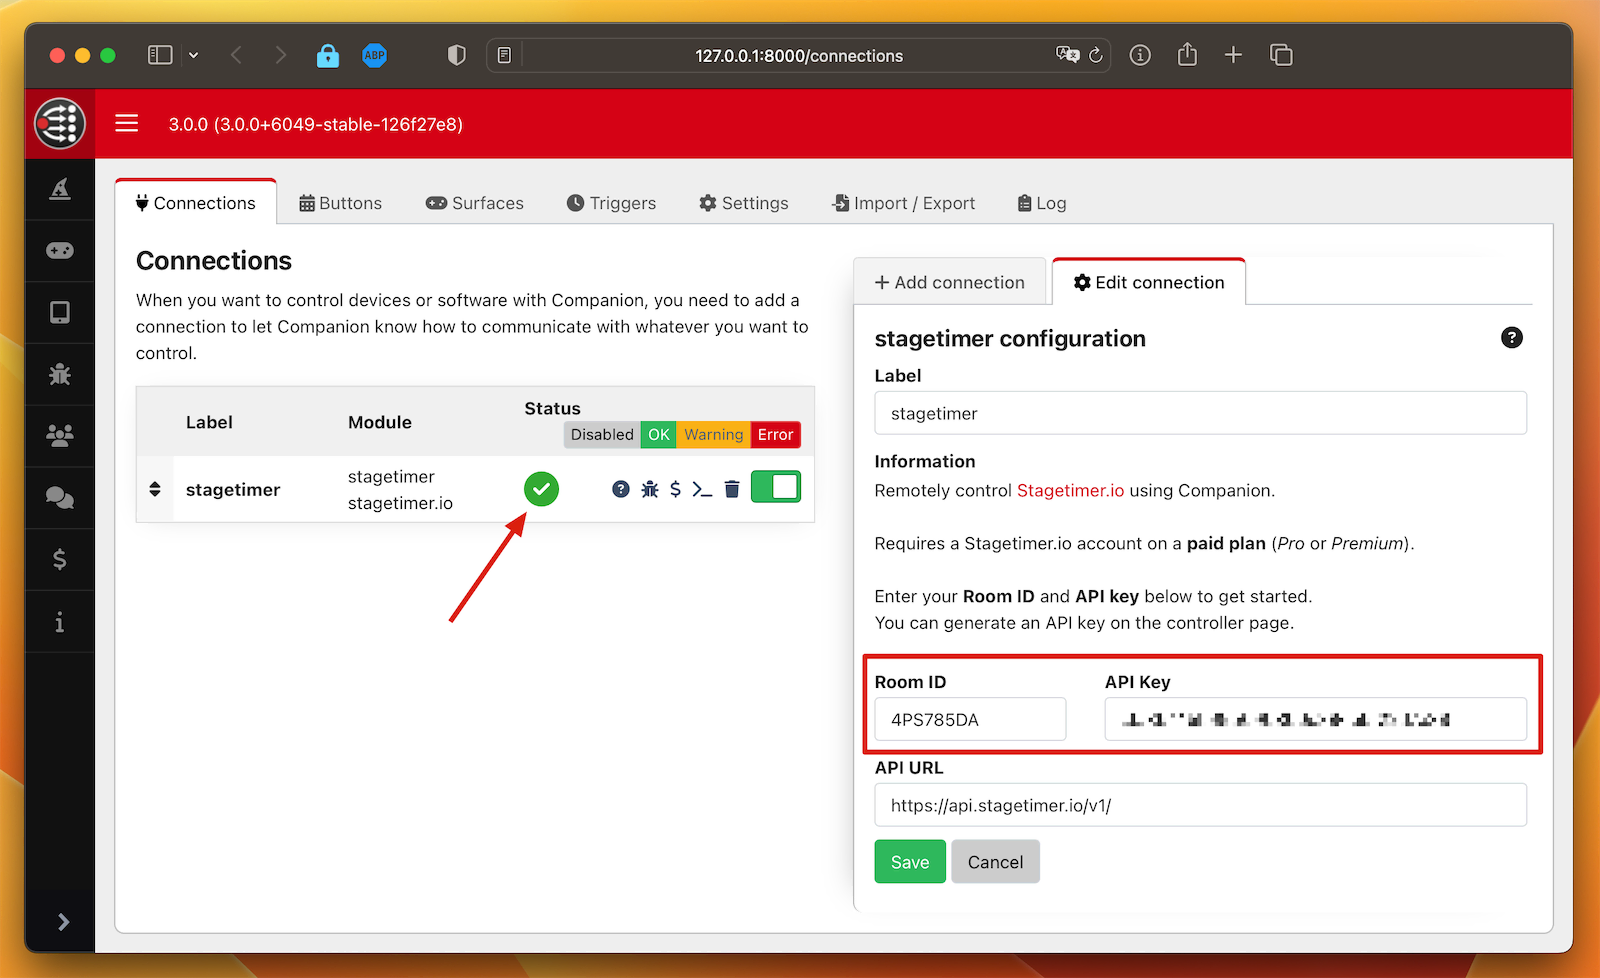
Stagetimer connection status check Note: The Companion module can also be used with the Stagetimer desktop app. In this scenario, you need to adjust the API URL to connect with your desktop app (explained later).
-
Now, let’s add a button. Switch to the “Buttons” tab in Companion, navigate to “Presets” → “Stagetimer API” → “Transport”, and drag and drop the “Start/Stop” button onto one of the available Stream Deck fields. The new button should appear on your Stream Deck, ready to control your Stagetimer!
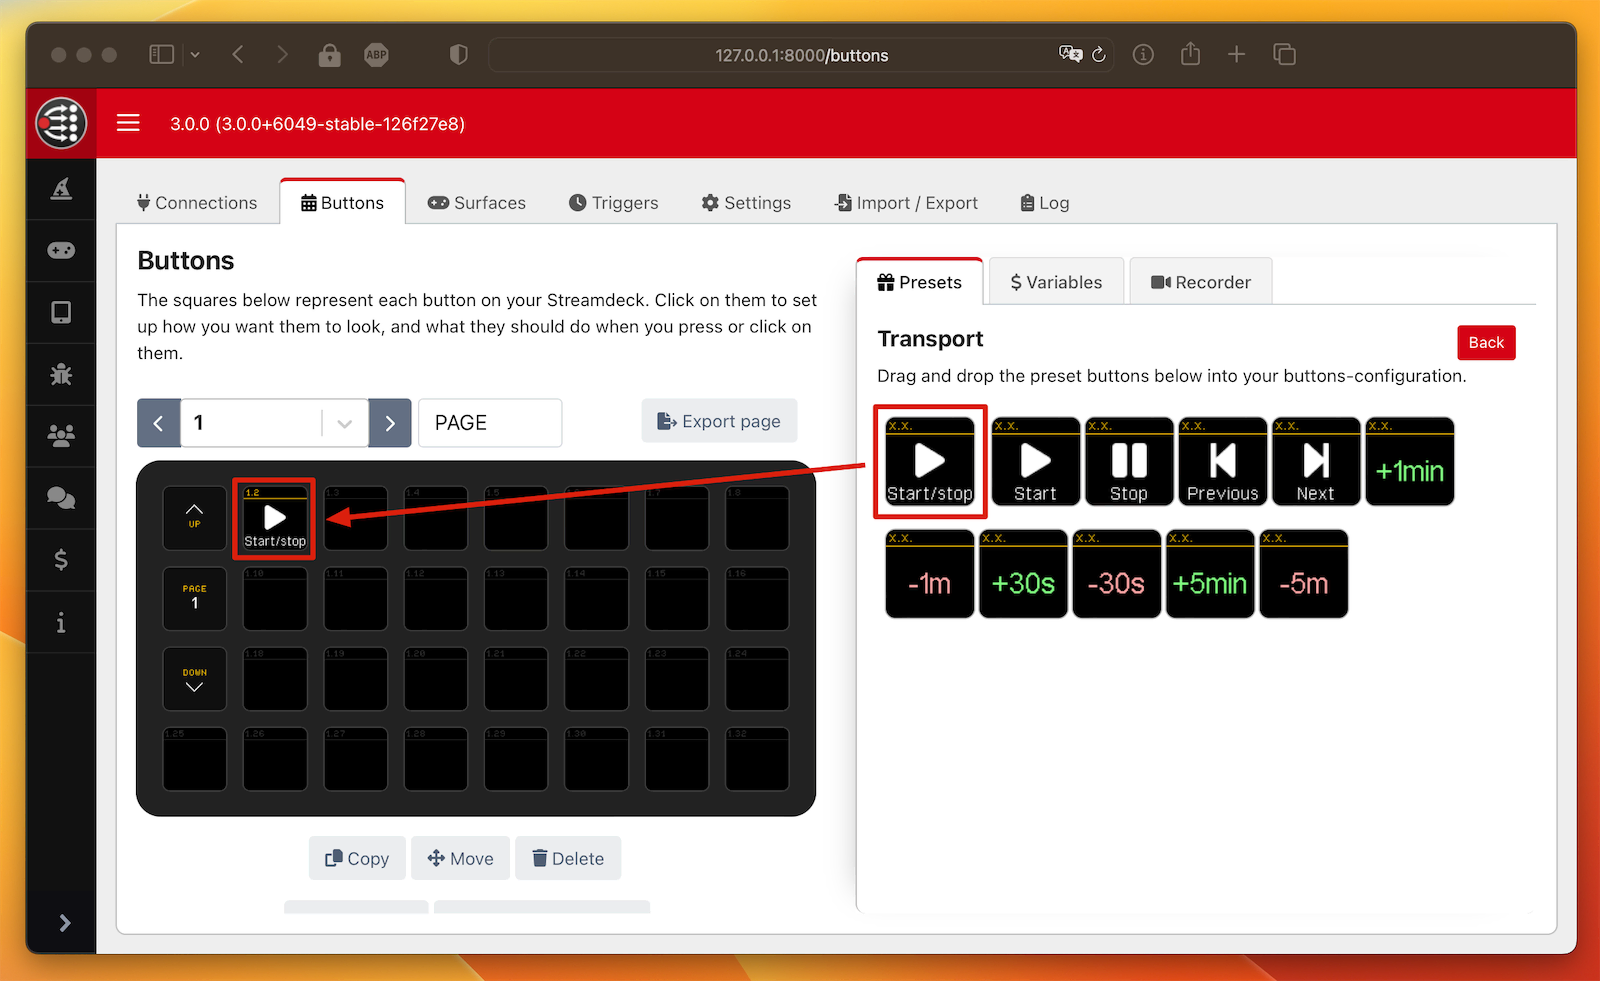
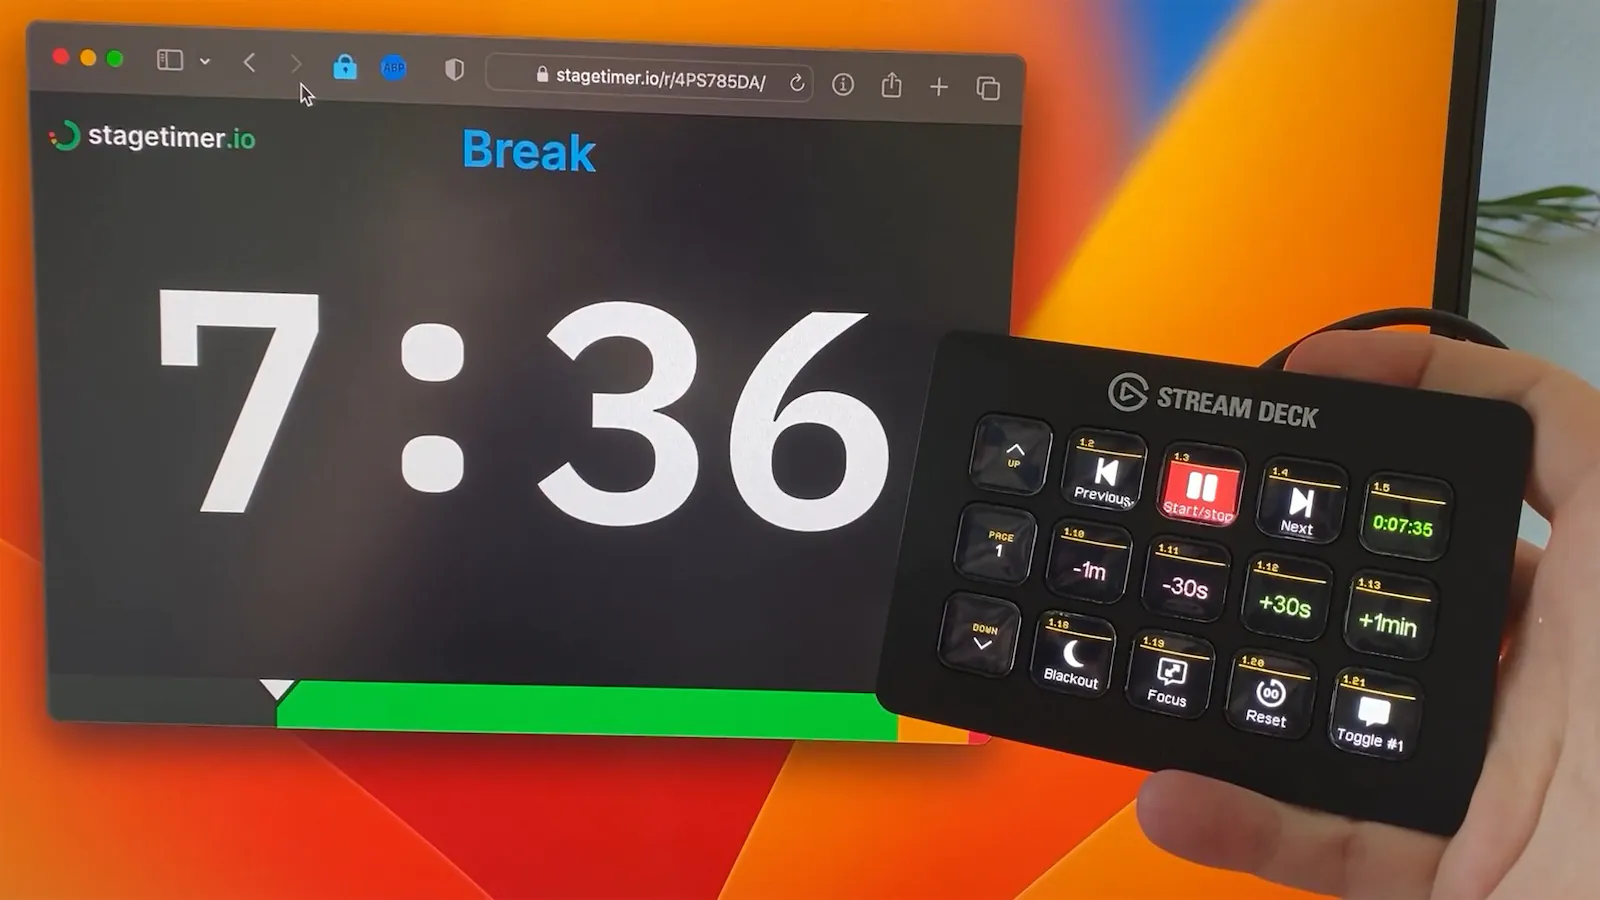
Adding the “Start/Stop” button 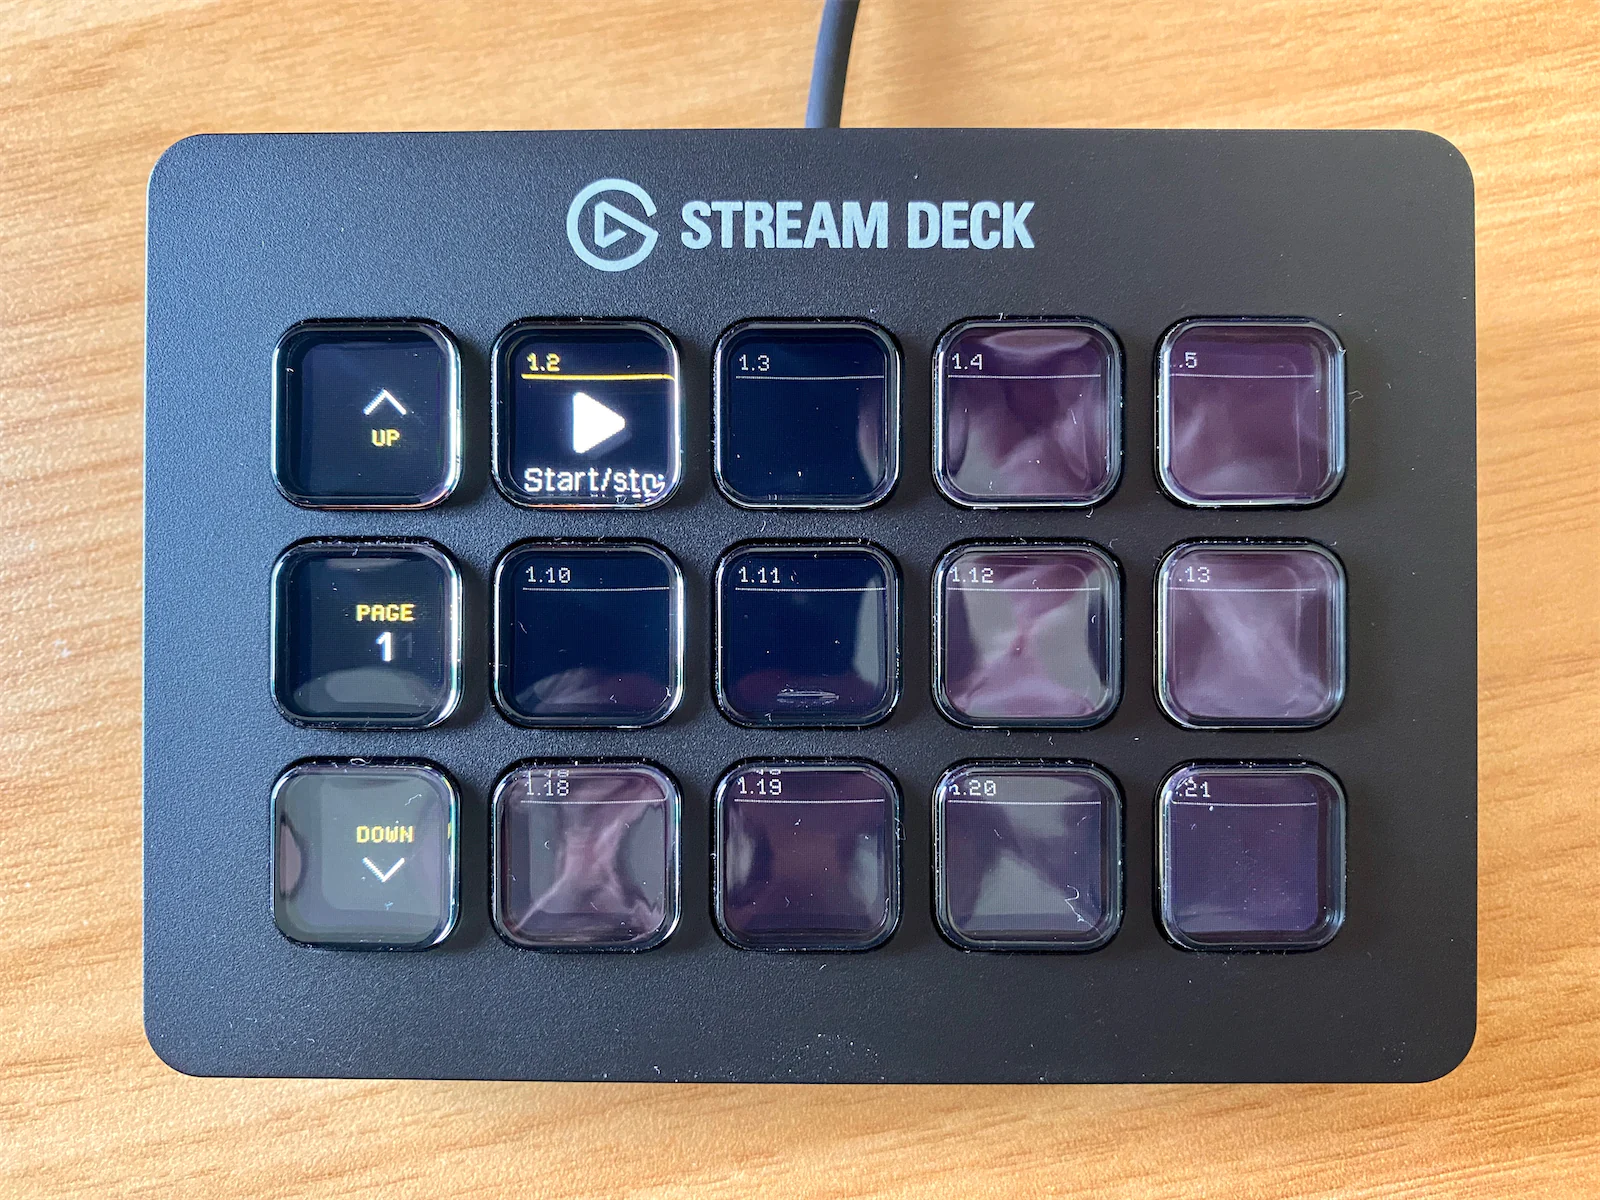
The “Start/Stop” button visible on the Stream Deck -
Feel free to add any other buttons based on your requirements and kickstart your event!
Using the Companion Module with the Desktop App
You’re not limited to using the Stagetimer Companion module with the web version of Stagetimer. The module also works seamlessly with the desktop app of Stagetimer.
The desktop app is available here: https://stagetimer.io/desktop-app/
Note: You need a paid Stagetimer account to use the API with the desktop app. All paid plans include an offline license key.
Follow the steps below to set it up:
-
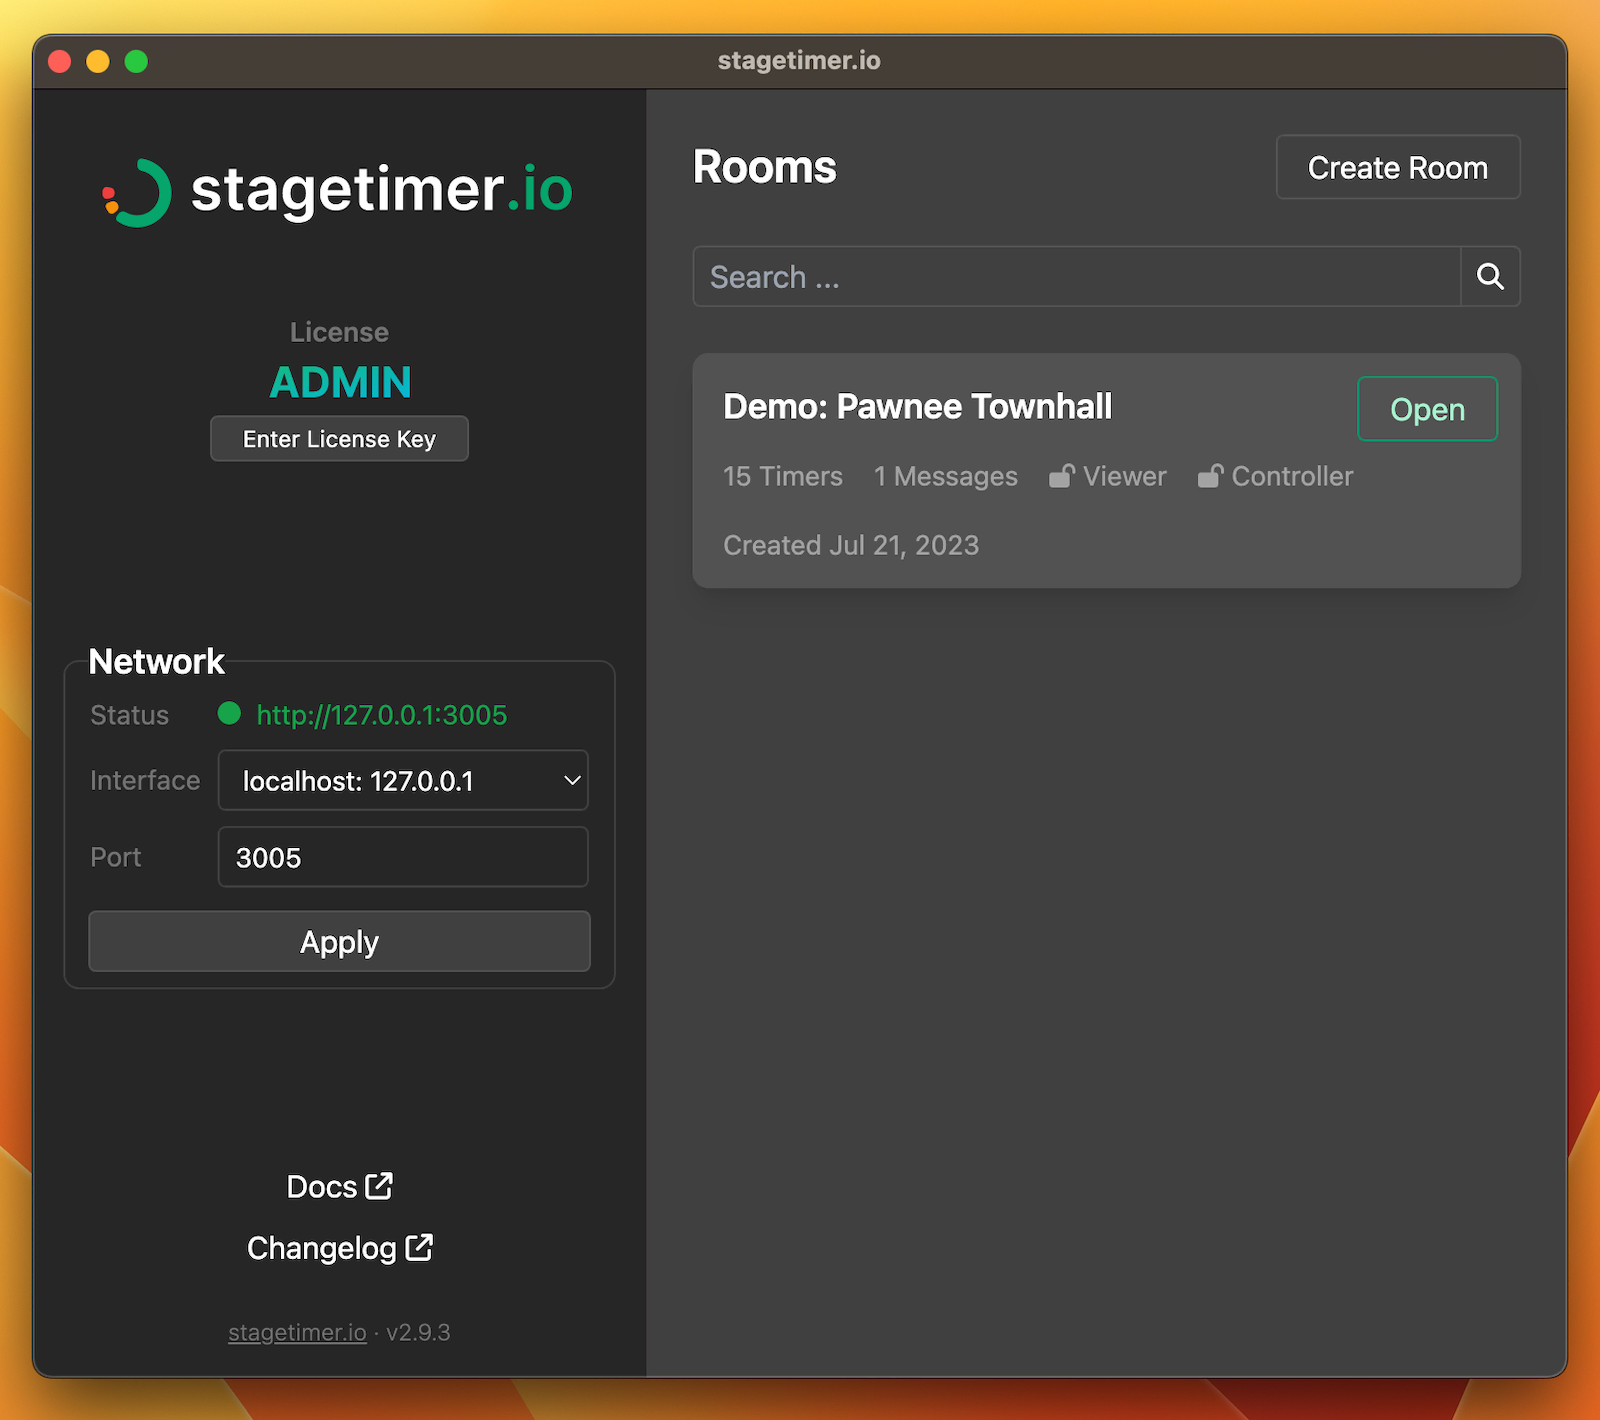
Start by launching the Stagetimer desktop app. Ensure it’s running on an IP address that is accessible from the Companion app. If both applications are on the same computer,
127.0.0.1should work perfectly. If they’re on separate systems, you might need to run it on your wireless or wired network IP. -
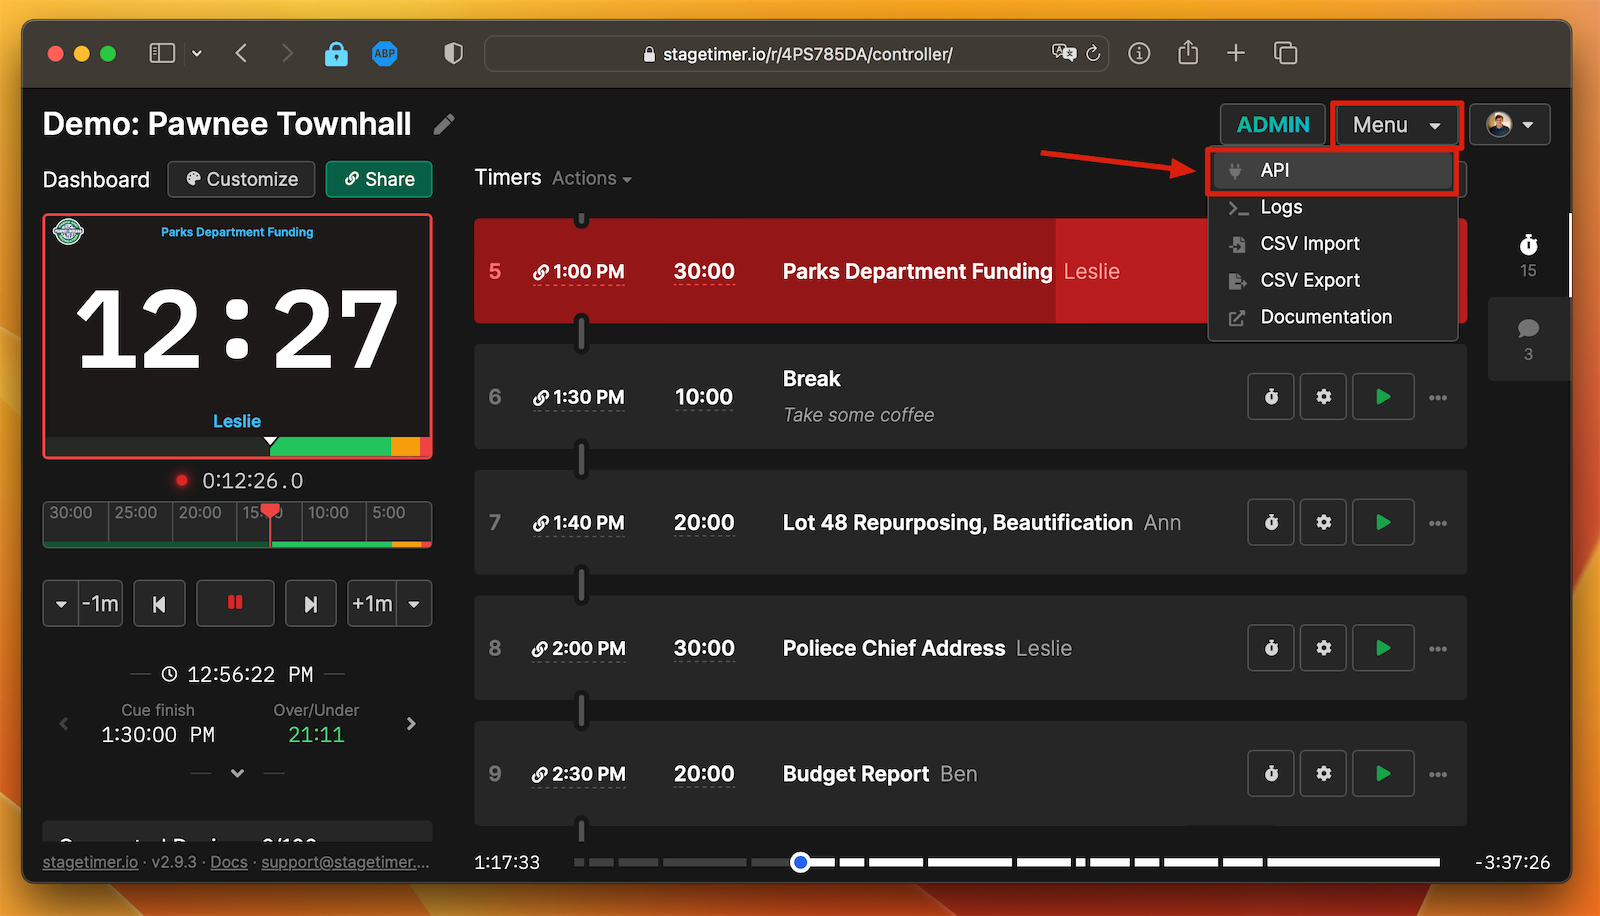
Next, navigate to the room and click on “Menu” → “API”. This will display the room ID, API Key, and API URL. These are the details you’ll need for the Companion module configuration.
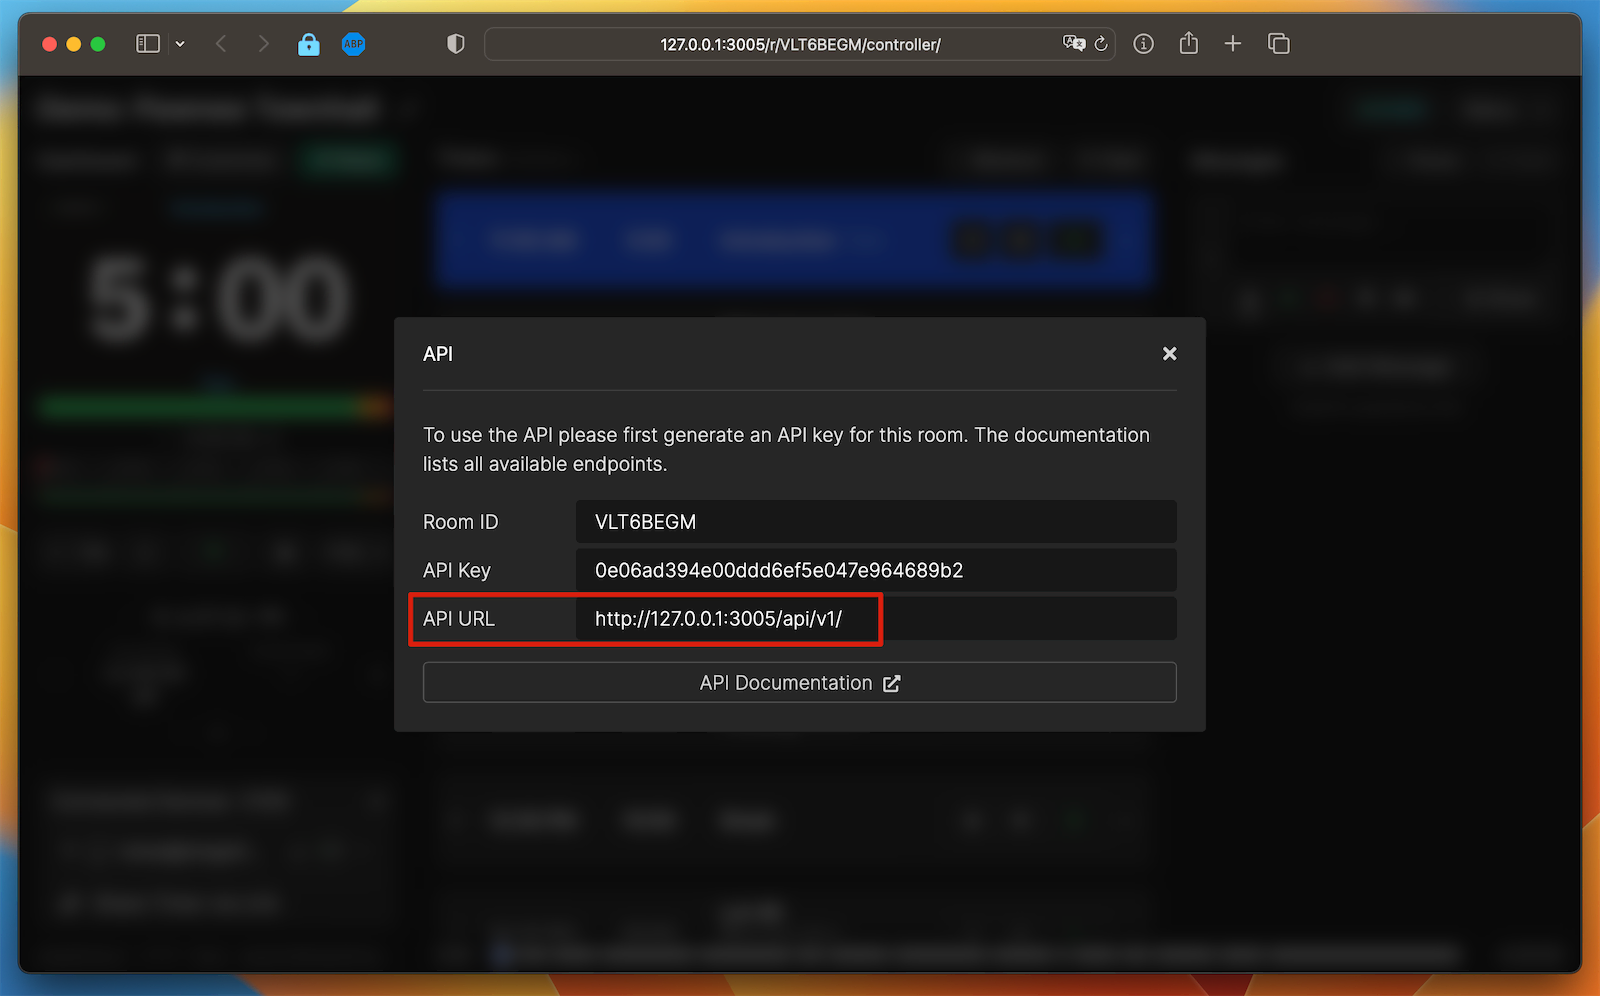
API details found under “Menu” -> “API” in the desktop app -
Finally, copy these details and paste them into the Companion module configuration. In the Companion app, this configuration section is also referred to as “Connections”. If the status turns green after clicking “Save”, that means you’re all set!
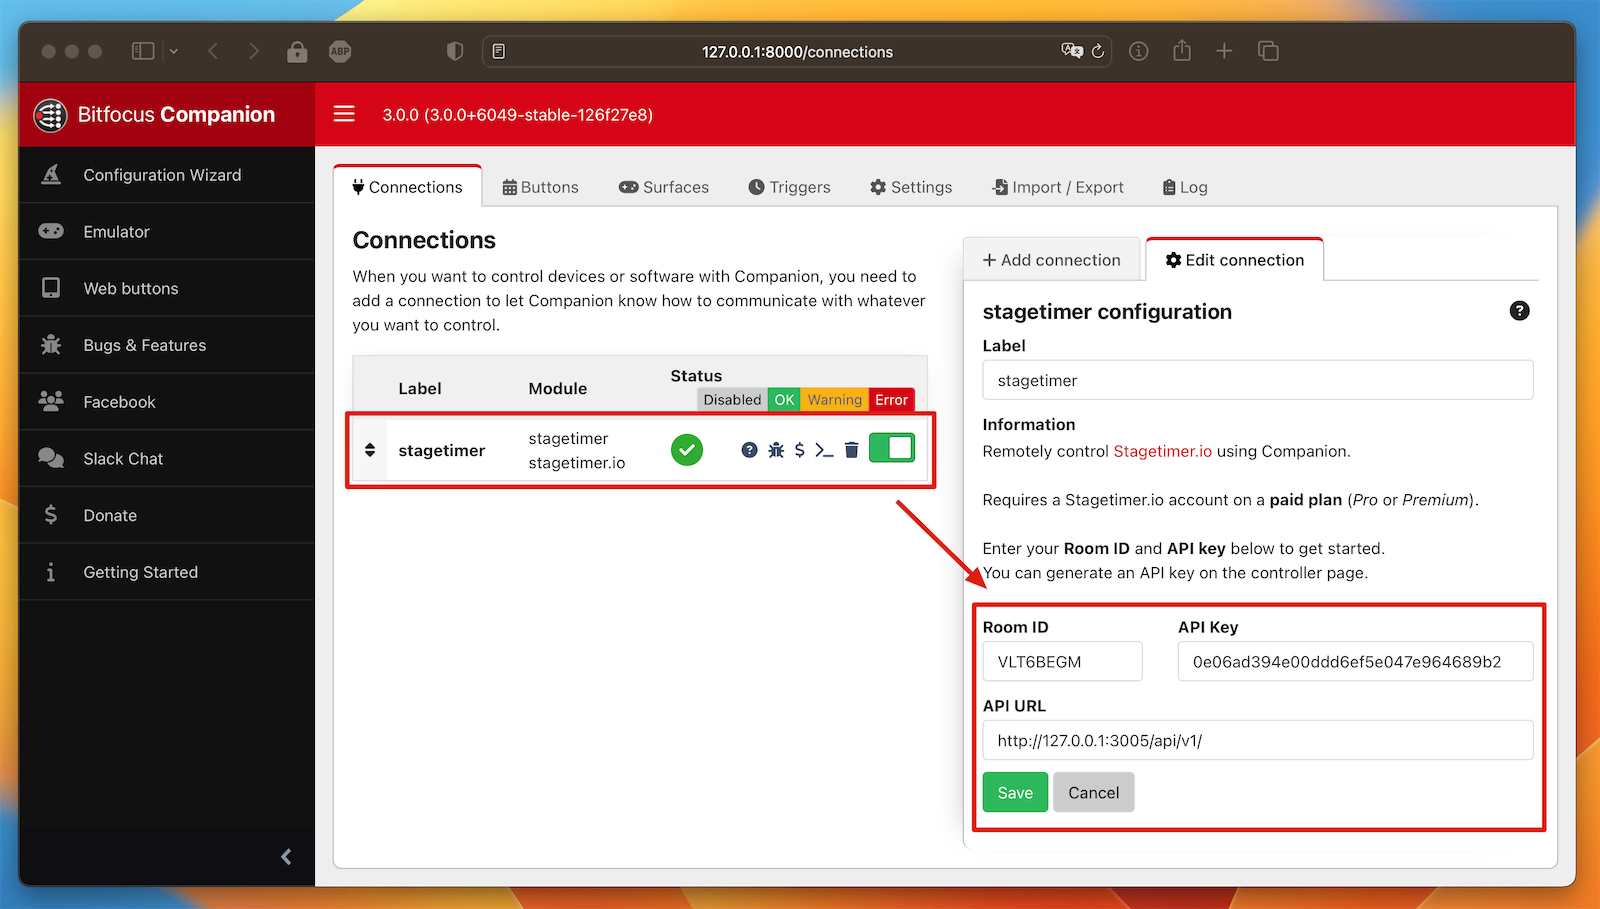
Update Companion module configuration
Congratulations, you’re now ready to control your Stagetimer desktop app using the Companion module!
Control Multiple Rooms in Companion
Switching rooms dynamically
The Utility: Switch room action lets you change the active room on-the-fly using a single connection. This is ideal when you want to reuse your button layout across different rooms without duplicating your setup.
Requirements:
- A team API key (generated from your Stagetimer dashboard), which has access to all rooms in your team.
Simply add the Utility: Switch room action to a button and enter the Room ID of the target room. The Room ID field supports variables, so you can wire it to other inputs or triggers. The module will reconnect to the new room and all variables and feedbacks will update automatically.
You can check which room is currently active using the $(stagetimer:roomId) variable.
Using multiple connections
For scenarios where you need to control multiple Stagetimer rooms simultaneously, Companion allows you to set up multiple connections. Here’s how:
-
In the Connections tab, locate your existing Stagetimer connection.
-
Change the label of your first Stagetimer connection to something distinctive (e.g.,
stagetimer-1). This helps differentiate between multiple rooms.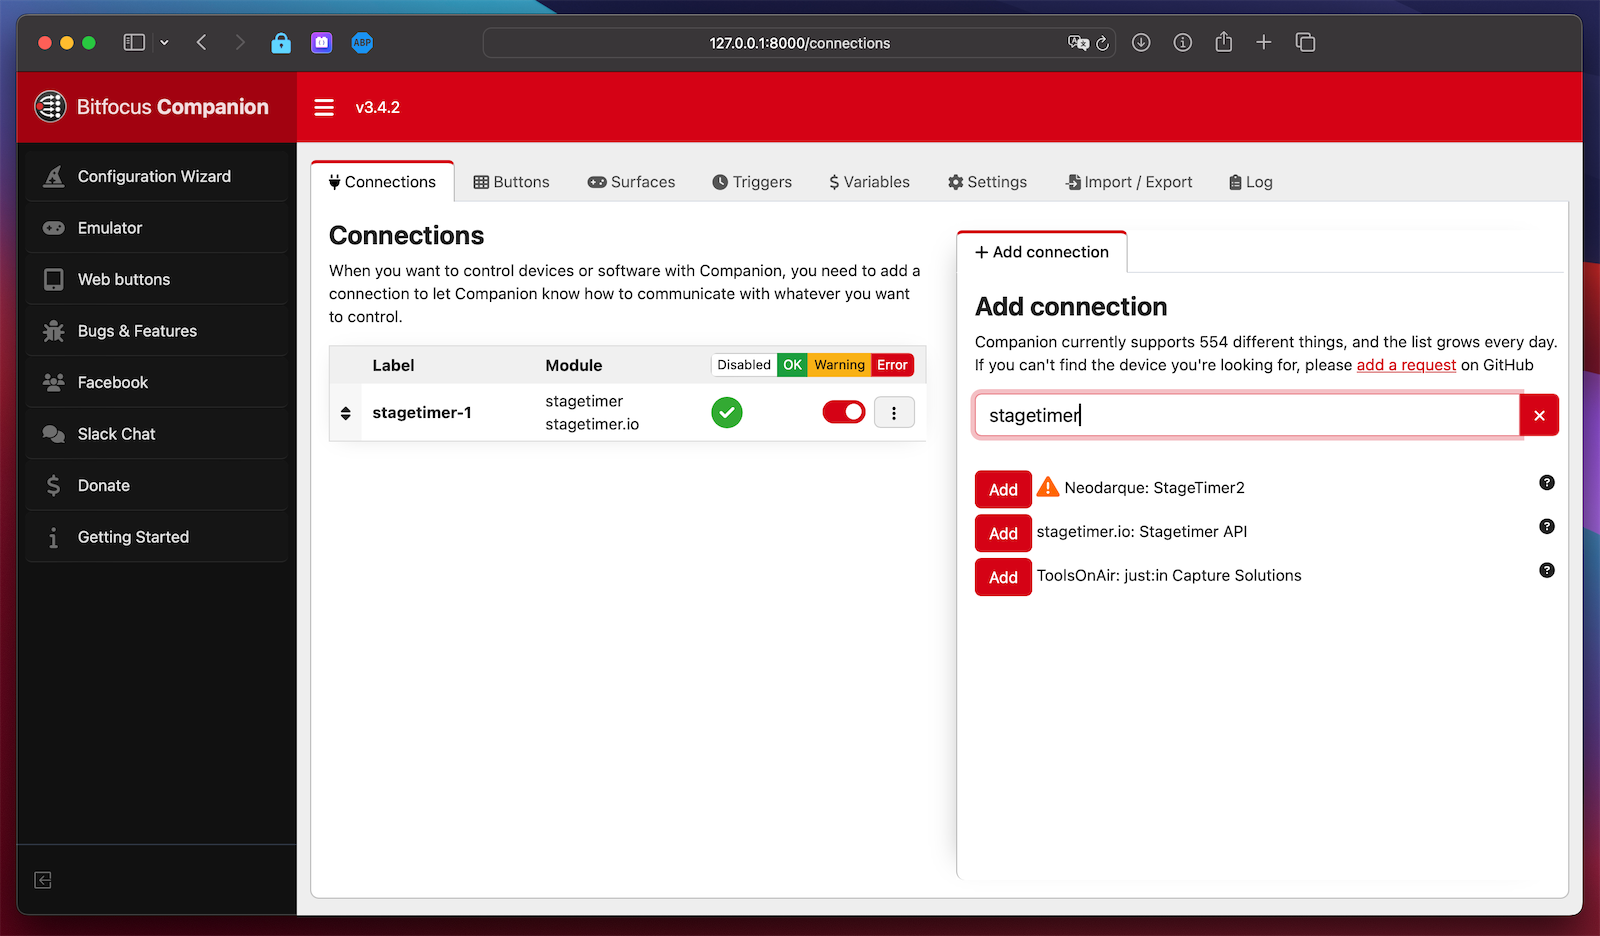
Change the label of your first Stagetimer connection -
Click the “Add connection” button and search for “stagetimer” to add another Stagetimer API module.
-
Configure the second connection with:
- A unique label (e.g.,
stagetimer-2) - The Room ID for your second room
- The corresponding API key
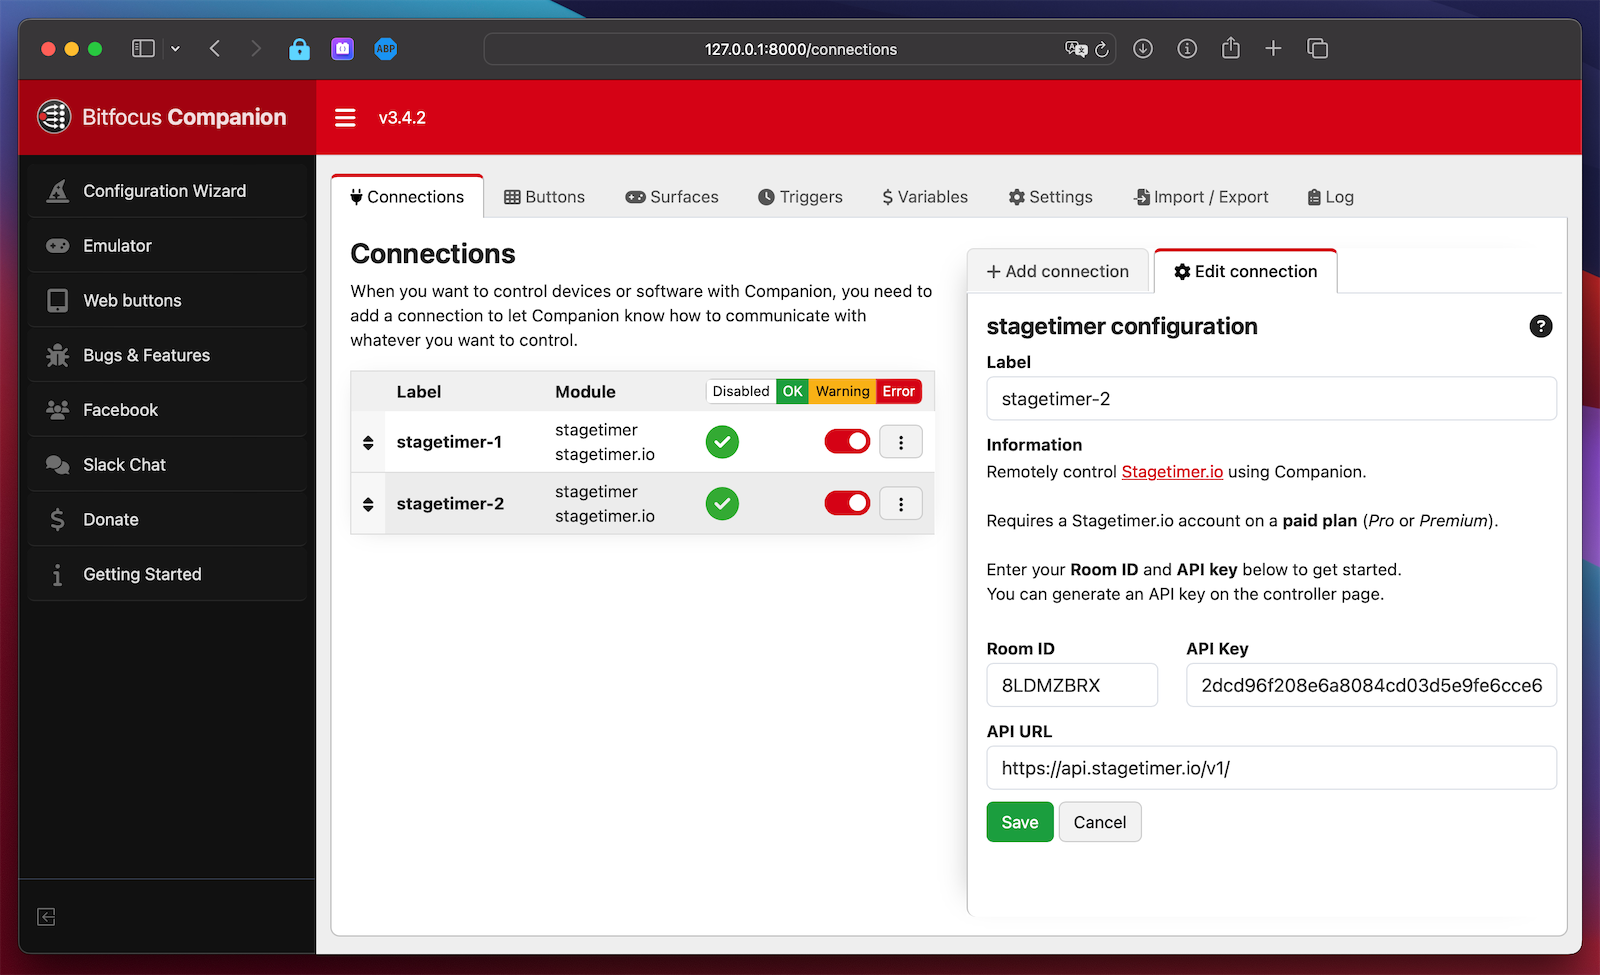
Setting up multiple Stagetimer connections - A unique label (e.g.,
-
Once both connections are set up, you can add buttons for either room to your Stream Deck. The presets section will now show options for both connections.
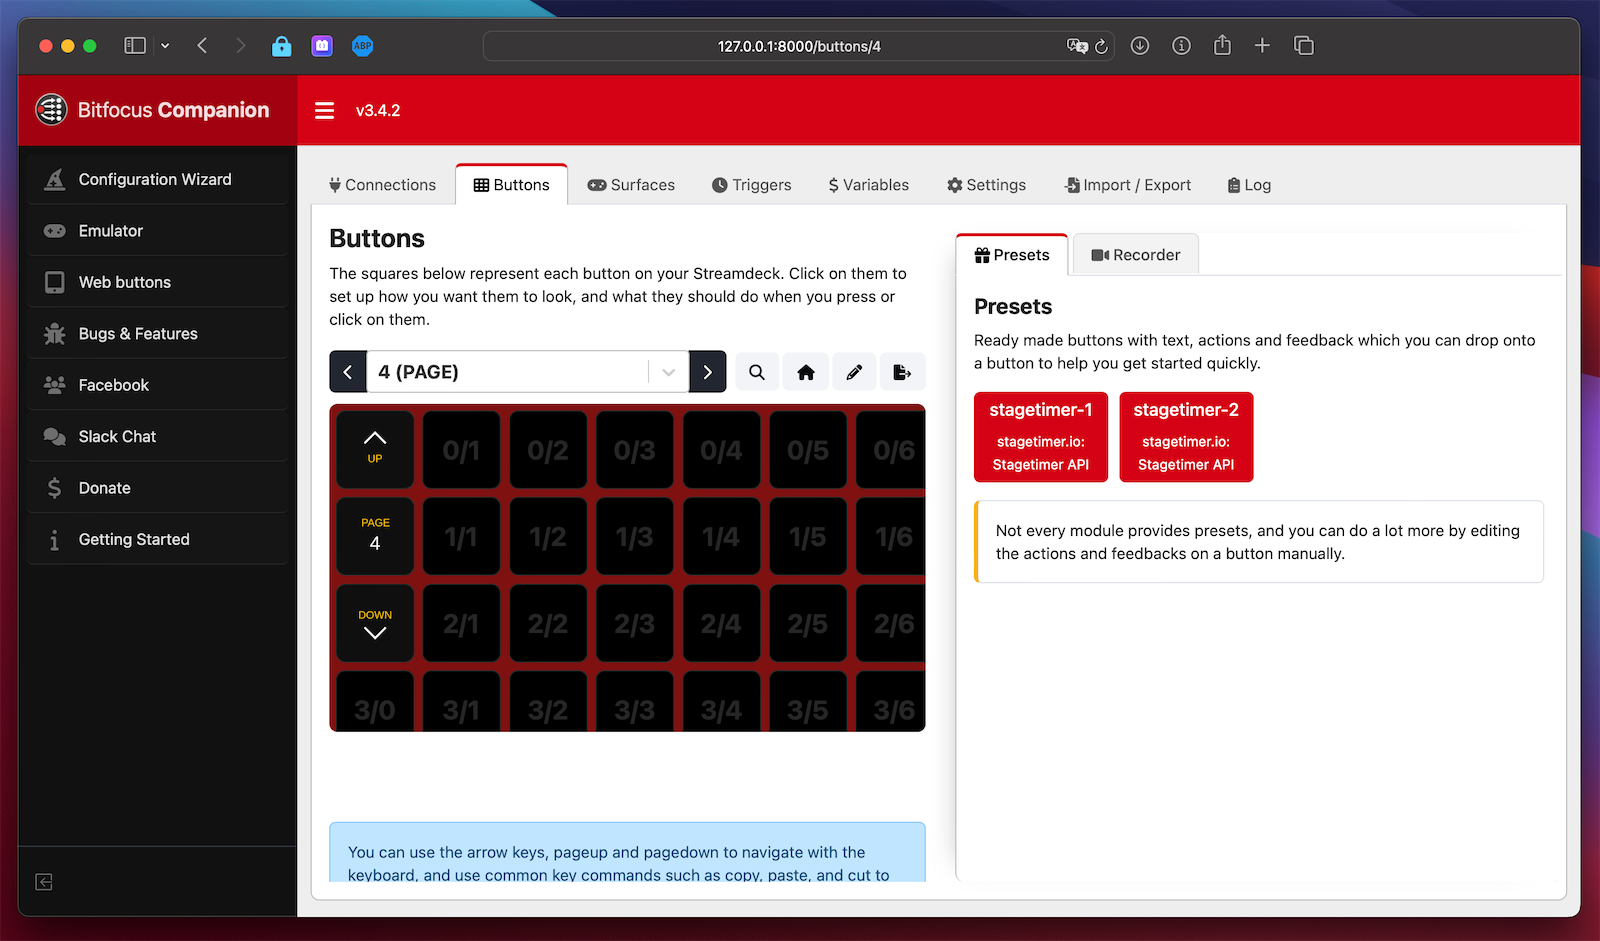
Presets for multiple rooms -
When setting up button text, you can use variables specific to each connection by referencing the connection label:
- For room 1:
$(stagetimer-1:currentTimerName) - For room 2:
$(stagetimer-2:currentTimerName)
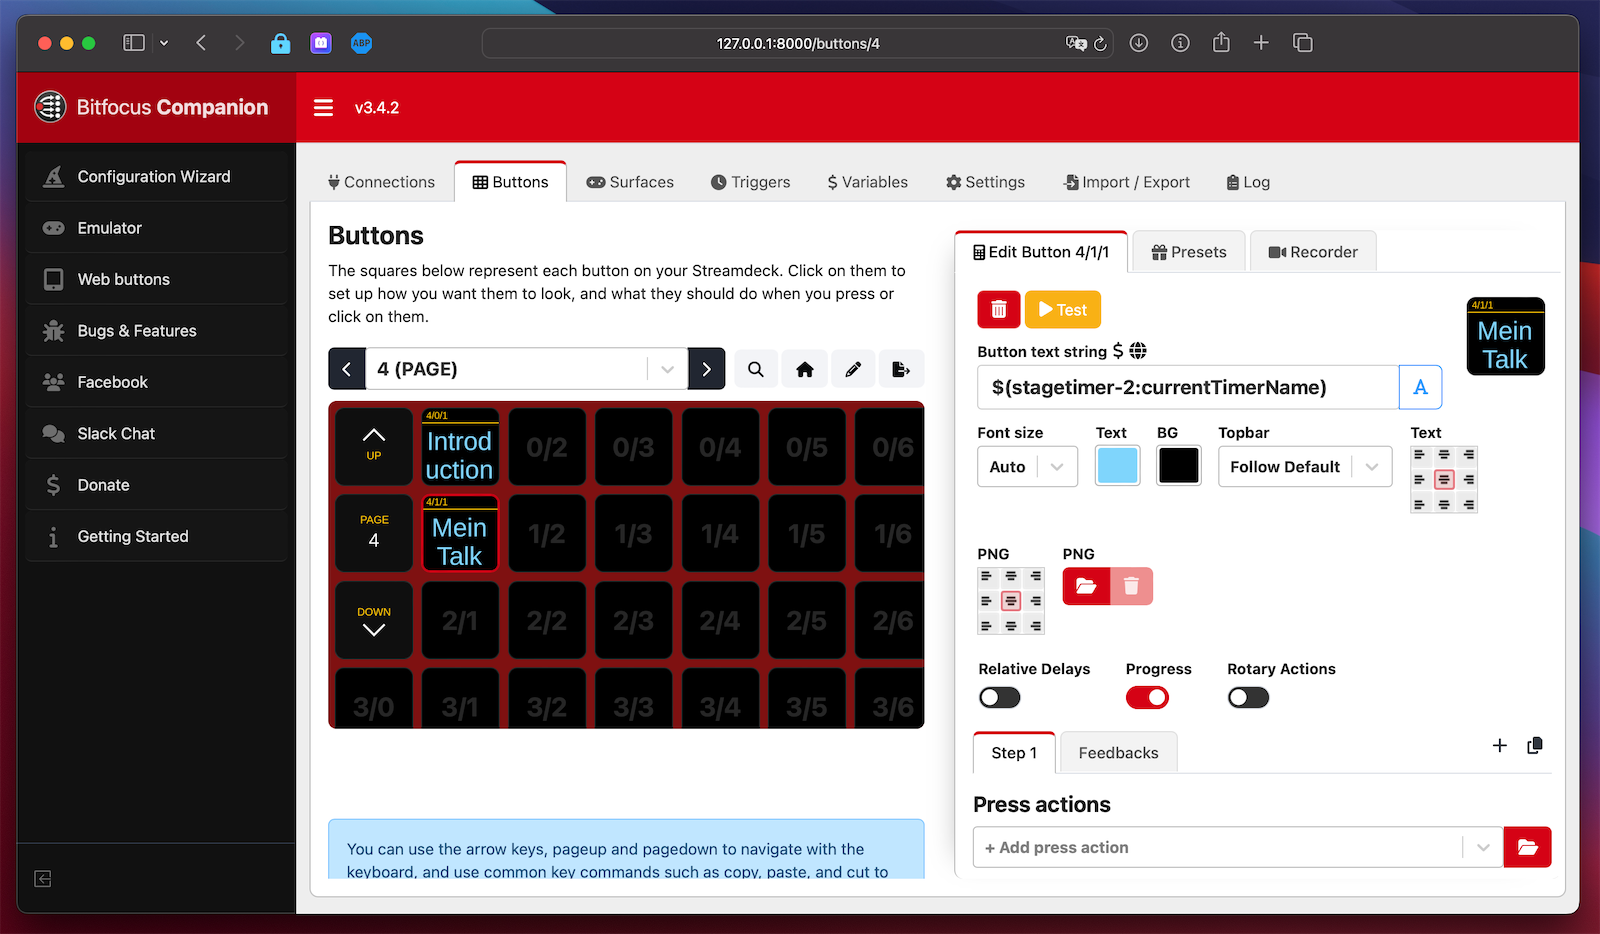
Configuring buttons for multiple rooms - For room 1:
This setup allows you to control multiple Stagetimer rooms from a single Stream Deck device, perfect for complex event setups or managing multiple stages.
Reference
The Stagetimer module provides numerous presets, actions, variables, and feedbacks. You can inspect the preset buttons as examples to see how to use these elements to create your own custom buttons.
Presets
Transport presets
| Button | Name | Description |
|---|---|---|
| Start/Stop | Toggle the timer between start and stop, the button turns red when the timer is started. | |
| Start | Start the timer, the button turns red when the timer is started. | |
| Stop | Stop or pause the timer, the button turns red when the timer is paused. | |
| Previous | Resets the timer or selects the previous timer if it already is reset. Has an option to autostart the previous timer. | |
| Next | Selects the next timer. Has an option to autostart the next timer. | |
| +5min | Add 5 minutes to the current timer. | |
| +1min | Add 1 minute to the current timer. | |
| +30s | Add 30 seconds to the current timer. | |
| -5min | Subtract 5 minutes from the current timer. | |
| -1min | Subtract 1 minute from the current timer. | |
| -30s | Subtract 30 seconds from the current timer. |
Viewer presets
| Button | Name | Description |
|---|---|---|
| Time remaining | Shows a live countdown of the full current timer including wrap-up colors. | |
| Time remaining (hours) | Shows only the hours of the current timer including wrap-up colors. | |
| Time remaining (minutes) | Shows only the minutes of the current timer including wrap-up colors. | |
| Time remaining (seconds) | Shows only the seconds of the current timer including wrap-up colors. | |
| Wrap-up indicator | Indicates the current wrap-up state: “On time”, “Wrap up..”, “Wrap up!”, or “Over time!” | |
| Timer appearance | Defines how the timer is displayed. Read more: Timer Appearances | |
| Current timer | Shows the title of the current timer. | |
| Current speaker | Shows the speaker of the current timer. | |
| Current timer labels | Shows the labels of the current timer. | |
| Next timer labels | Shows the labels of the next timer. | |
| Timezone | Shows the timezone setting of the room. | |
| Flash 3 times | Triggers the timer to flash 3 times. Option to flash between 1 and 99 times. | |
| Stop flashing | Stops the timer from flashing. | |
| Toggle blackout mode | Toggles blackout mode on or off, hiding the timer. | |
| Toggle ON AIR | Toggles ON AIR mode on or off. |
Timer presets
| Button | Name | Description |
|---|---|---|
| Reset | Reset to the first timer. Option to target any timer indicated by index (starting from 1) or timer ID. | |
| Start timer | Start the second timer. Option to target any timer indicated by index (starting from 1) or timer ID. | |
| Stop timer | Stop the second timer. Option to target any timer indicated by index (starting from 1) or timer ID. | |
| Create timer | Create a new timer. Options to configure the timer before it is created. |
Message presets
| Button | Name | Description |
|---|---|---|
| Toggle message | Toggle a message. Option to target any message indicated by index (starting from 1) or message ID. | |
| Show message | Show a message. Option to target any message indicated by index (starting from 1) or message ID. | |
| Hide message | Hide a message. Option to target any message indicated by index (starting from 1) or message ID. Otherwise hides the active message. | |
| Create message | Create a new message. Options to configure the message before it is created. |
Actions
| Action | Description |
|---|---|
| Message: Show | Show a message in the room. Enable “Fullscreen” to cover all other output elements. |
| Message: Hide | Hide a message in the room |
| Message: Toggle visibility | Show/hide a message in the room. When showing, enable “Fullscreen” to cover all other output elements. |
| Message: Create new message | Create a new message in the room |
| Timer: Start | Start or resume a specific timer in the room |
| Timer: Stop | Stop a specific timer in the room |
| Timer: Toggle playback | Toggle (start/stop) a specific timer in the room |
| Timer: Reset | Reset a specific timer to the original duration |
| Timer: Create new timer | Create a new timer in the room |
| Timer: Update timer | Update an existing timer in the room |
| Transport: Start | Start or resume the highlighted timer in the room |
| Transport: Stop | Stop the highlighted timer in the room |
| Transport: Start/stop | Start/stop the highlighted timer in the room |
| Transport: Reset | Reset or restart the currently highlighted timer |
| Transport: Next | Highlight the next timer in the list |
| Transport: Previous | Reset the highlighted timer if running, otherwise highlight the previous timer. Optionally auto-start. |
| Transport: Add time | Add an amount of time to the highlighted timer in the room |
| Transport: Subtract time | Subtract an amount of time from the highlighted timer in the room |
| Viewer: Enable blackout mode | Enable blackout mode in the room |
| Viewer: Disable blackout mode | Disable blackout mode in the room |
| Viewer: Toggle blackout mode | Toggle (enable/disable) blackout mode in the room |
| Viewer: Enable focus mode (legacy) | Legacy: prefer “Message: Show” with the “Fullscreen” option. |
| Viewer: Disable focus mode (legacy) | Legacy: prefer “Message: Hide”. |
| Viewer: Toggle focus mode (legacy) | Legacy: prefer “Message: Show” with the “Fullscreen” option. |
| Viewer: Enable ON AIR | Enable ON AIR mode in the room |
| Viewer: Disable ON AIR | Disable ON AIR mode in the room |
| Viewer: Toggle ON AIR | Toggle (enable/disable) ON AIR mode in the room |
| Viewer: Flash the screen | Flashes the screen in the room. Can be used to grab the attention of speakers. |
| Viewer: Stop flashing | Stops any flashing timers and messages on the screen. |
| Utility: Switch room | Change the active room. Requires a team API key. The module will reconnect to the new room. Supports variables. |
| Utility: Get room | Get the status of the room |
| Utility: Get status | Get the playback status of the room |
| Utility: Test auth | Test connection and authentication |
Variables
Room
| Variable | Description |
|---|---|
$(stagetimer:roomId) | Room ID |
$(stagetimer:roomName) | Room name |
$(stagetimer:roomTimezone) | Room timezone (Docs) |
Playback Snapshot
The time display matches the Stagetimer output, taking timer appearance into account. The remaining time variables are always strictly a countdown.
| Variable | Description |
|---|---|
$(stagetimer:timeDisplay) | Time display |
$(stagetimer:timeDisplayHours) | Time display (hours) |
$(stagetimer:timeDisplayMinutes) | Time display (minutes) |
$(stagetimer:timeDisplaySeconds) | Time display (seconds) |
$(stagetimer:currentTimerRemaining) | Timer remaining time |
$(stagetimer:currentTimerRemainingAsMs) | Timer remaining time (ms) |
$(stagetimer:currentTimerRemainingHours) | Timer remaining time (hours) |
$(stagetimer:currentTimerRemainingMinutes) | Timer remaining time (minutes) |
$(stagetimer:currentTimerRemainingSeconds) | Timer remaining time (seconds) |
Current Timer
| Variable | Description |
|---|---|
$(stagetimer:currentTimerId) | Timer ID |
$(stagetimer:currentTimerName) | Timer name |
$(stagetimer:currentTimerSpeaker) | Timer speaker |
$(stagetimer:currentTimerNotes) | Timer notes |
$(stagetimer:currentTimerAppearance) | Timer appearance (Docs) |
$(stagetimer:currentTimerStartTime12h) | Hard start time (12h format, Docs) |
$(stagetimer:currentTimerStartTime24h) | Hard start time (24h format, Docs) |
$(stagetimer:currentTimerDuration) | Timer duration |
$(stagetimer:currentTimerDurationAsMs) | Timer duration (ms) |
$(stagetimer:currentTimerLabels) | Timer labels (comma-separated) |
$(stagetimer:currentTimerLabel1) | Timer label 1 |
$(stagetimer:currentTimerLabel2) | Timer label 2 |
$(stagetimer:currentTimerLabel3) | Timer label 3 |
Next Timer
| Variable | Description |
|---|---|
$(stagetimer:nextTimerId) | Timer ID |
$(stagetimer:nextTimerName) | Timer name |
$(stagetimer:nextTimerSpeaker) | Timer speaker |
$(stagetimer:nextTimerNotes) | Timer notes |
$(stagetimer:nextTimerAppearance) | Timer appearance (Docs) |
$(stagetimer:nextTimerStartTime12h) | Hard start time (12h format, Docs) |
$(stagetimer:nextTimerStartTime24h) | Hard start time (24h format, Docs) |
$(stagetimer:nextTimerDuration) | Timer duration |
$(stagetimer:nextTimerDurationAsMs) | Timer duration (ms) |
$(stagetimer:nextTimerLabels) | Timer labels (comma-separated) |
$(stagetimer:nextTimerLabel1) | Timer label 1 |
$(stagetimer:nextTimerLabel2) | Timer label 2 |
$(stagetimer:nextTimerLabel3) | Timer label 3 |
Feedbacks
- Blackout mode
- Connected
- Flashing
- Focus mode
- ON AIR mode
- Message showing
- Playback running
- Playback stopped
- Timer is over time
- Timer is running and on time
- Timer is showing red wrap-up warning
- Timer is showing yellow wrap-up warning
Use the Stagetimer API directly
The Stagetimer API documentation lists all accessible commands. Many are readily available as actions or presets in the Stagetimer module. However, a few might be missing, like the “Delete message” function.
Here’s a step-by-step guide to use such functions:
-
Create a Generic Button in Companion
Start by adding a regular button in Companion and attach the “Run shell path” action to it.
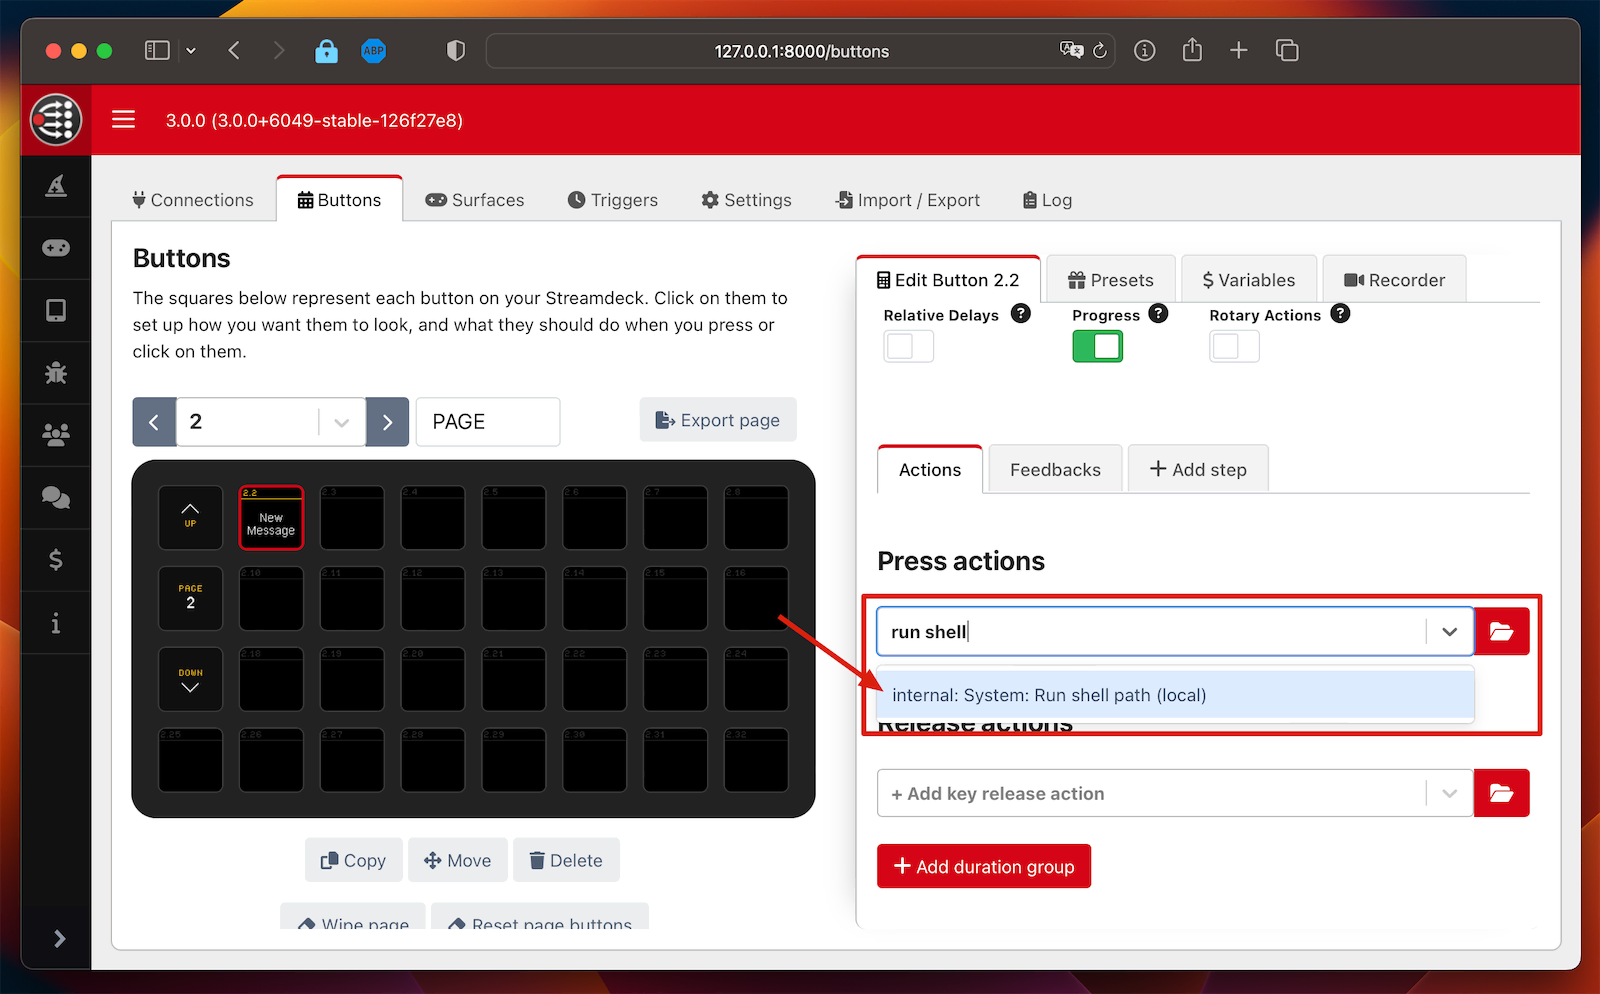
Adding a regular button in Companion -
Copy-Paste the
curlCommand from the Stagetimer API DocumentationNext, copy the
curlcommand exactly as it appears from the Stagetimer API documentation and paste it into the “Path” field. Remember to replace placeholders with your Room ID and API Key in the command.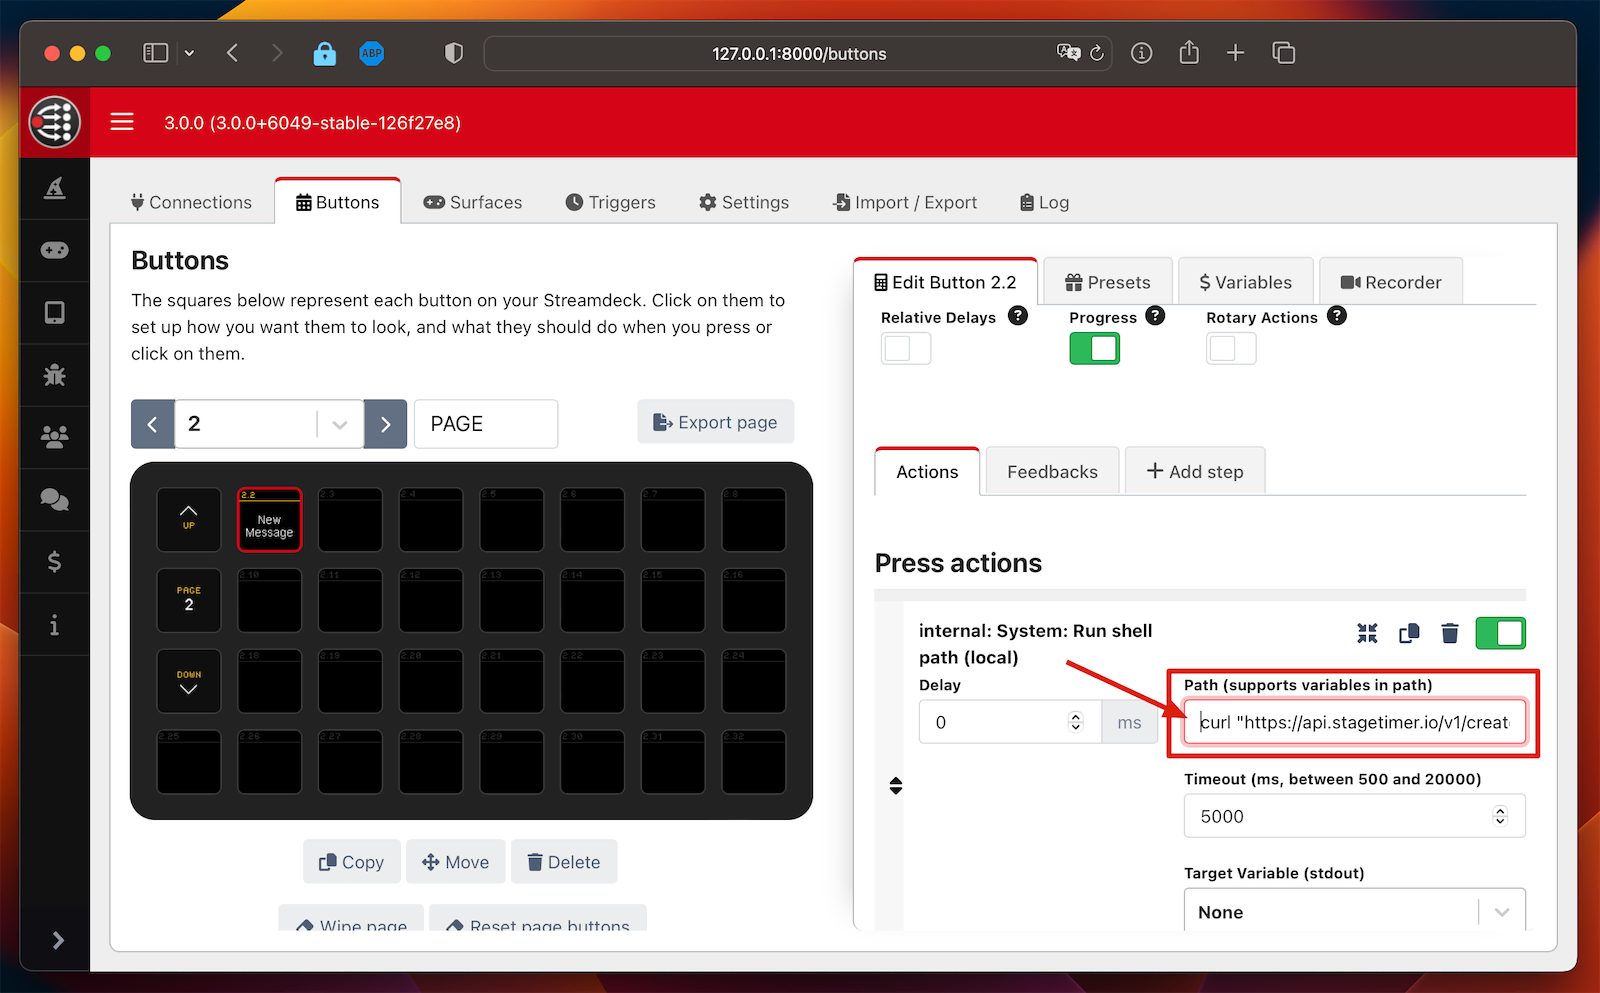
Pasting the curlcommand into the “Path” field in Companion -
Customize the Command As Per Your Need
As an example, if you want the button to delete the top-most message in the room, each time it’s clicked, modify the command as follows:
curl "https://api.stagetimer.io/v1/delete_message?room_id=YOUR_ROOM_ID&api_key=YOUR_API_KEY&index=1"Pro Tip: When you click the “API Documentation” button from the room’s API popup, then it will prefill all API commands with your room ID, API Key and it will use the correct API URL if you use the desktop app.
And there you go! You’ve successfully expanded your Stagetimer module functions within Companion.