How to Use Stagetimer with OBS Studio
What we are going to accomplish
In this guide, you’ll learn how to integrate Stagetimer, a cloud-based speaker timer, with OBS Studio, a free open-source software for video recording and live streaming. By the end, you’ll be able to import Stagetimer into an OBS scene, make the background transparent, isolate individual elements like the countdown or messages, display audience questions on your stream, use audio chimes, and optionally receive timer displays via NDI® from the desktop app.

Prefer a video?
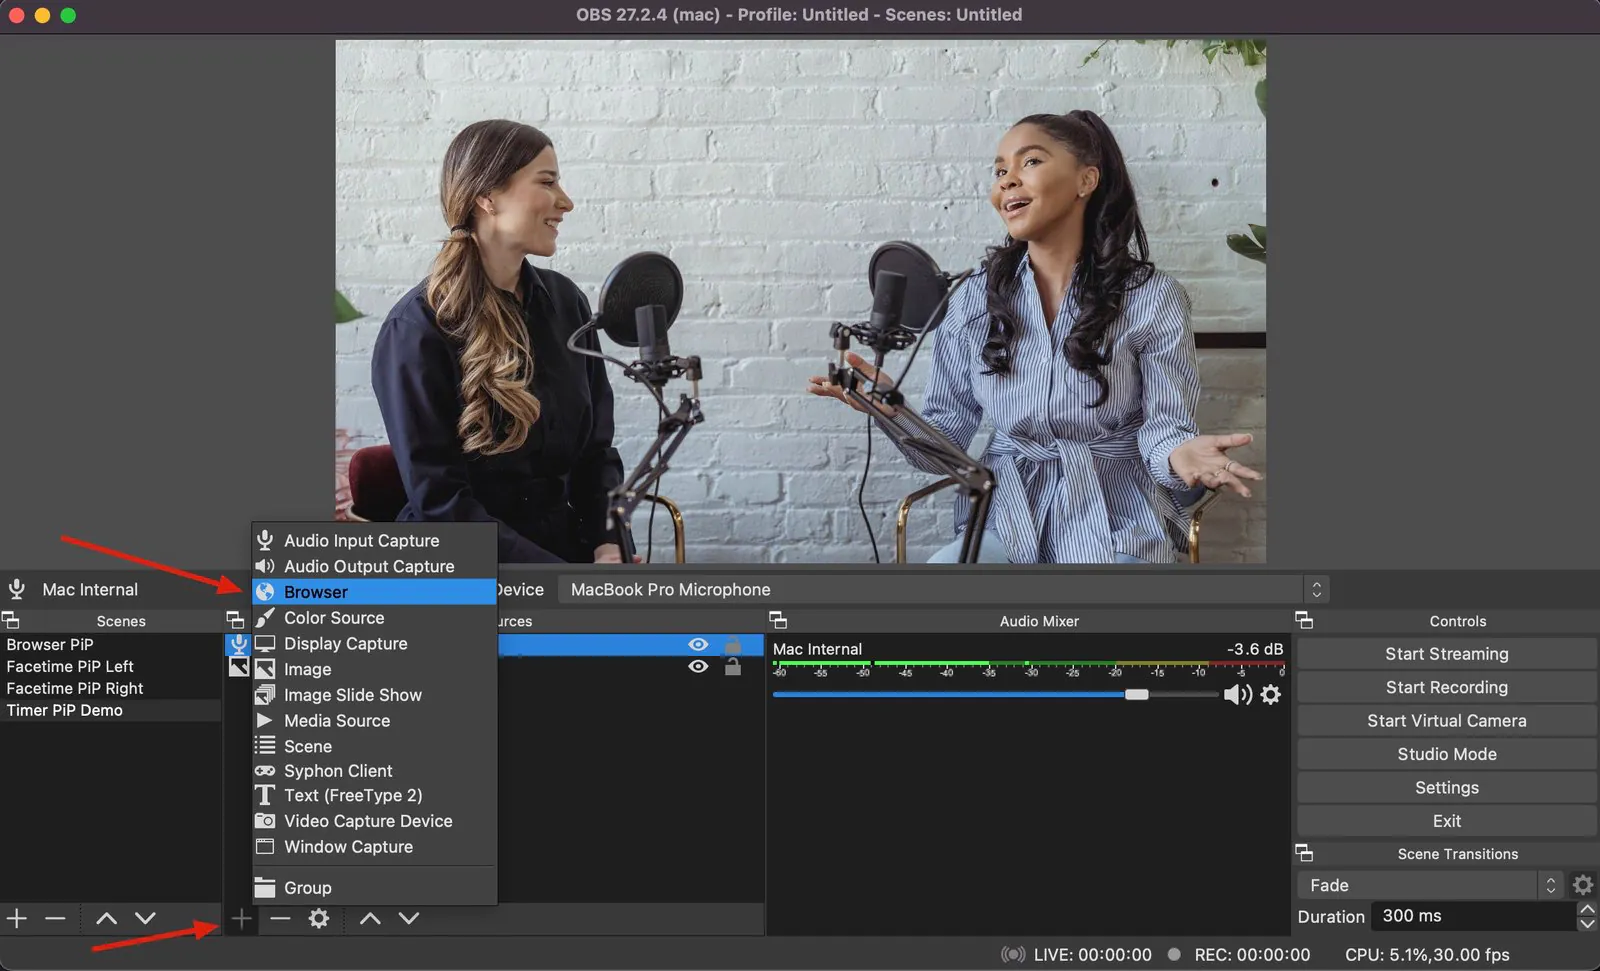
1. Import Stagetimer into an OBS scene
Assuming you have OBS Studio installed and set up:
-
Open OBS Studio and create a new scene, or select an existing scene to edit.
-
In the Sources panel, click the ”+” button and select “Browser”.
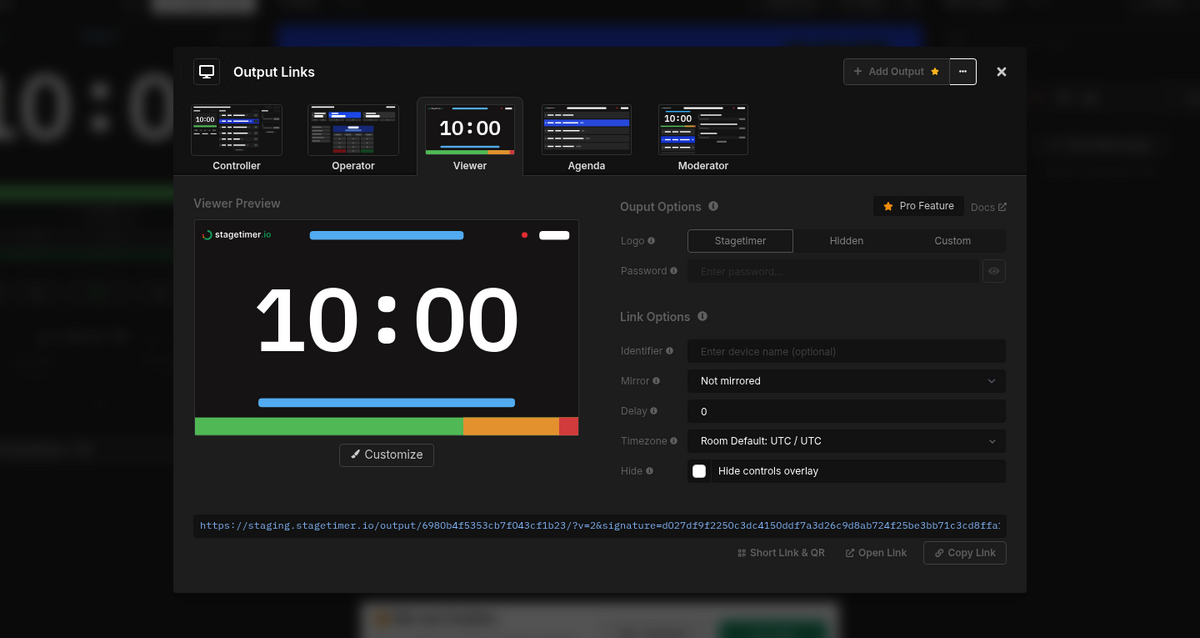
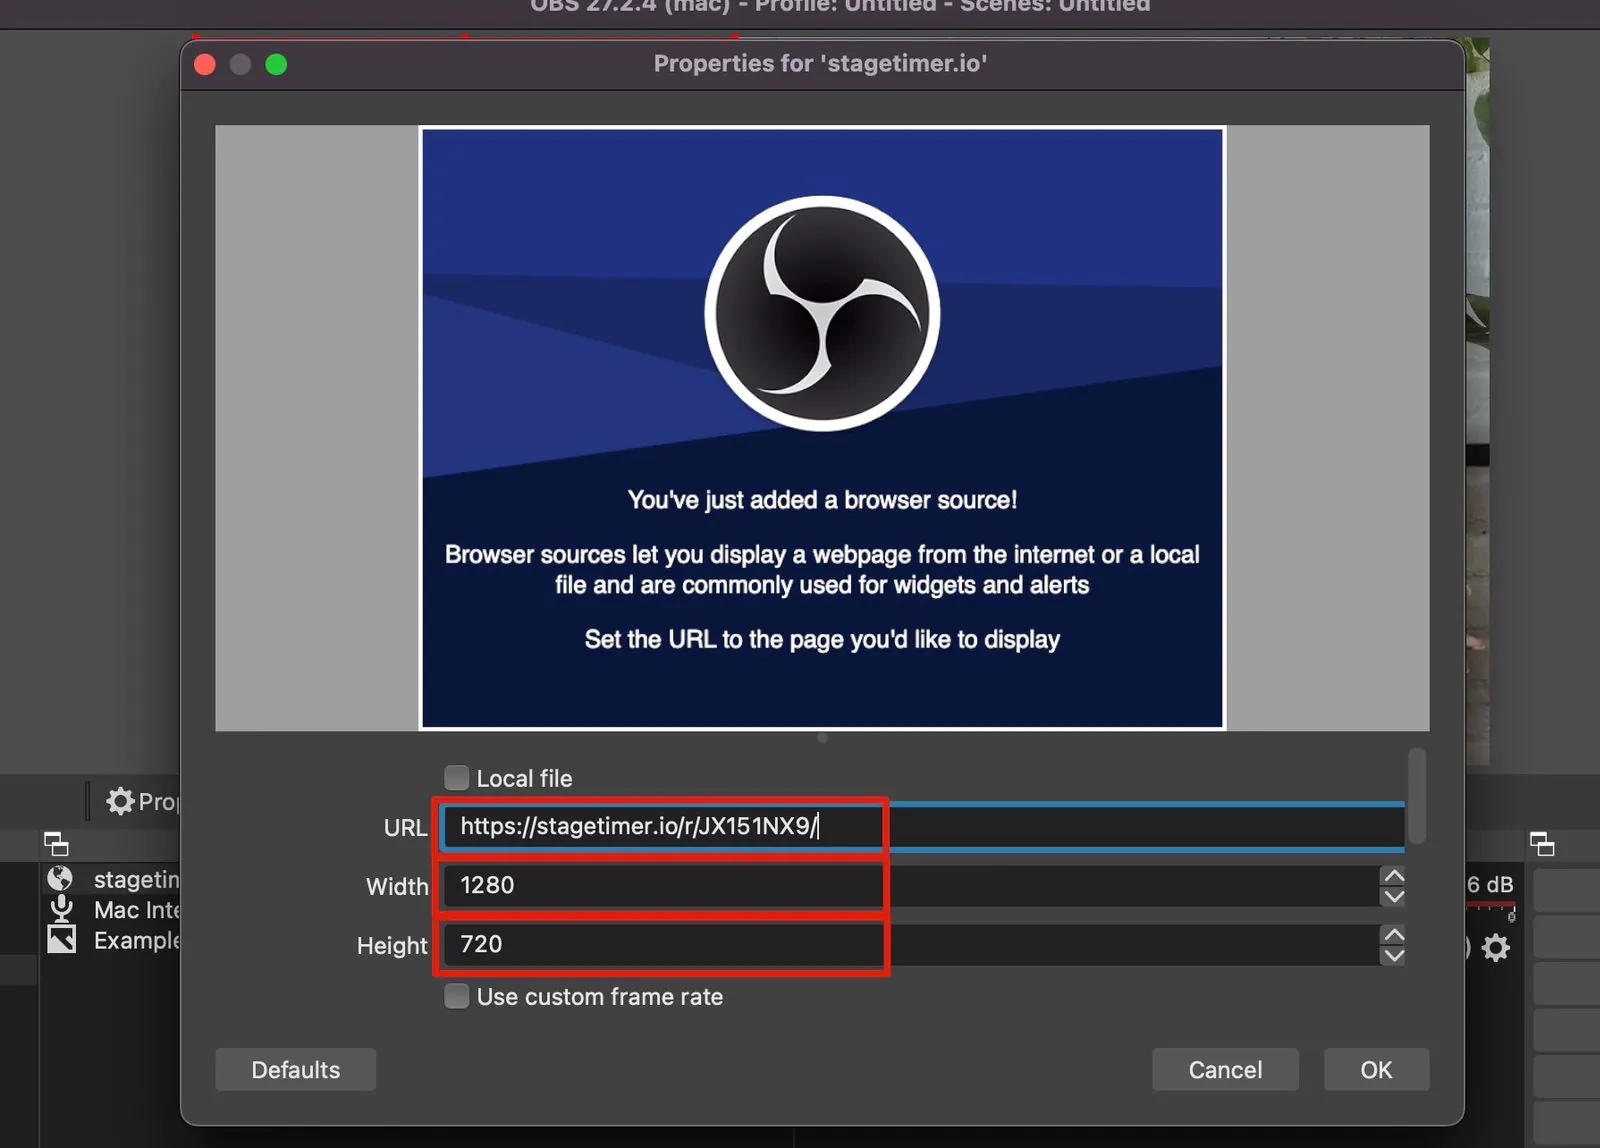
- In the properties window, enter the URL of the Stagetimer Viewer. Set the width to 1280 and the height to 720 for a 16×9 aspect ratio.
To get the Viewer URL: On the Stagetimer Controller page, click “Output Links” above the output preview. Select the Viewer output tab, then copy the link at the bottom of the popup.
-
Click “OK” to close the properties window. The timer is now imported into your scene.
-
Resize the browser source as needed.
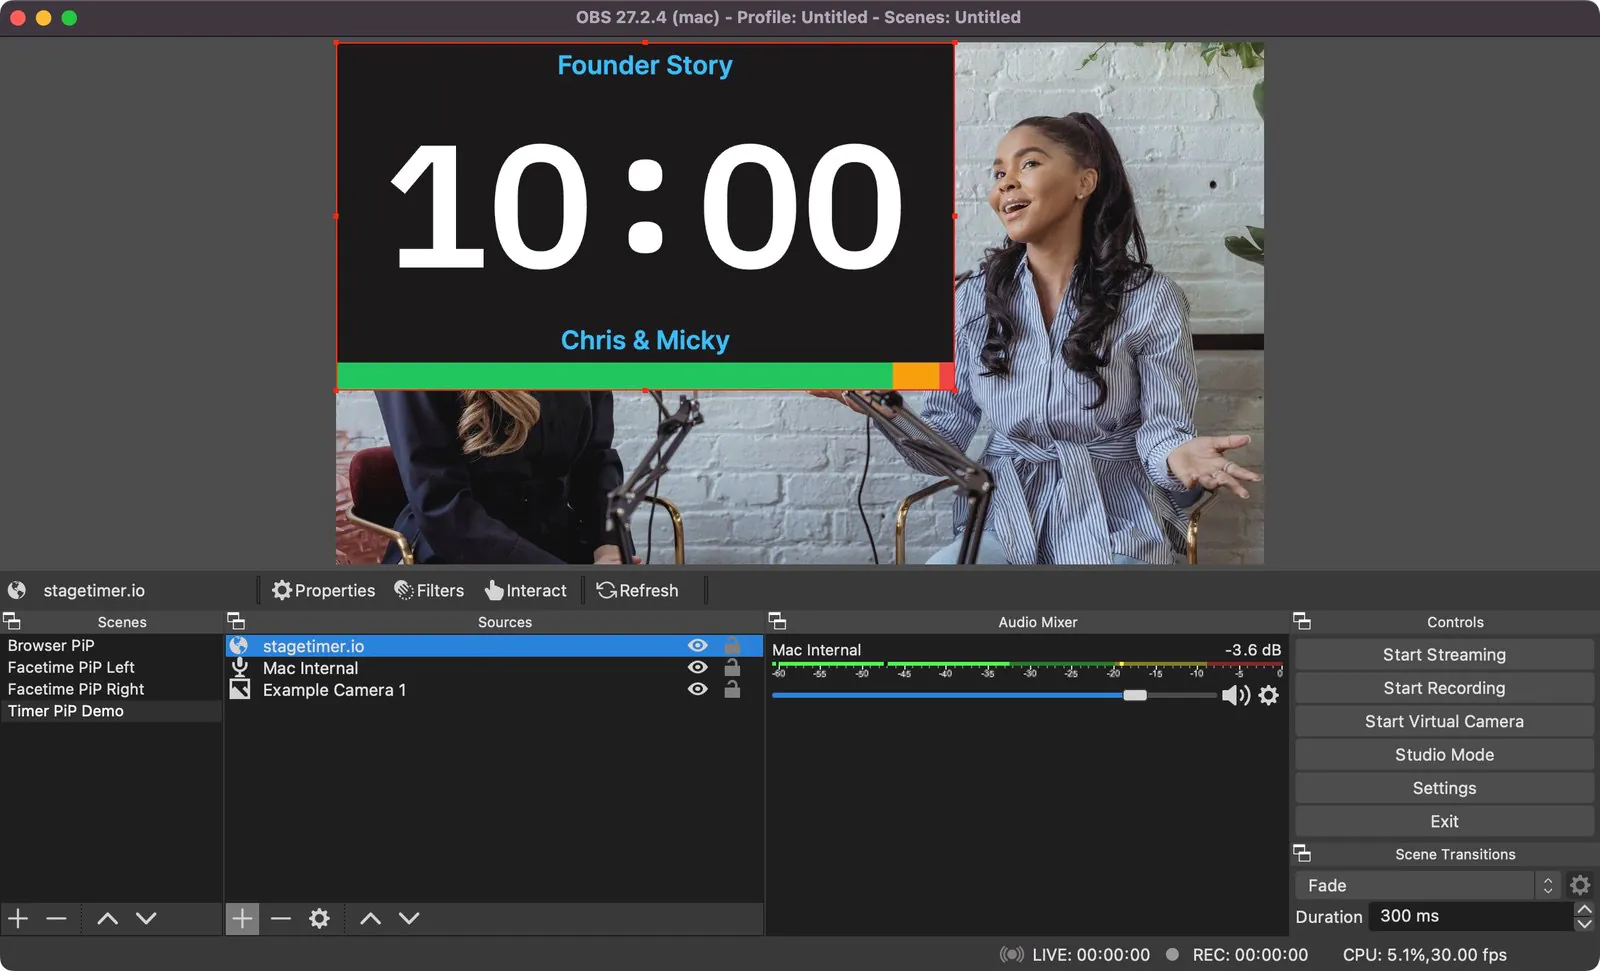
👉 Tip: You don’t have to use 1280×720. The Viewer automatically adjusts to any page size and aspect ratio.
2. Make the background transparent in OBS
There are several ways to make the background of the Stagetimer source transparent in OBS.
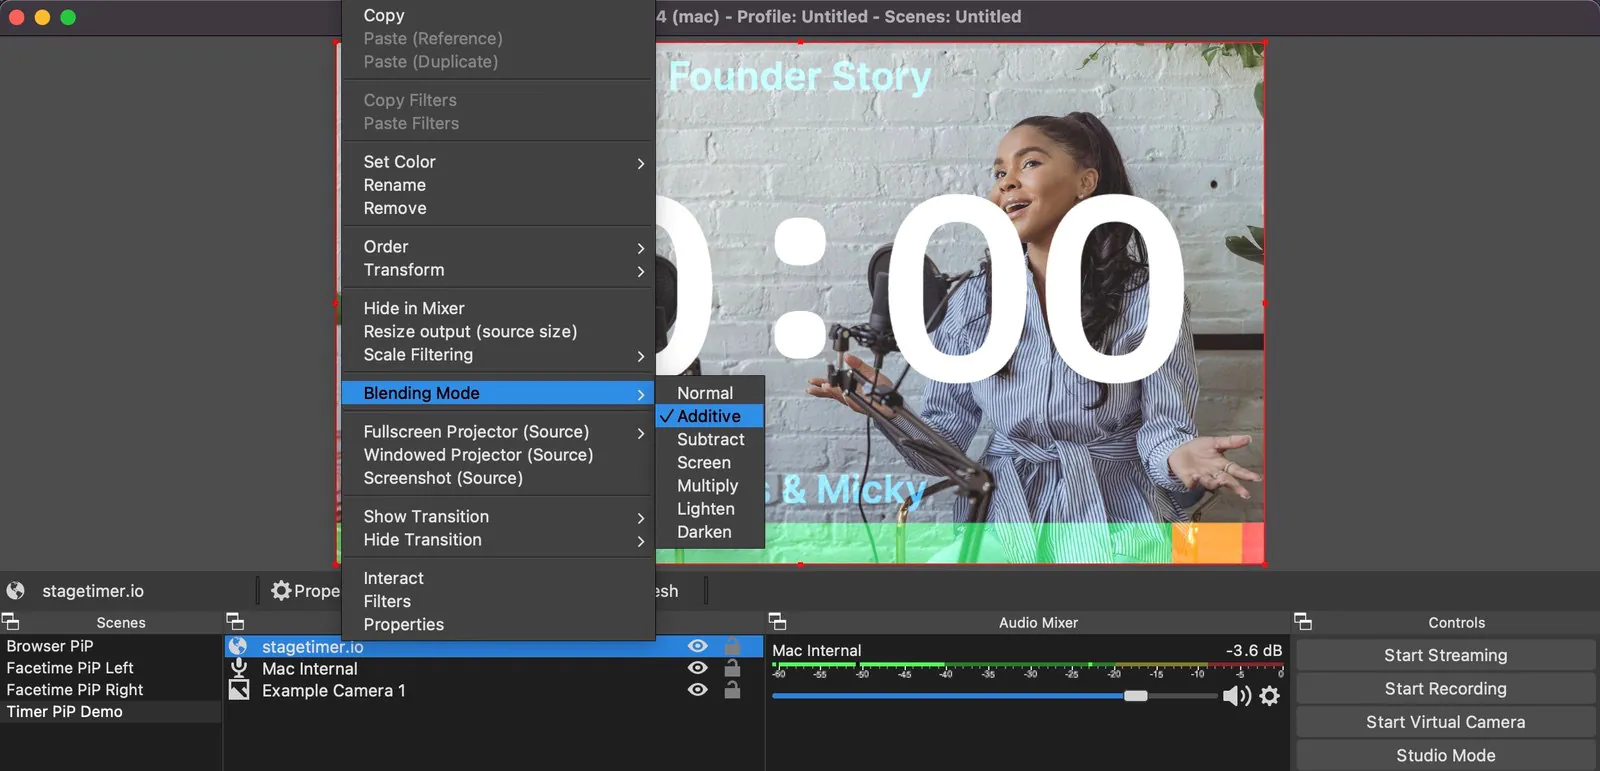
Option 1: Additive Blending Mode
Right-click your source in the Sources panel, select “Blending Mode”, then “Additive”. This uses brightness values to determine opacity — white text becomes fully visible while the dark background disappears. The blue title and colorful progress bar may appear semi-transparent. If that’s not what you want, try option 2 or 3.
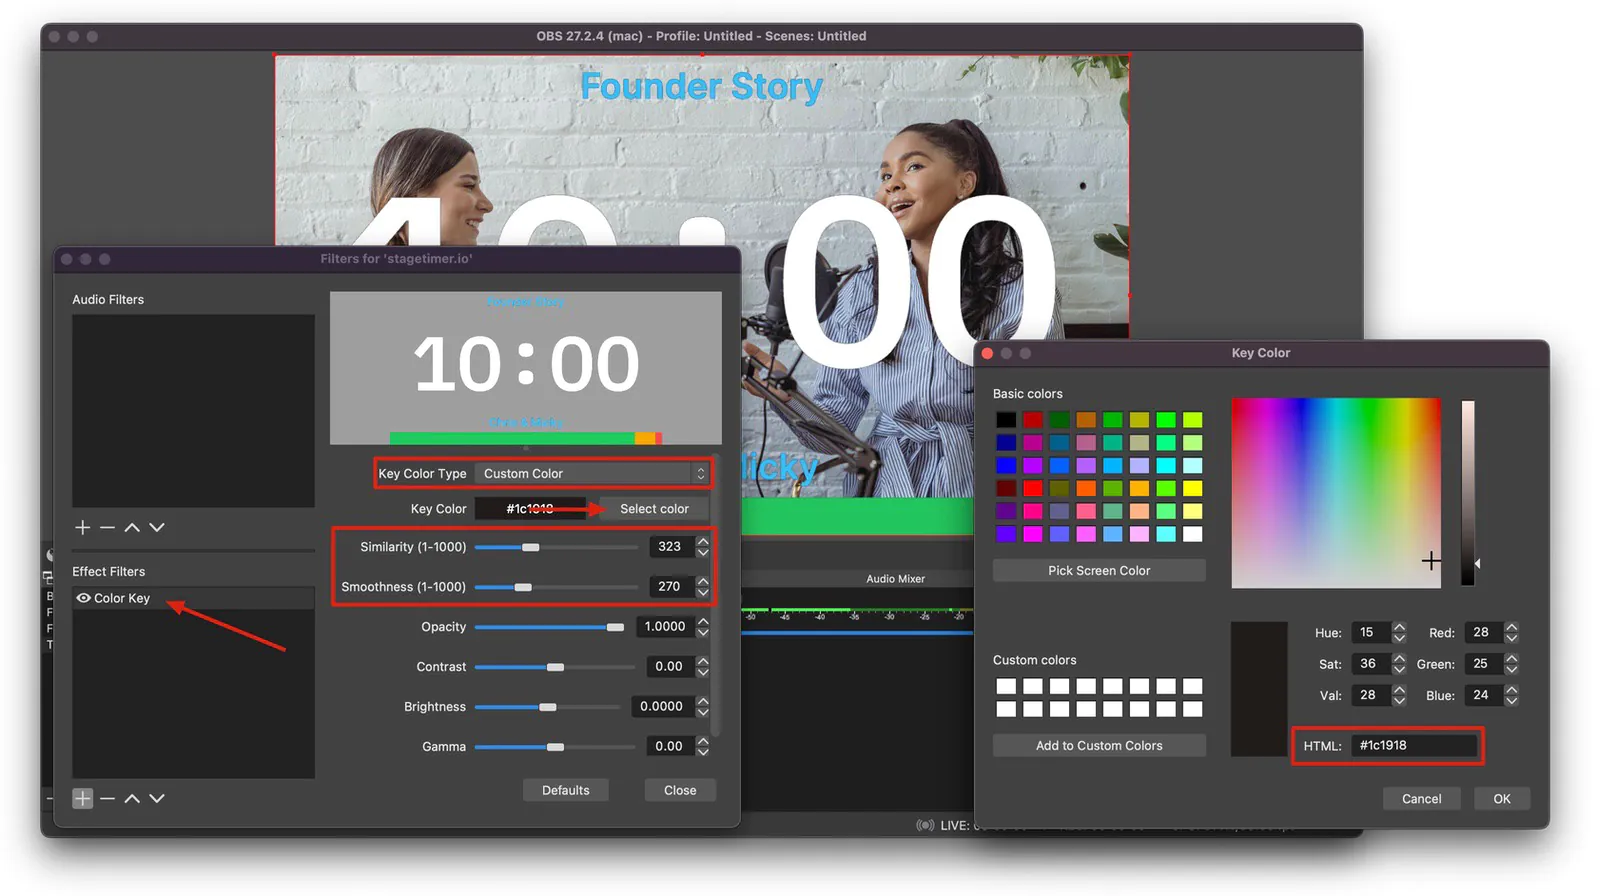
Option 2: Color Key Filter
Right-click the source and open “Filters”. Click ”+” to add a new filter and select “Color Key”. Set the key color to #1c1918 (the Stagetimer default background) and increase the similarity and smoothness a bit until the background is cleanly removed.
Option 3: Transparent Background (Premium)
The cleanest approach is to use Stagetimer’s built-in transparent background, which requires a Premium plan.
Open Output Links on the Controller page and select the Viewer output you want to customize. Click the “Customize” button to open the layout editor. In the Background setting, select “Transparent”. The checkered pattern indicates transparency.
No blending modes or filters needed — Stagetimer renders with a transparent background directly. For better readability over varied backgrounds, you can also adjust text styling per element in the customizer.
For complete details on customizing outputs, see the Custom Outputs documentation.
3. Isolate individual elements of Stagetimer in OBS
Sometimes you don’t want the full Viewer display — just the countdown, or just a message. With Custom Outputs (Premium), you can create outputs that contain only the elements you need.
Timer-only output
- In Output Links, click ”+ Add Output” to create a new output.
- Click “Customize” to open the layout editor.
- Remove all elements except the timer (select an element and press Delete).
- Optionally set the background to transparent.
- Copy the link and add it as a Browser source in OBS.
You can now position and resize this timer independently in your OBS scene, separate from other elements.
Message-only output
Follow the same steps, but keep only the Message element. This is great for displaying audience questions or production messages as a lower-third overlay.
Set the browser source dimensions to something like 1280×250 for a wide, thin message bar. The message text automatically fills the available space.
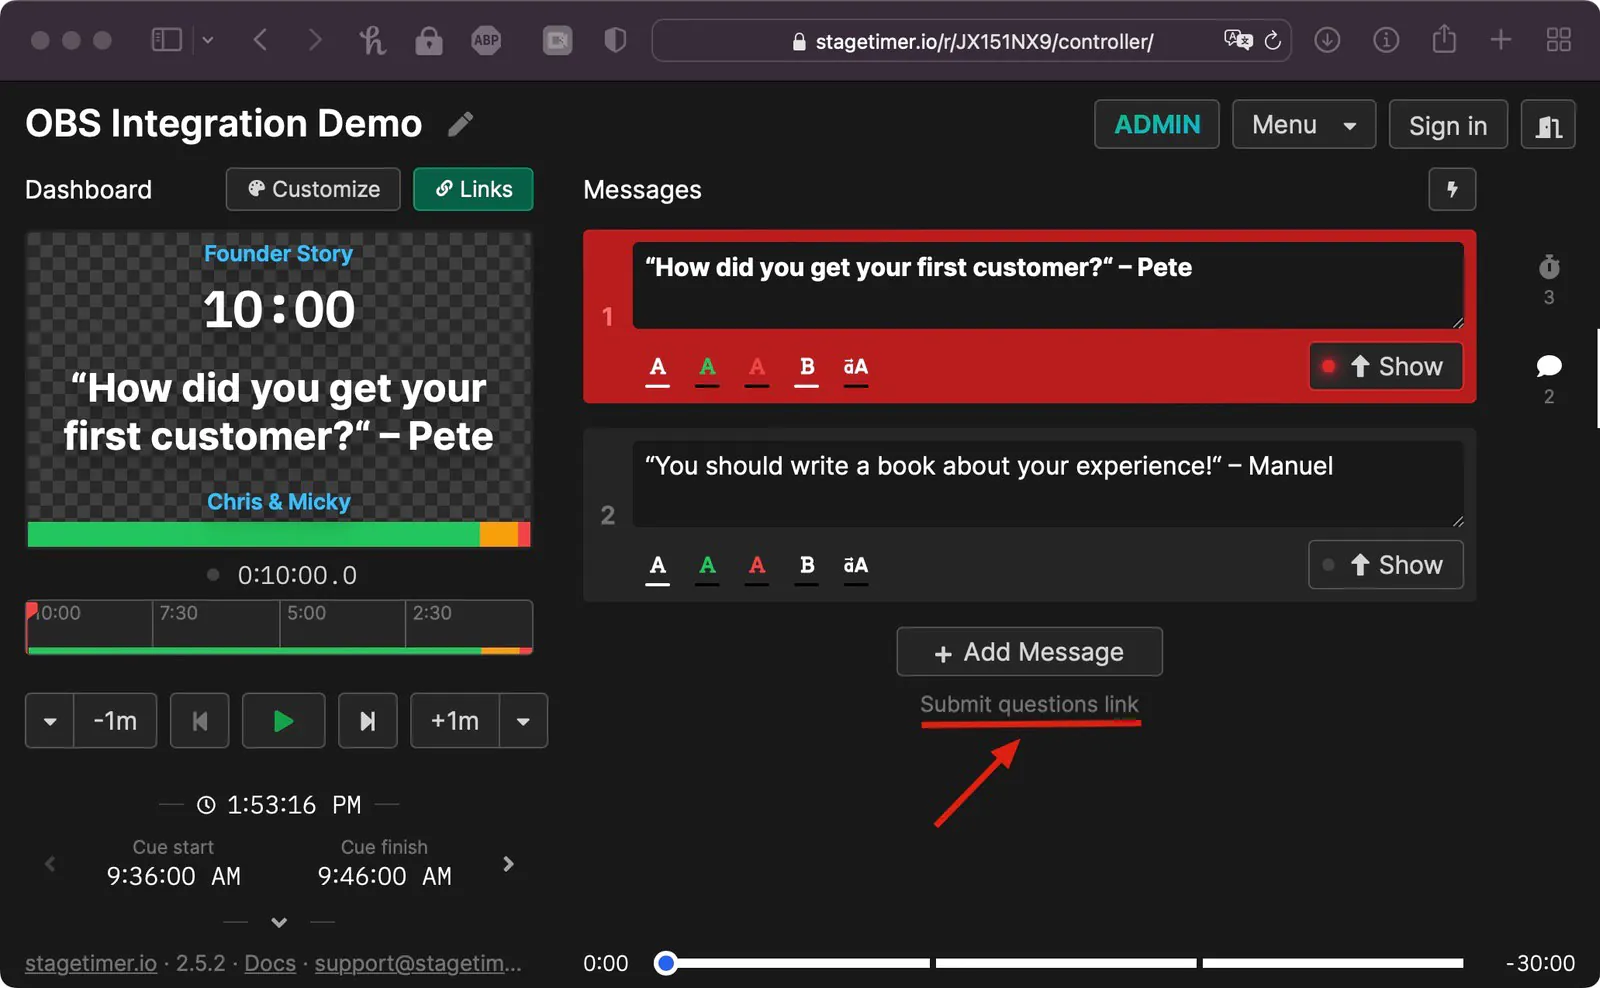
Stagetimer includes a built-in audience interaction feature that lets viewers submit questions directly to your message queue.
Set up the question form
In the Messages section on the Controller page, click “Submit questions link” to generate a shareable link and QR code. Share this with your audience — they can submit questions without needing a Stagetimer account and without counting toward your live connections.
Questions appear as new messages in your message list. You can review, edit, color-code, and display them to presenters when ready.
Show questions in OBS
To display audience questions on your stream, create a message-only output as described in section 3 using Custom Outputs.
Add it as a Browser source in OBS and position it as a lower-third graphic. When you click “Show” on a message in Stagetimer, it appears on screen immediately.
👉 Note: The submit questions form is not protected against bots, so avoid posting it on a public website.
5. Use Stagetimer’s Audio Chimes with OBS
When using audio chimes with OBS, make sure two settings are configured correctly.
- In the properties window for the browser source, enable the “Control audio via OBS” option.
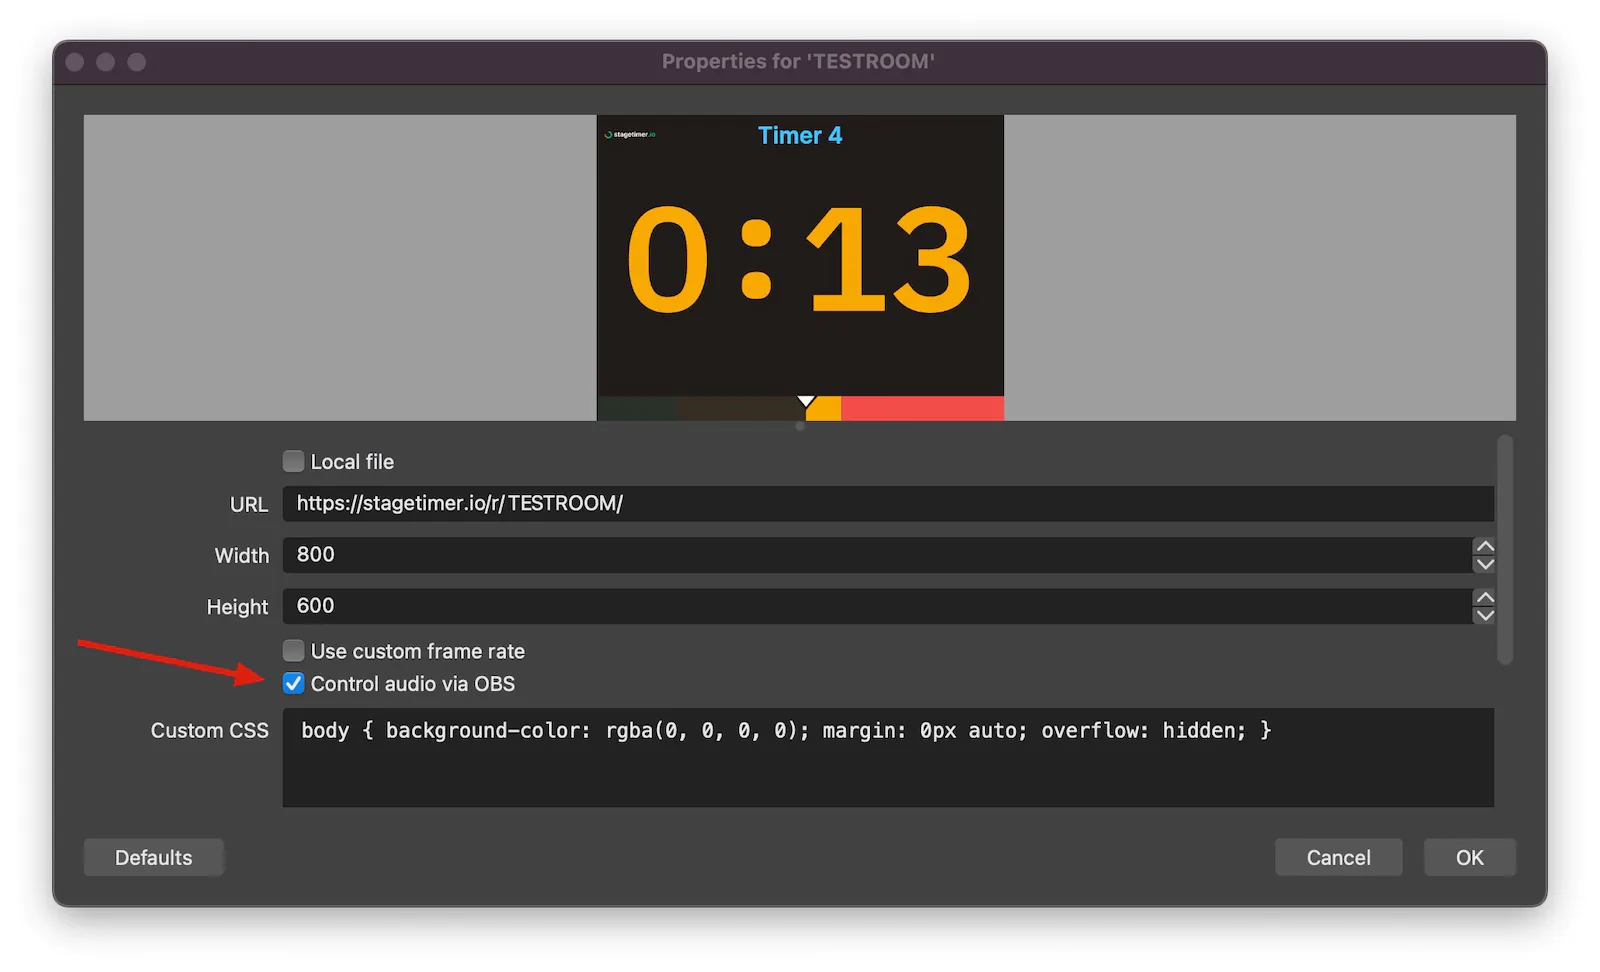
- Open the “Advanced Audio Properties” panel and set the audio monitoring for the browser input to either “Monitor Off” or “Monitor and Output”.
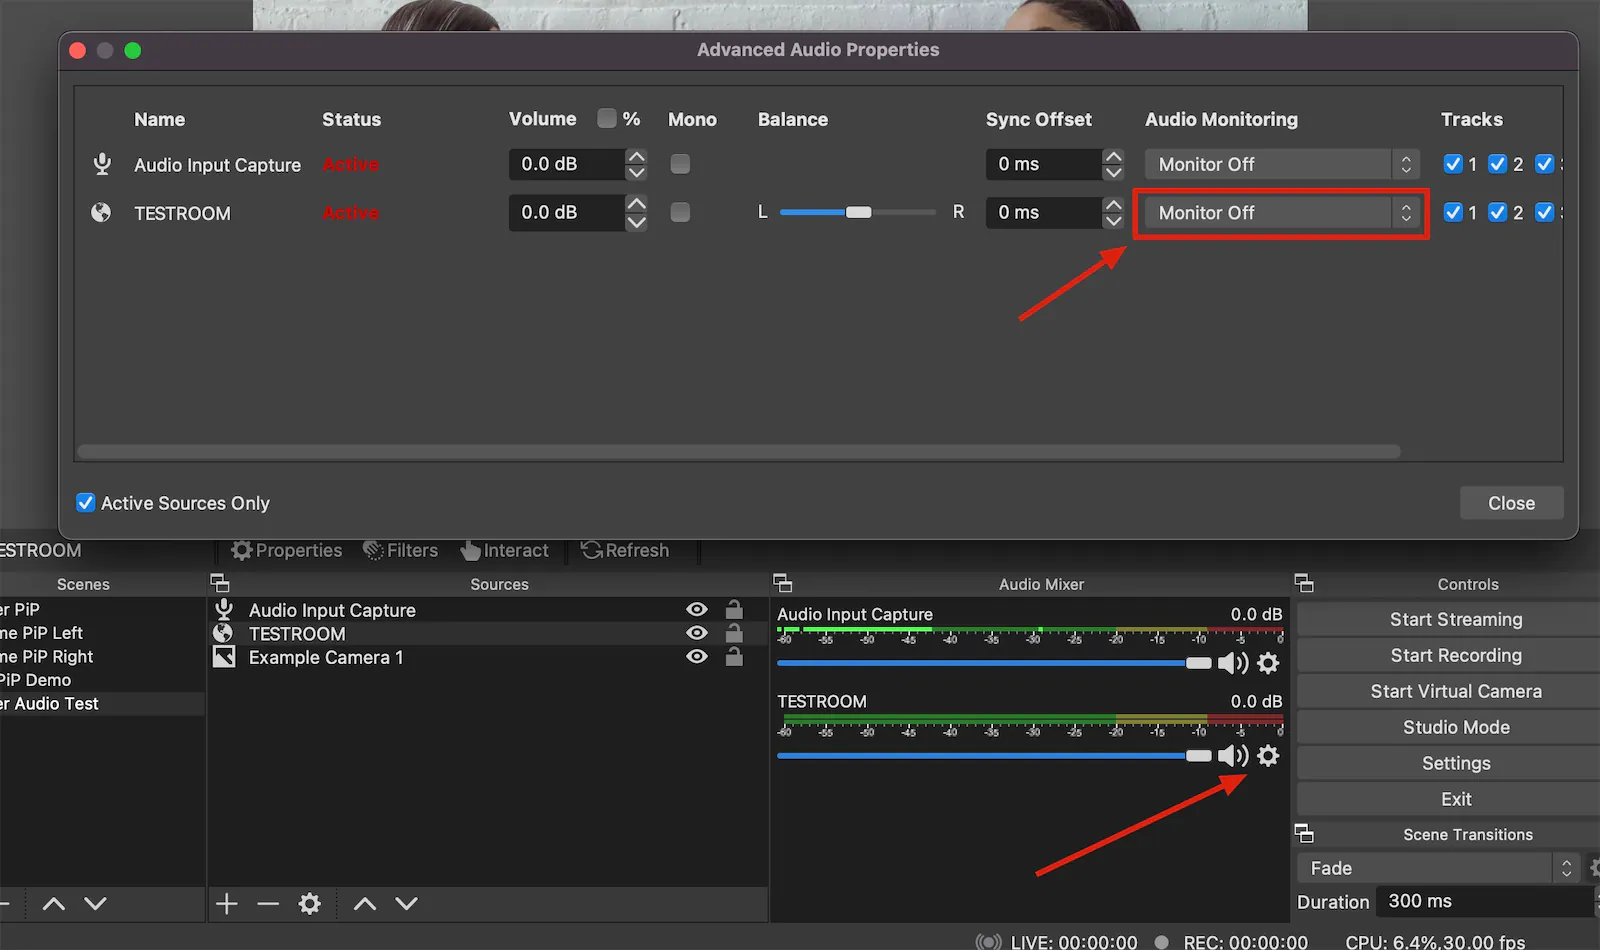
To properly monitor audio from the browser source, mute any open Stagetimer browser windows outside OBS and use the “Monitor and Output” setting inside OBS. This way, what you hear in your headphones matches what goes on stream.
⚠️ Avoid relying on audio from a browser window outside of OBS. If the browser is running in the background or minimized, tabs may not run in real-time — audio could be delayed or skipped entirely.
6. NDI® Output (Desktop App)
If you’re using the Stagetimer desktop app, you can receive timer displays as NDI video sources instead of using browser sources. OBS doesn’t support NDI natively, but the free DistroAV plugin adds full NDI support.
Install DistroAV and the NDI Runtime
You need two things:
-
NDI Runtime — Download NDI Tools from ndi.video, which includes the runtime. Install it and restart your computer.
-
DistroAV plugin — Download from distroav.org or the GitHub releases page. Install it and restart OBS.
DistroAV (formerly known as obs-ndi) is a free, open-source plugin maintained by the community. It requires OBS v31 or higher and NDI Runtime v6 or higher.
Adding an NDI source in OBS
- Make sure the Stagetimer desktop app is running and NDI output is enabled (it’s on by default).
- Open a controller for the room you want to use. This advertises NDI sources for that room’s outputs.
- In OBS, click + in the Sources panel and select NDI Source (this option appears after installing DistroAV).
- In the properties dialog, open the Source Name dropdown. Stagetimer sources will be listed with names like
HOSTNAME (Stagetimer - Room Name - Output Name). - Select the source and click OK.
The timer appears as a standard OBS source — you can resize, crop, and layer it like any other source.
If the source doesn’t appear in the dropdown, check that both the NDI Runtime and DistroAV are installed correctly, and that the Stagetimer desktop app is on the same network as your OBS machine. You can also copy the exact NDI source name from the Output Links popup in Stagetimer.
Transparent overlays via NDI
With a Premium plan, you can set a transparent background per output in the output designer. The NDI feed carries the alpha channel through to OBS — no chroma keying or blending modes needed. Just layer the NDI source over your video.
For more details on NDI source naming, lifecycle, and Live Connection counting, see the NDI output documentation.