How to Use Stagetimer with Zoom
Introduction
Want to keep your Zoom meetings on track with visible countdown timers? This guide shows you how to integrate Stagetimer, a cloud-based remote-controlled countdown timer, with Zoom for video conferencing and webinars.
By the end of this guide, you’ll know how to display timers in Zoom using different methods — from simple screen sharing to professional virtual camera setups that let the timer persist even when participants share their screens.
Choose your method:
- Method 1: Screen Share — Simplest option, share your browser window showing the timer. Good for basic needs when you’re not sharing other content.
- Method 2: Virtual Camera — Professional setup that makes Stagetimer appear as a participant. Timer stays visible even when others share screens. Requires OBS Studio (free).
Method 1: Screen Share (Simple)
The simplest way to show Stagetimer in Zoom is to share your screen or a portion of it.
When to use this method
- Quick meetings where you only need to show the timer
- You’re not presenting slides or other content
- You want the easiest setup with no additional software
Setup steps
-
Get your Stagetimer link
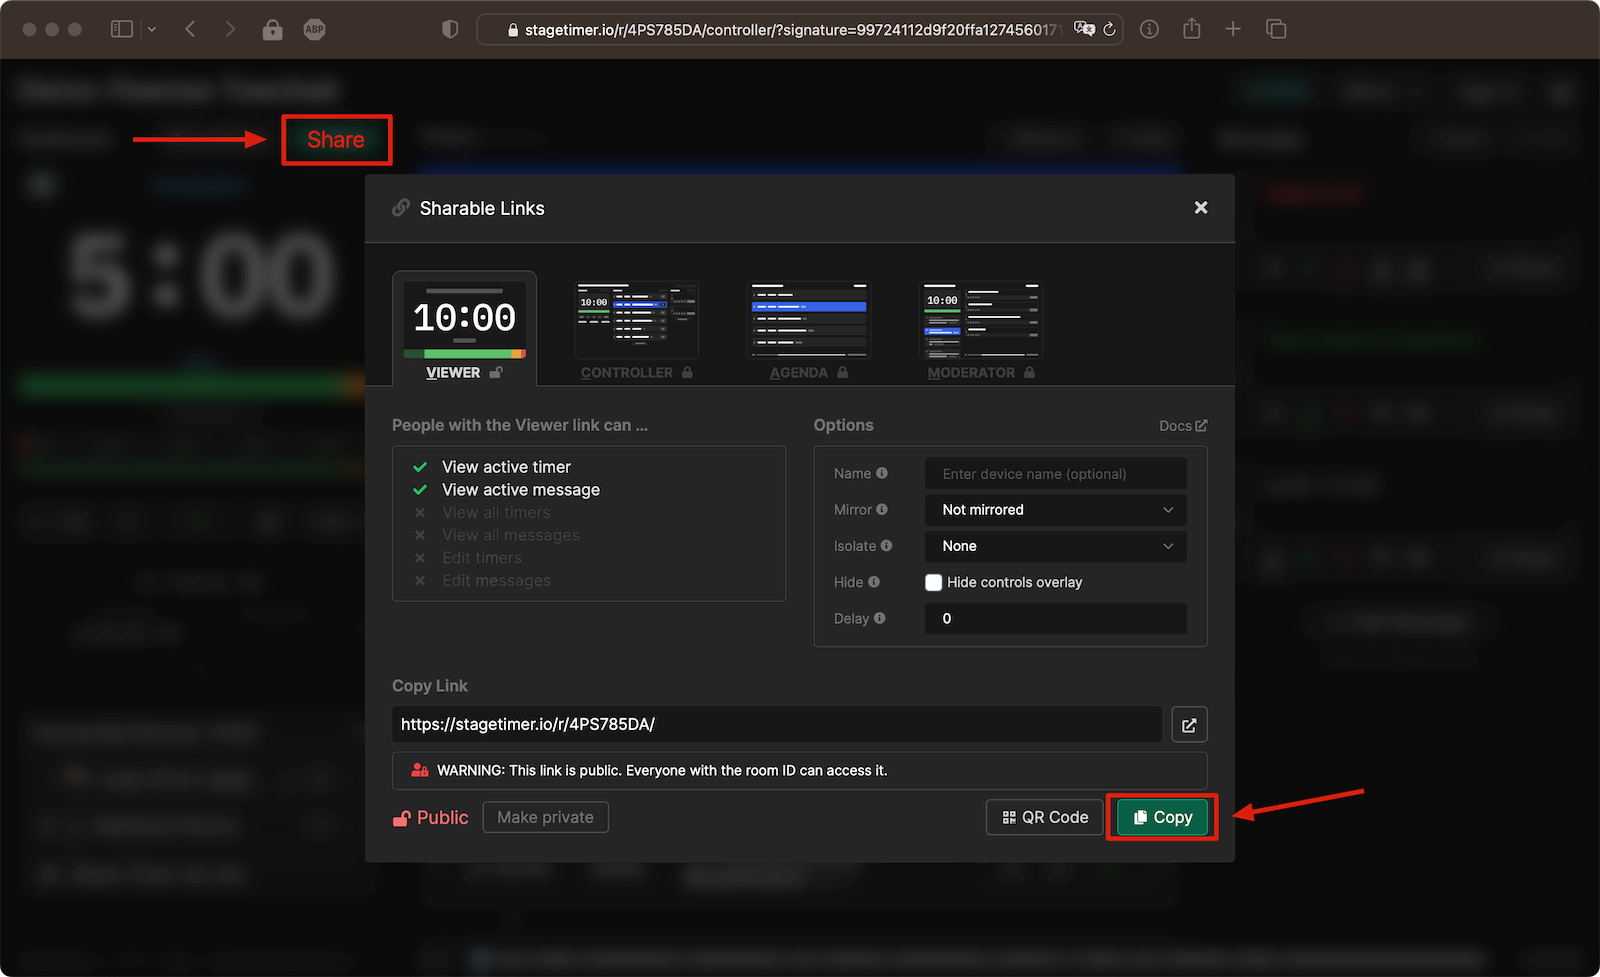
On the Stagetimer Controller page, click Output Links above the output preview. Select the Viewer output, then copy the link.
-
Open the timer in your browser
Paste the link into your browser and open it in a new window or tab. Press F11 (or Cmd+Shift+F on Mac) to make it fullscreen for a cleaner look.
-
Share in Zoom
In your Zoom meeting, click “Share Screen”. You have two options:
Option A: Share the browser window
- Select the browser window showing Stagetimer
- Click “Share”
Option B: Share portion of screen (more flexible)
- Click “Advanced” at the top of the share screen dialog
- Select “Portion of Screen”
- Position the green rectangle over your timer window
- You can resize and move this rectangle while sharing
Limitations
- Timer disappears when you stop sharing to let someone else present
- Takes up your screen share slot — you can’t simultaneously show slides
- Screen share indicator bars may be visible
💡 Tip: Use Custom Outputs (Premium) to create a timer-only display without extra UI elements like the title or progress bar.
Method 2: Virtual Camera with OBS Studio
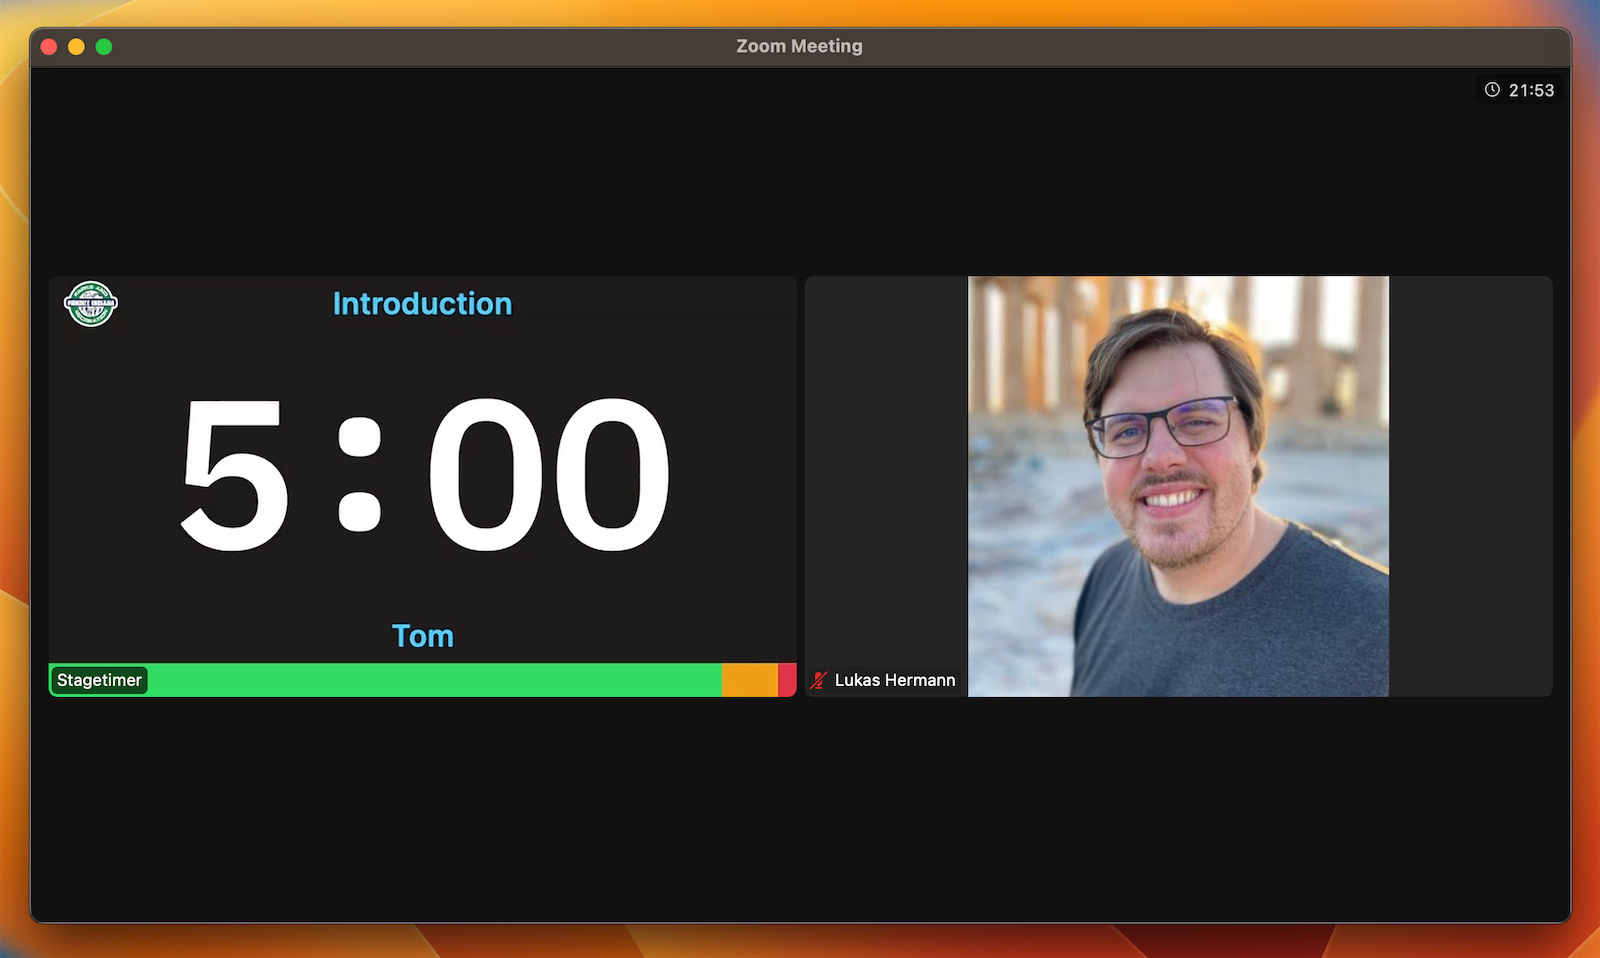
For a more professional setup, use a virtual camera to make Stagetimer appear as a separate participant in your Zoom call. The timer stays visible even when you or others share screens.
Why use a virtual camera?
A virtual camera is software that creates a “fake” webcam on your computer. Instead of showing your physical camera, it shows whatever you configure — in this case, the Stagetimer display. Zoom sees it as just another camera option.
Benefits:
- Timer persists when you or others share screens
- No screen share indicator bars
- Can join Zoom twice from the same computer (once as you, once as the timer)
- Professional appearance for webinars and events
You’ll need
- OBS Studio (free, open-source) — Available for Windows, Mac, and Linux
- A Zoom account with “Join from browser” enabled (see step 8 below)
- Same computer or a second device
Setup steps
1. Download and install OBS Studio
Head to the OBS Studio website and download the application for your operating system. Install it following the standard installation process.
2. Create a scene in OBS Studio
Launch OBS Studio. If it’s your first time, you can skip the Auto-Configuration Wizard for now.
- In the Scenes panel (bottom left), click the ”+” button to create a new scene or use the default scene.
- In the Sources panel, click the ”+” button and select “Browser”.

3. Add Stagetimer as a browser source
- On the Stagetimer Controller page, click Output Links above the output preview.
- Select the Viewer output and copy the link at the bottom.
- Back in OBS, paste the Stagetimer link into the URL field.
- Set the width to 1280 and height to 720 for a standard 16:9 aspect ratio.
- If you want to use audio chimes, enable “Control audio via OBS”.
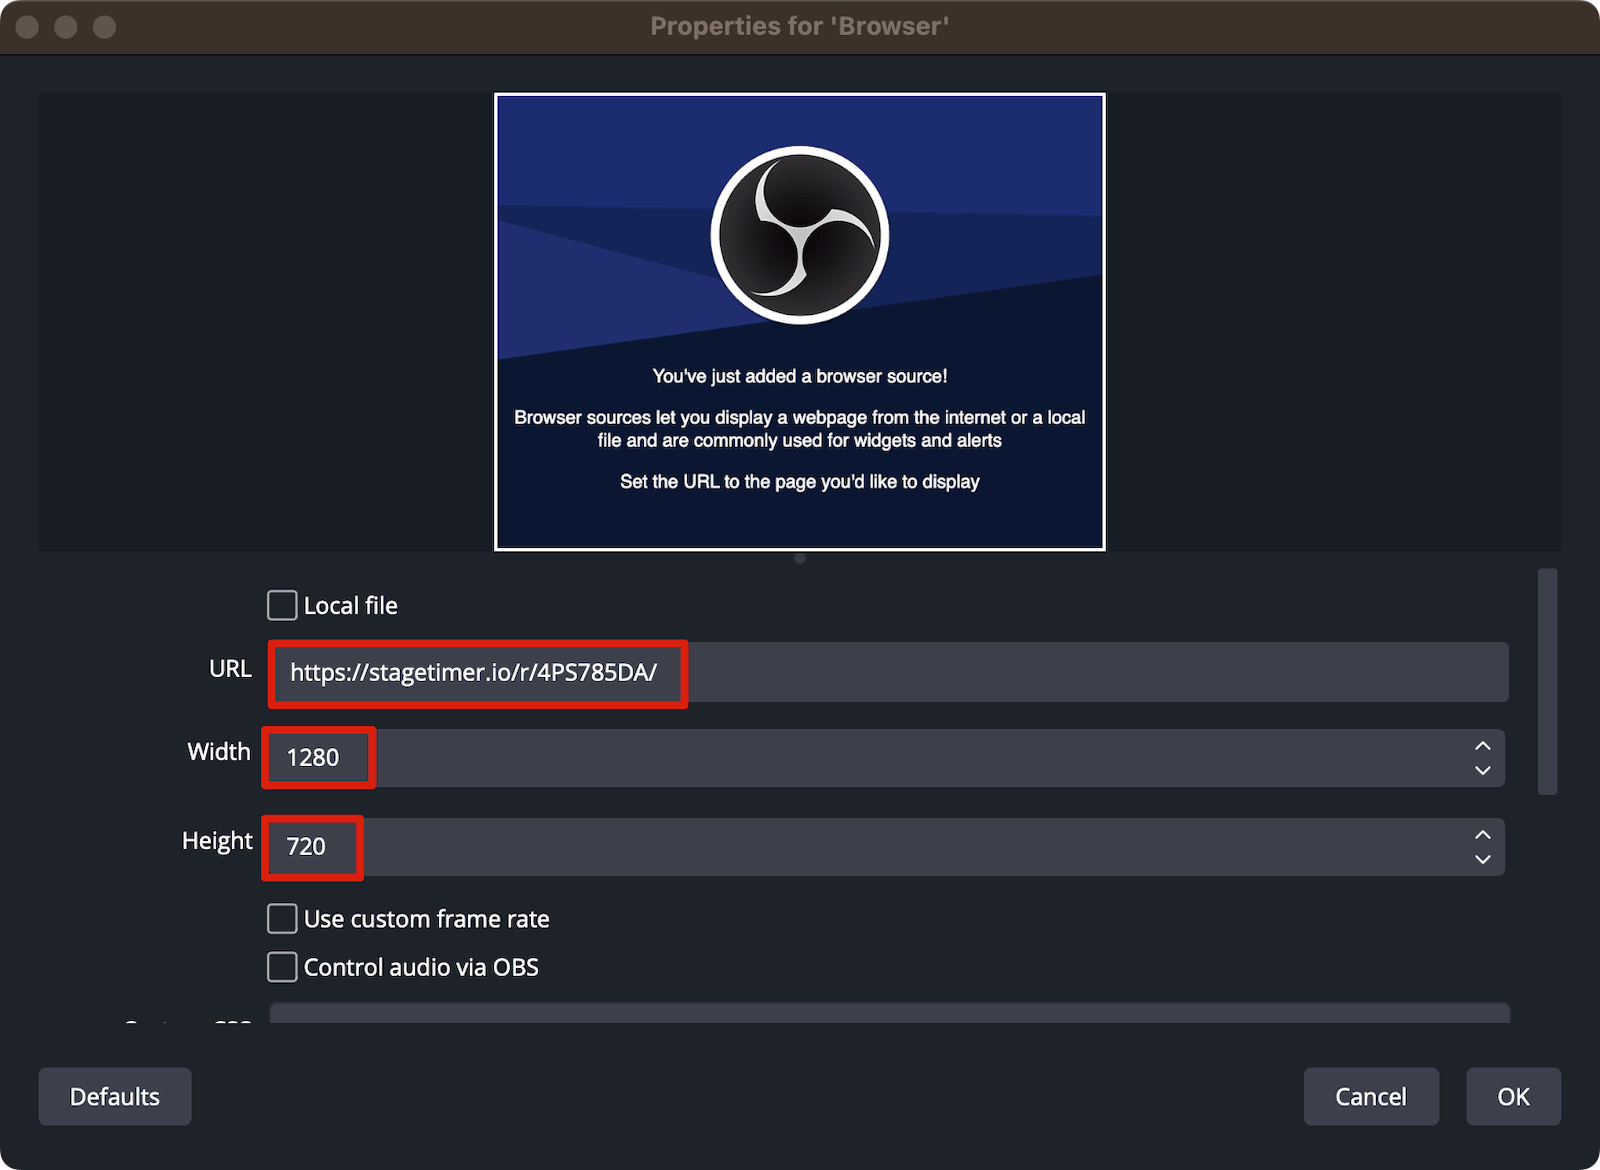
- Click “OK” to add the source.
💡 Tip: Learn more about using audio chimes with OBS.
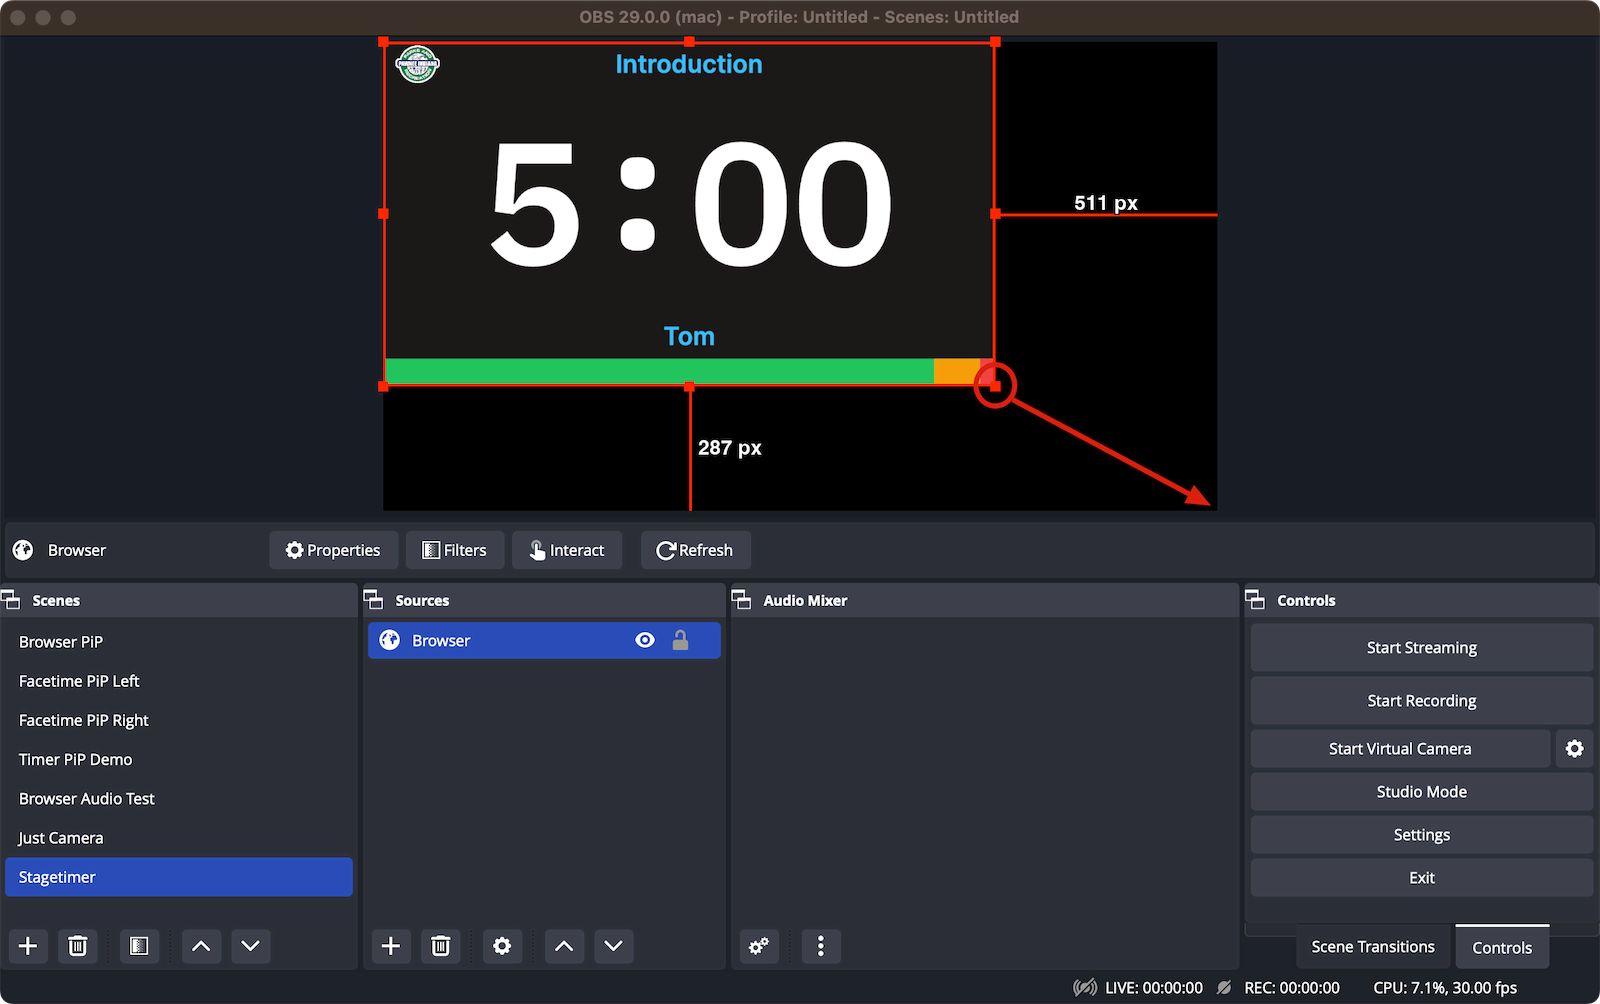
4. Resize the source (optional)
Click and drag the corners of the browser source in the OBS preview to resize it. Make it fullscreen or position it however you prefer.
5. Start the OBS virtual camera
Click the “Start Virtual Camera” button in the bottom-right controls panel of OBS Studio. This creates a virtual webcam that Zoom can use.
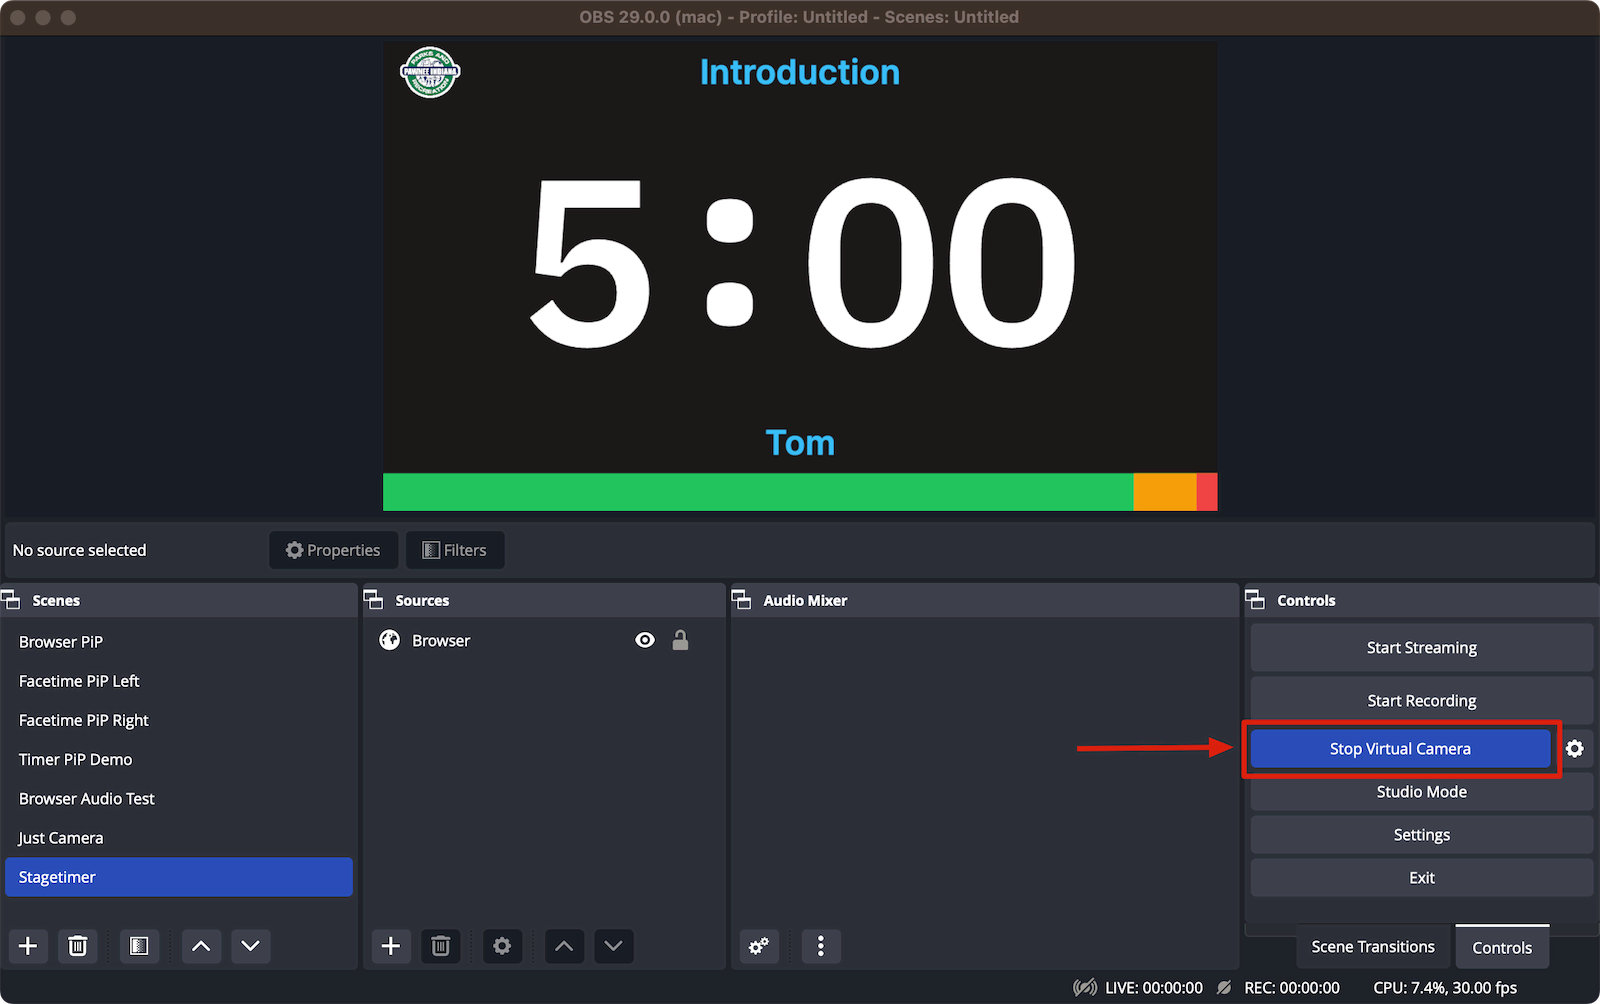
Note: Keep OBS running in the background while you use the virtual camera in Zoom.
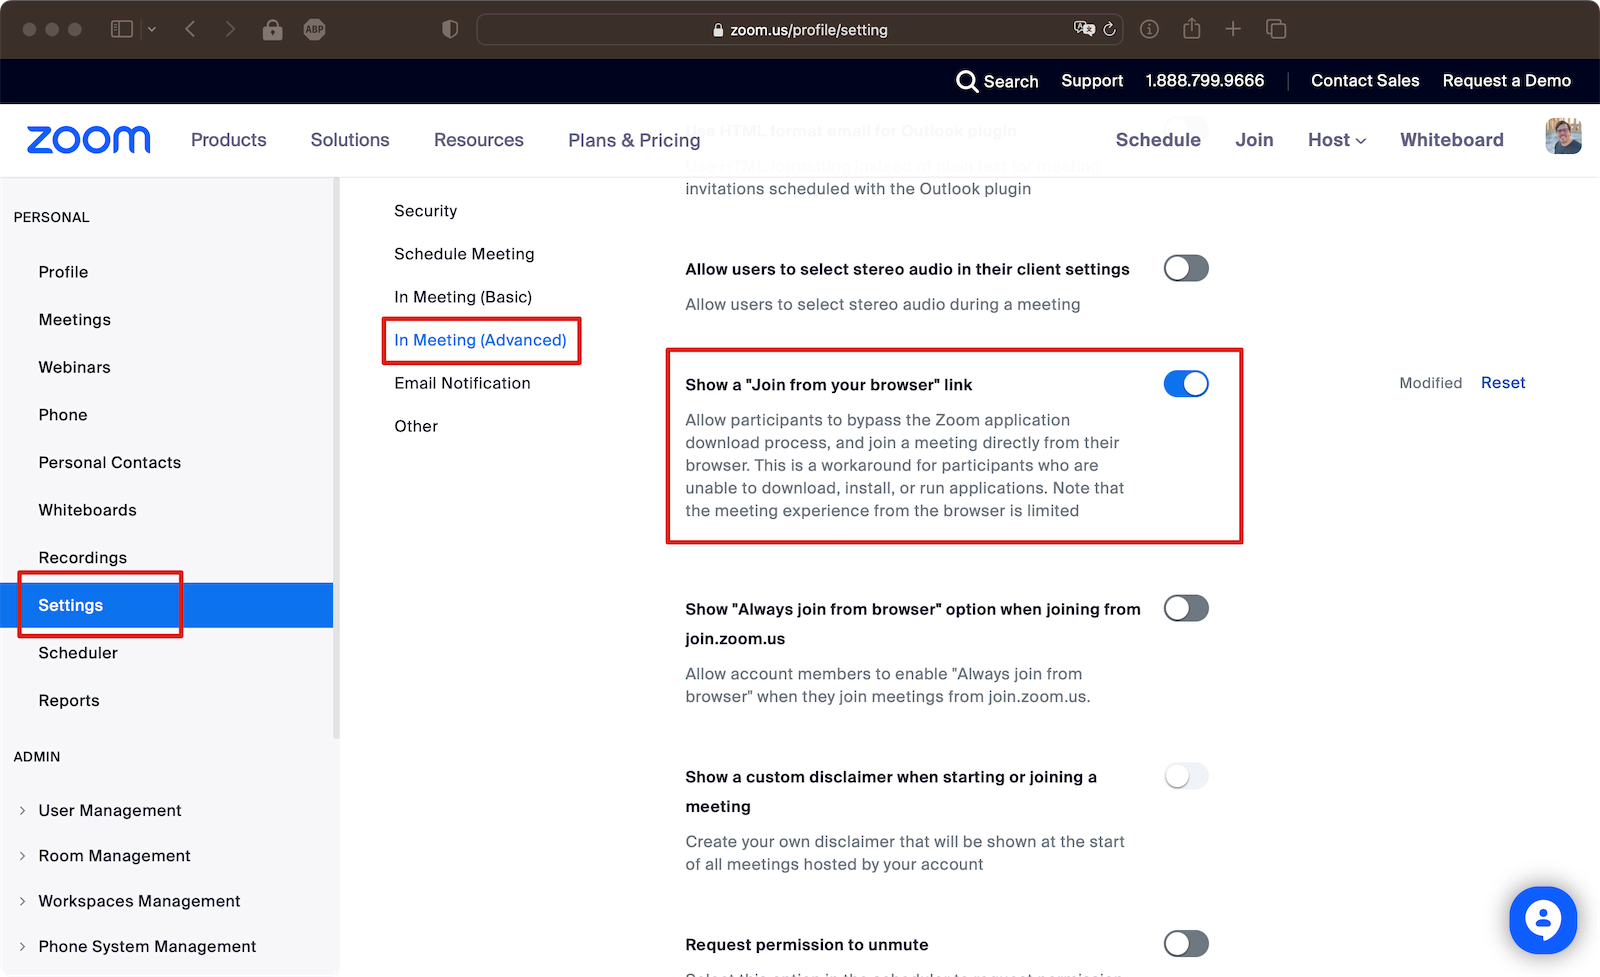
6. Enable “Join from browser” in Zoom
To add the timer as a separate participant, you’ll need to join the Zoom meeting twice from the same computer — once as yourself, and once as the timer using your browser.
- Sign in to the Zoom web portal at zoom.us
- Navigate to Settings → In Meeting (Advanced)
- Enable “Show a ‘Join from your browser’ link”
Here’s Zoom’s official guide on enabling this option.
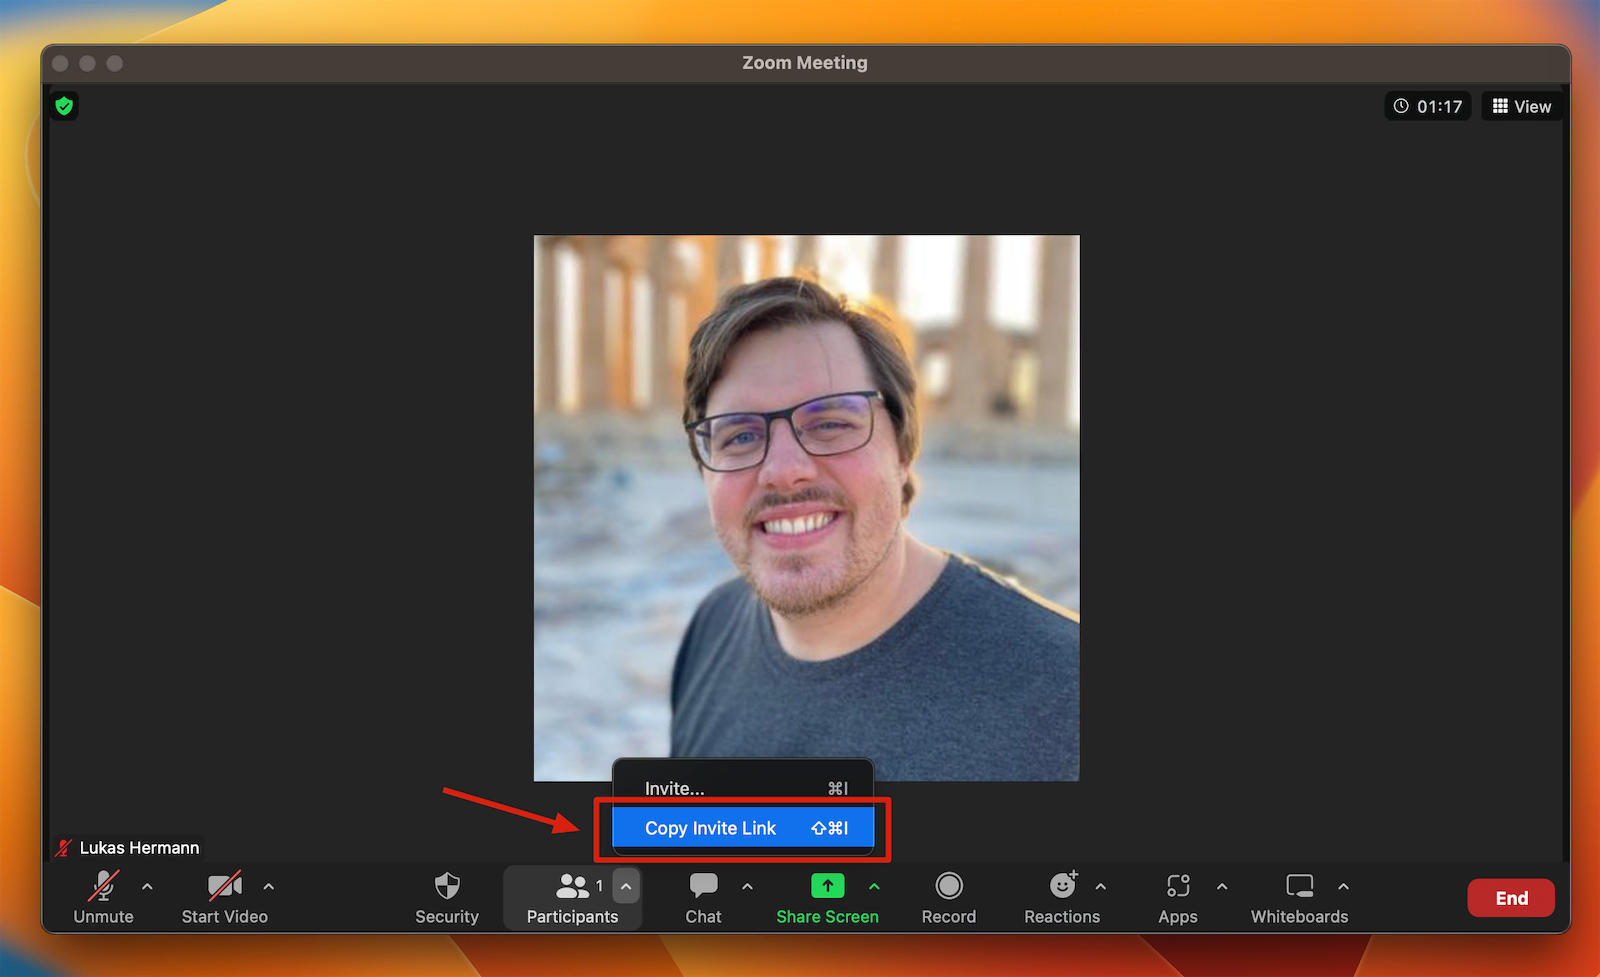
7. Start your Zoom meeting and get the invite link
- Start your Zoom meeting as usual from the Zoom app (this is you joining normally).
- Click “Invite” and copy the meeting invite link.
8. Join Zoom from your browser
- Open the invite link in a recent version of Chrome, Firefox, or Edge.
- At the bottom of the launch page, click “Join from your browser”.
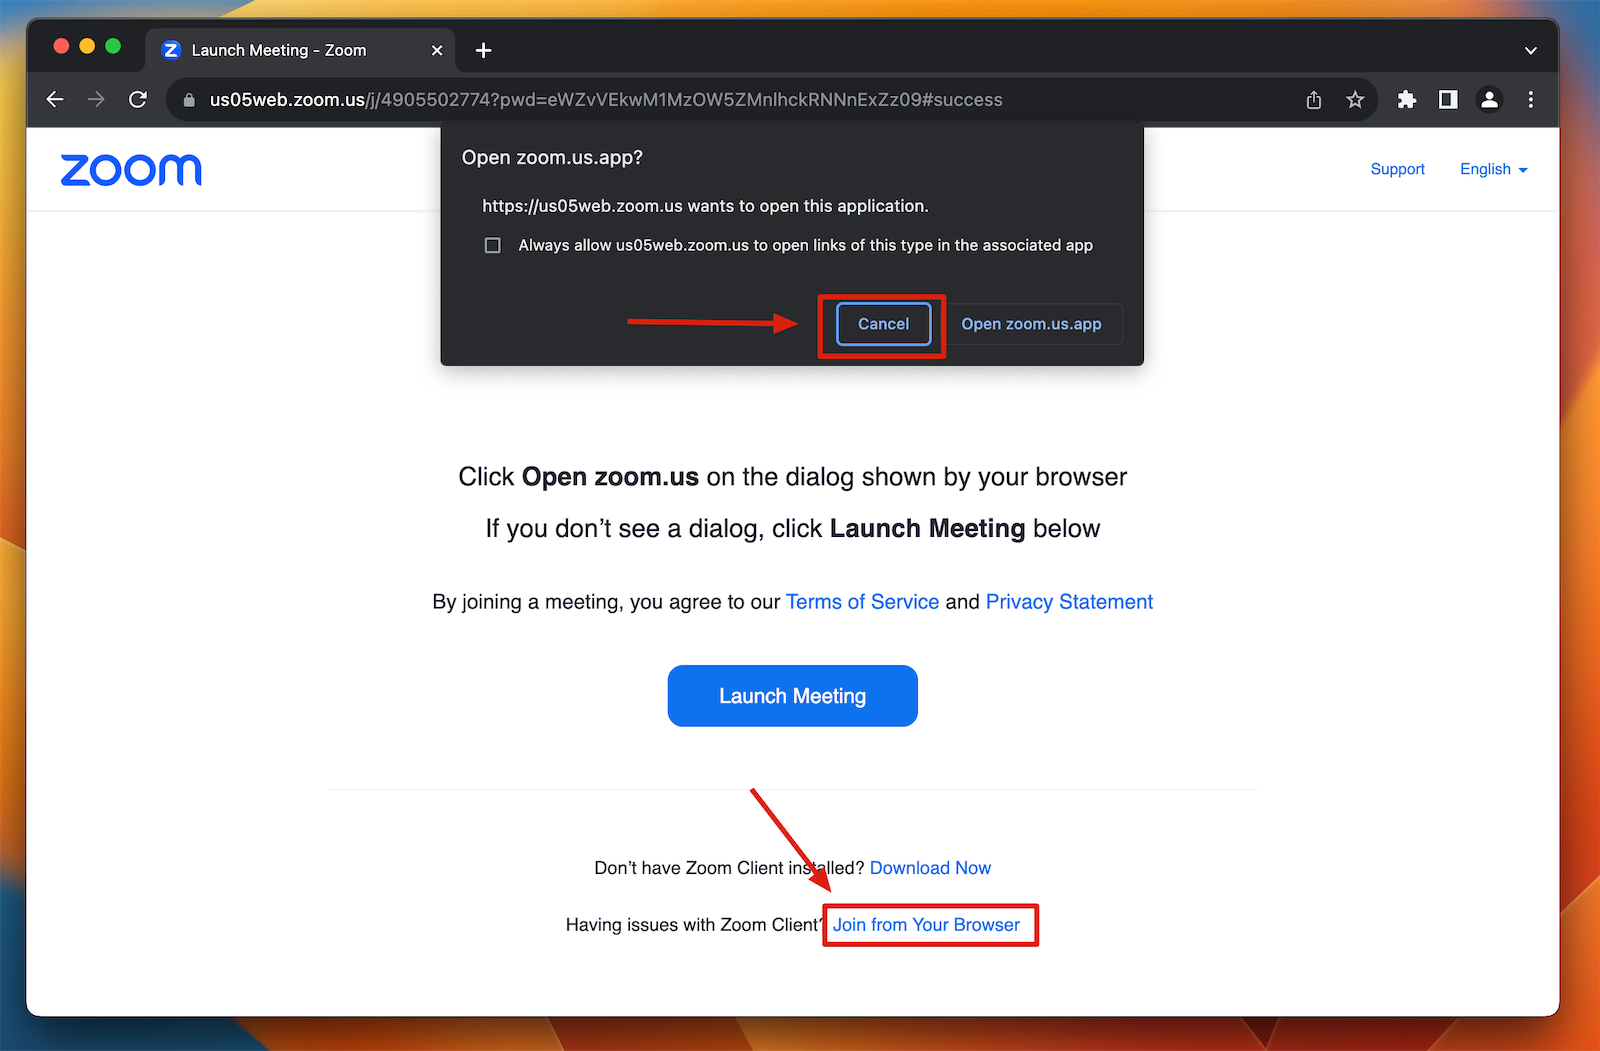
- Enter a name like “Stagetimer” or “Timer” so participants know what this camera shows.
9. Select the OBS virtual camera
- When prompted for camera access, allow the browser to use your camera.
- Click the small arrow next to the camera icon and select “OBS Virtual Camera” from the dropdown.
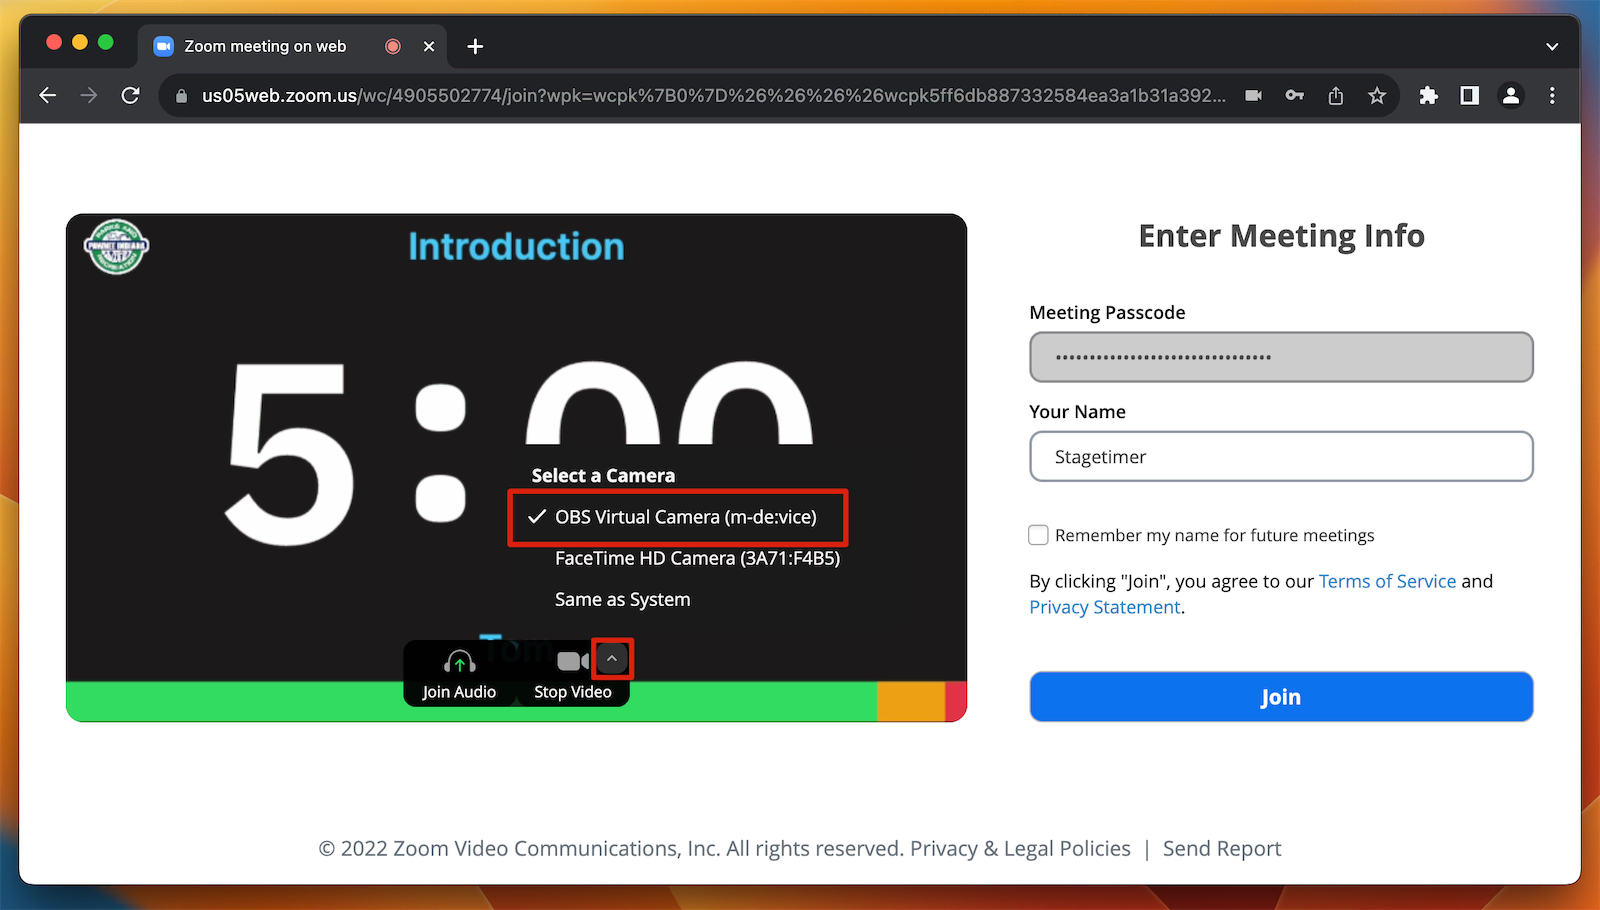
You should now see the Stagetimer display instead of your webcam feed.
10. Join the call
Click “Join with Video” to join the meeting. Stagetimer now appears as a participant in your Zoom call.
The timer will remain visible in the participant grid even when you or others share screens, making it perfect for timed presentations, panel discussions, or workshops.
Important tips
Avoid audio echoes: Since you’re joining the Zoom call twice from the same computer, make sure to:
- Mute the microphone on the browser instance (the timer participant)
- Don’t join audio twice, or participants will hear an echo
System audio: If you’re using audio chimes, configure OBS audio settings correctly (see OBS integration guide).
macOS display issues: If your main screen goes black when using fullscreen in OBS, open System Preferences → Mission Control and ensure “Displays have Separate Spaces” is checked.
Customize your timer display
With Custom Outputs (Premium plan), you can create specialized timer displays:
- Timer-only output: Remove all elements except the countdown for a minimal, distraction-free display
- Transparent backgrounds: Make the background fully transparent in OBS for overlay effects
- Message-only output: Display audience questions or speaker notes separately
See the Custom Outputs documentation for complete customization options.
Alternative Virtual Camera Software
If you find OBS Studio too complex or want platform-specific alternatives, these applications also provide virtual camera functionality:
ManyCam (Windows & Mac)
ManyCam is a user-friendly virtual camera and live video software with a simpler interface than OBS.
- Built-in virtual camera functionality
- Native time/clock overlay tools (though Stagetimer provides more control features)
- Easier learning curve for beginners
- Pricing: Free version available, Pro version starts at $29/year
Setup is similar to OBS: add Stagetimer as a web source, enable the virtual camera, and select it in Zoom.
eCamm Live (Mac only)
eCamm Live is a professional live streaming and virtual camera app designed specifically for Mac.
- Native macOS integration with excellent performance
- Built-in countdown timer features (though Stagetimer offers remote control and multi-device sync)
- Direct Zoom integration
- Clean, Mac-native interface
Pricing: Free trial available, full version starts at $20/month or $169/year
Comparison
| Feature | OBS Studio | ManyCam | eCamm Live |
|---|---|---|---|
| Price | Free | Free / $29+/year | $20/mo or $169/year |
| Platform | Windows, Mac, Linux | Windows, Mac | Mac only |
| Complexity | Advanced | Beginner-friendly | Intermediate |
| Virtual Camera | ✅ Built-in | ✅ Built-in | ✅ Built-in |
| Browser Sources | ✅ Yes | ✅ Yes | ✅ Yes |
All three work well with Stagetimer. Choose based on your budget, platform, and comfort level with video production software.
Next Steps
Now that you have Stagetimer running in Zoom, explore these features to get the most out of your setup:
- Custom Outputs — Create timer-only or message-only displays (Premium)
- Output Links — Learn about all available output options and customization
- Messages — Display speaker notes and audience questions
- Submit Questions — Let your audience submit questions that appear in your message queue
Questions or issues? Check out our documentation or contact support.