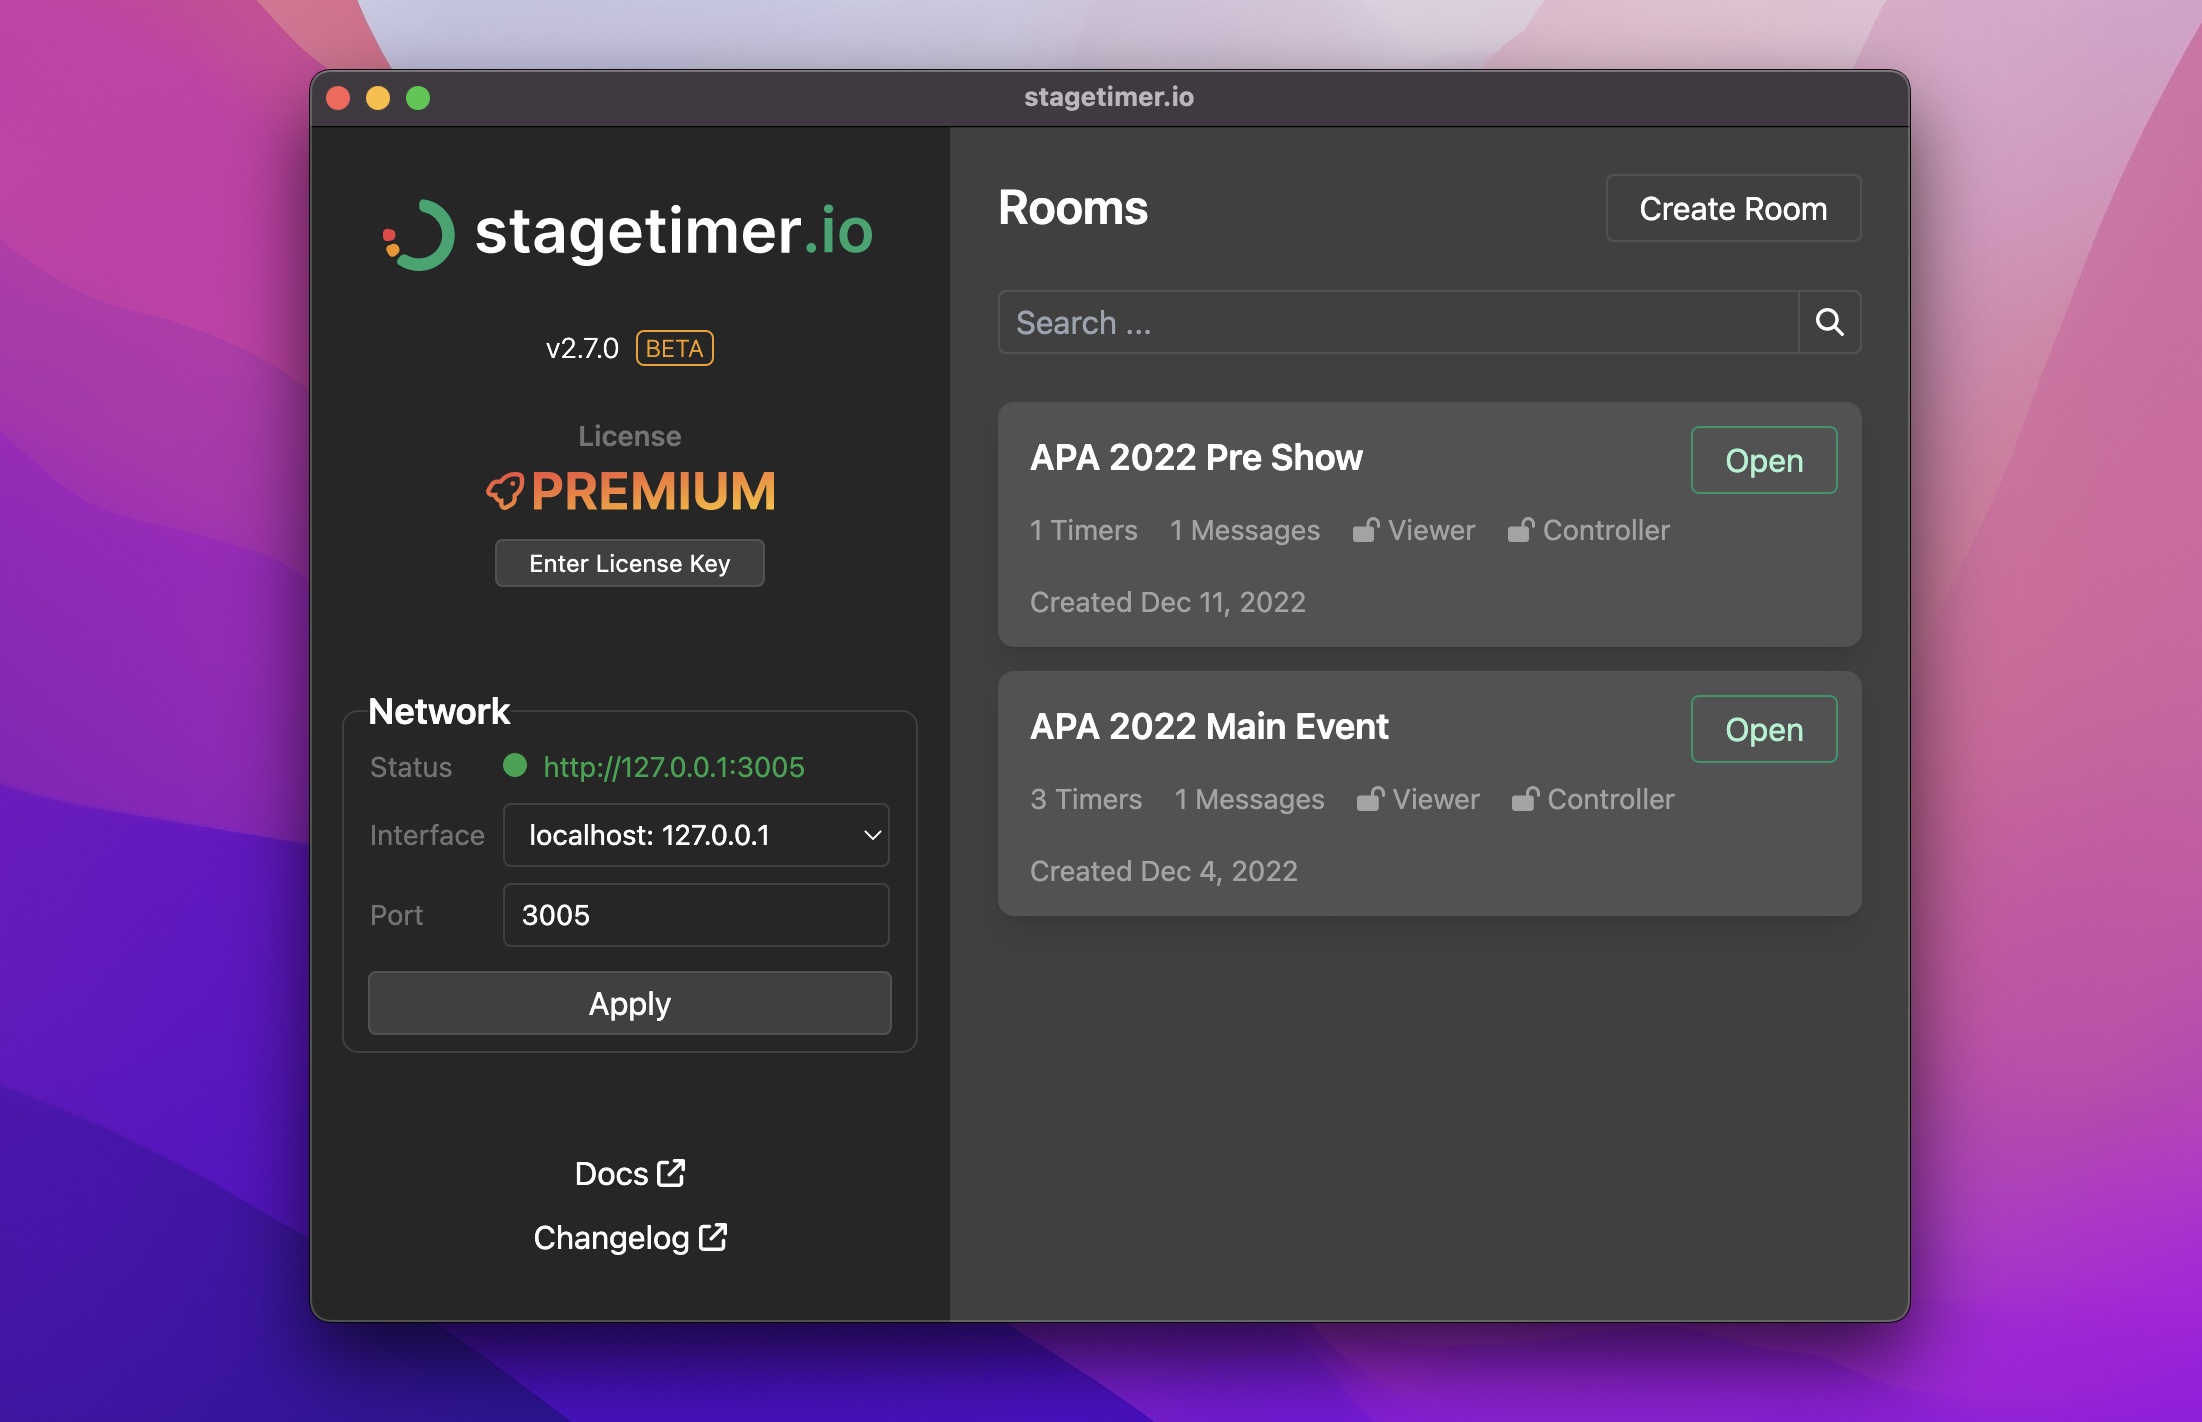
Stagetimer Desktop App
What is the Desktop App?
Stagetimer’s desktop app is designed for environments where internet connectivity is unavailable or unreliable, such as remote event locations, conference centers with restricted network access, or corporate environments with regulated internet use. Additionally, using the desktop app can prevent disruptions caused by unexpected internet outages.
This version is available as an installable application for both Mac and Windows. It mirrors the capabilities of the web version, allowing a seamless transition between online and offline modes. The basic features of the offline app are free to download. Each Stagetimer plan includes an offline license key that activates the corresponding paid features in the desktop app.
Licensing
The desktop app is free to download and use — the same features that are free on the web are free in the desktop app. Every paid Stagetimer plan (Pro and Premium) also includes a desktop app license key at no extra cost, unlocking the corresponding paid features offline — no separate purchase needed.
For users who only need the offline version without a web subscription, a standalone desktop-app-only lifetime license is available as a one-time purchase.
Downloading the Desktop App
Download the latest version of the offline application from our official page:
https://stagetimer.io/desktop-app/
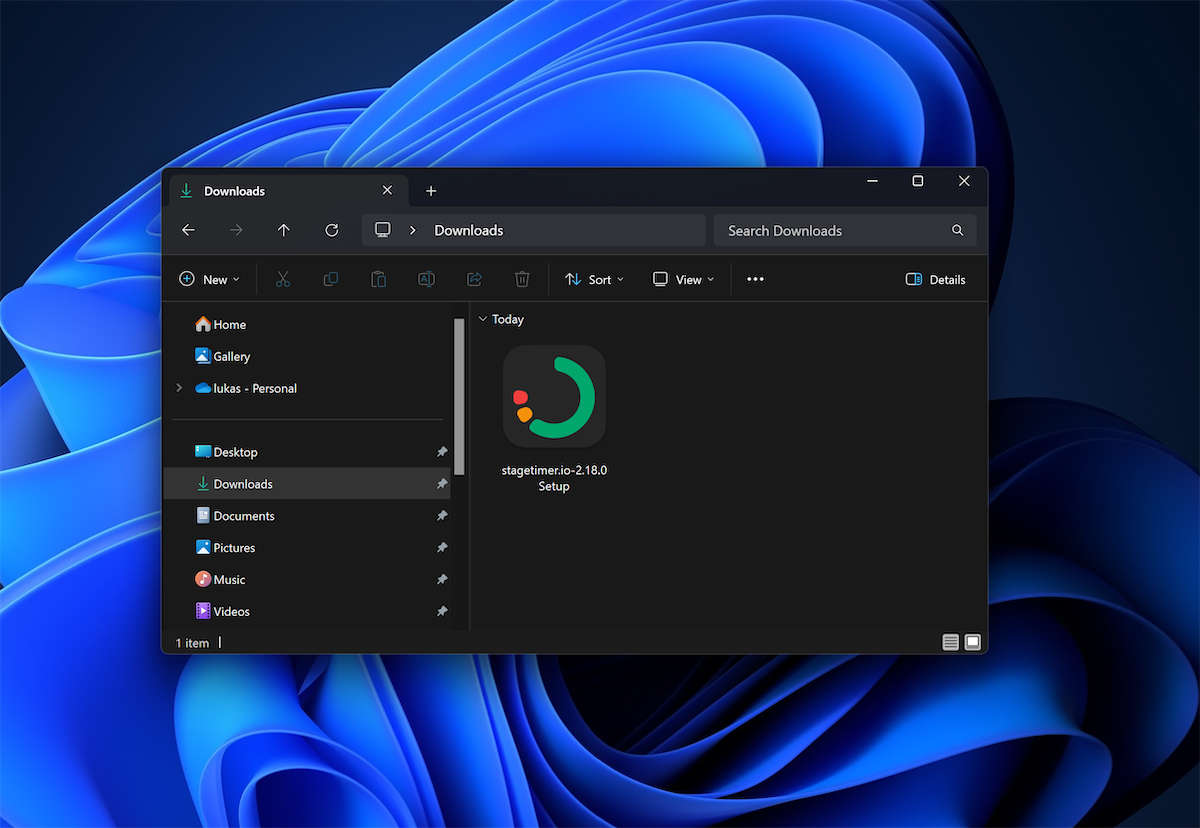
After downloading, run the installation file and follow the on-screen instructions. The setup process is straightforward, designed to get the app up and running with minimal hassle.
💡 Name change in v3.5.0: The app was renamed from “stagetimer.io” to “Stagetimer”. Installer filenames changed accordingly (e.g. Stagetimer-3.5.0-arm64.dmg instead of stagetimer.io-3.3.6-arm64.dmg). On Linux, the executable remains stagetimerio. Your existing data, rooms, and license keys are preserved when updating.
Installing the Desktop App
Windows
- Download the Windows installer (.exe file) from the desktop app page.
- Run the downloaded installer file. You’ll see it appear in your Downloads folder.
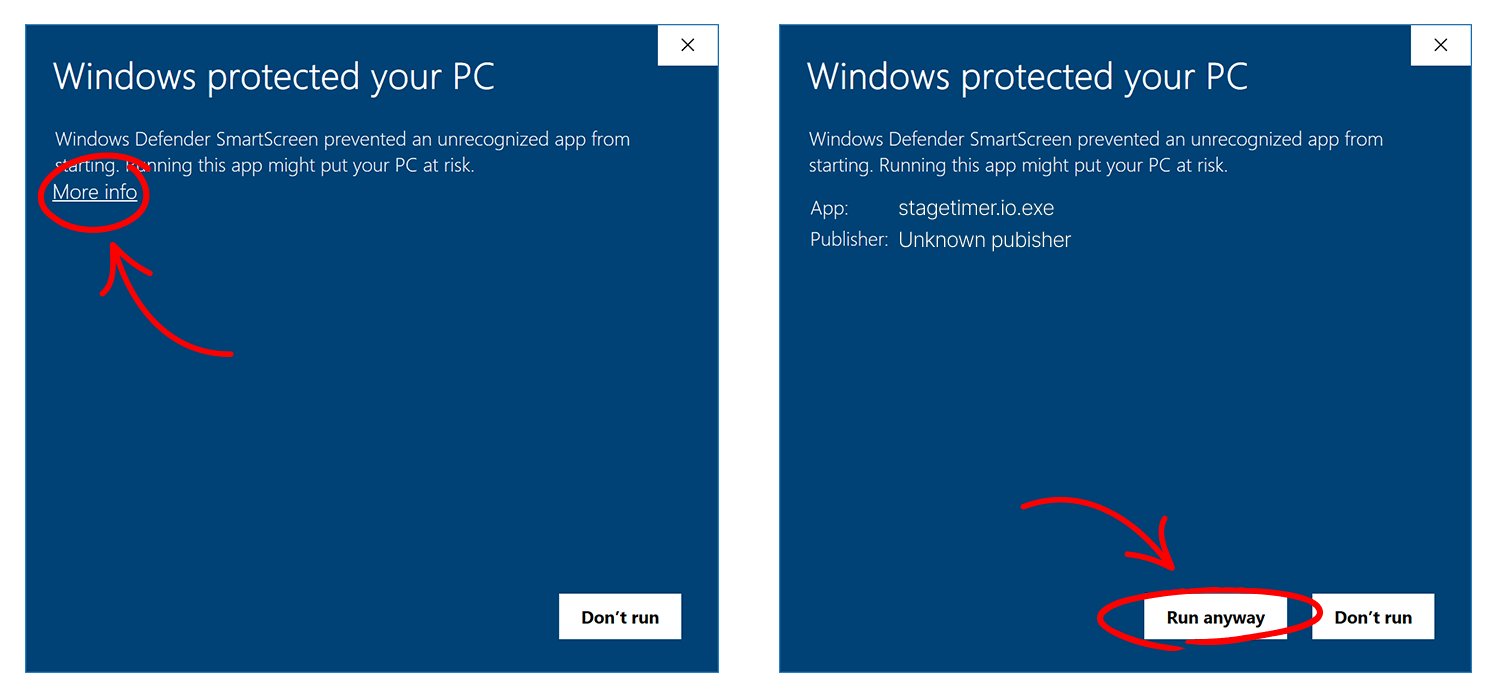
- When you first run the installer, Windows may display a security warning. This appears because the app isn’t code-signed with an official Microsoft certificate, which can be challenging and costly for smaller developers like us.
-
Click “More info” on the first warning screen, then click “Run anyway” on the second screen. This is safe when the installer was downloaded directly from our official website.
-
The installer runs automatically and typically opens the Stagetimer app within a few seconds of clicking the setup file.
💡 Updates: You can install updates the same way by downloading and running the new installer. All your existing data, rooms, and license keys will be preserved during the update process.
MSI Installer (for IT admins)
For enterprise or fleet deployment scenarios, an MSI installer is available as an alternative to the standard .exe installer. The MSI can be deployed silently via SCCM, Intune, or Group Policy:
msiexec /i Stagetimer-3.5.0.msi /quiet /norestart💡 Note: The MSI installer requires administrator privileges and installs to C:\Program Files\Stagetimer.io, unlike the standard .exe which installs per-user without admin rights.
MacOS
- Download the correct macOS installer (.dmg file) from the desktop app page. There are separate versions for Intel and Apple Silicon processors.
💡 To check which version you need: Click the Apple logo in the top-left corner of your screen, then select “About This Mac.” If you see “Chip Apple M1,” “M2,” or another variant of the M chip, download the Apple Silicon version. If you see an Intel processor listed, download the Intel version.
- Open the downloaded .dmg file. You’ll see it in your Downloads folder or dock.

- The installer window will open, showing the Stagetimer app icon and an Applications folder. Drag the Stagetimer app into the Applications folder to install it.

- Once copied, you can find the app in your Applications folder, Launchpad, or by searching with Spotlight.

- When you first launch the app, macOS may display a security warning because the app isn’t code-signed with an official Apple Developer certificate.
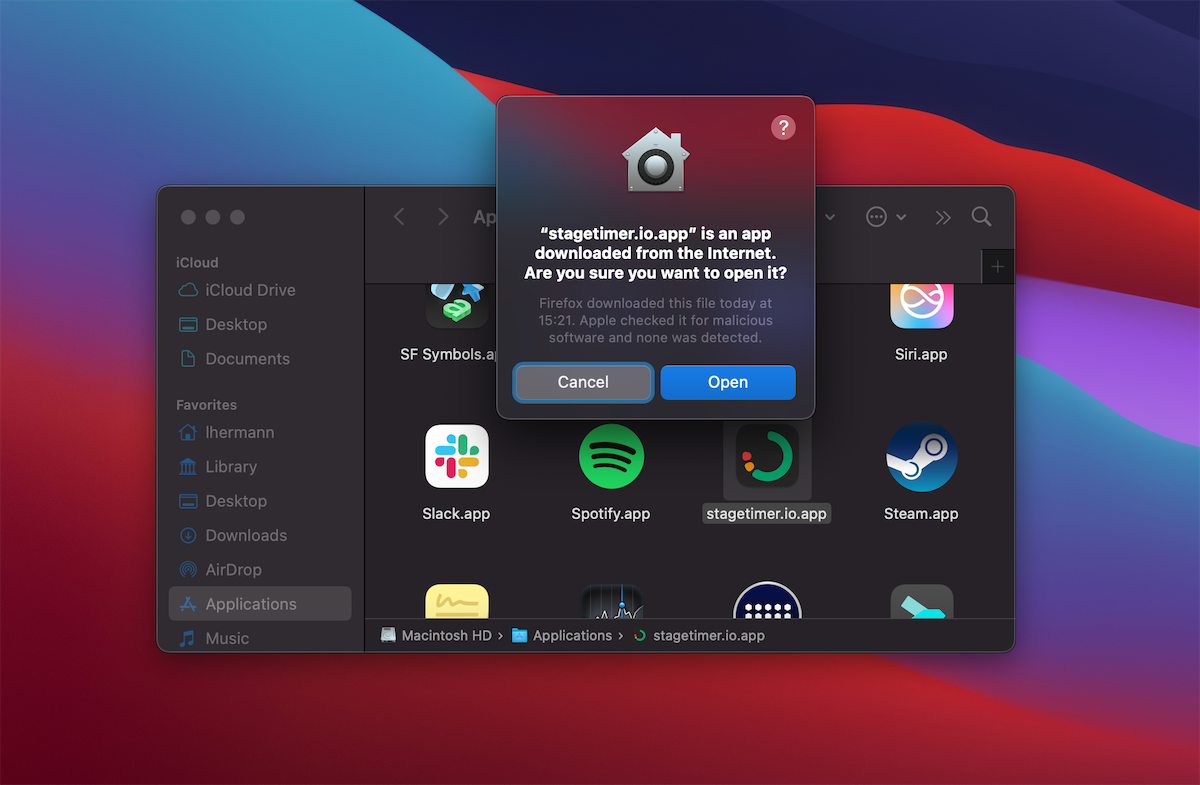
- Click “Open” to proceed. This is safe when the app was downloaded directly from our official website. The security warning won’t appear on subsequent launches.
💡 If the “Open” button isn’t available: Right-click on the Stagetimer app in your Applications folder and select “Open” from the context menu. This will bypass the security restriction and allow you to launch the app.
💡 Updates: Install updates by downloading the new .dmg file and repeating the drag-to-Applications process. Your existing data, rooms, and license keys will be preserved.
Ubuntu/Debian Linux
-
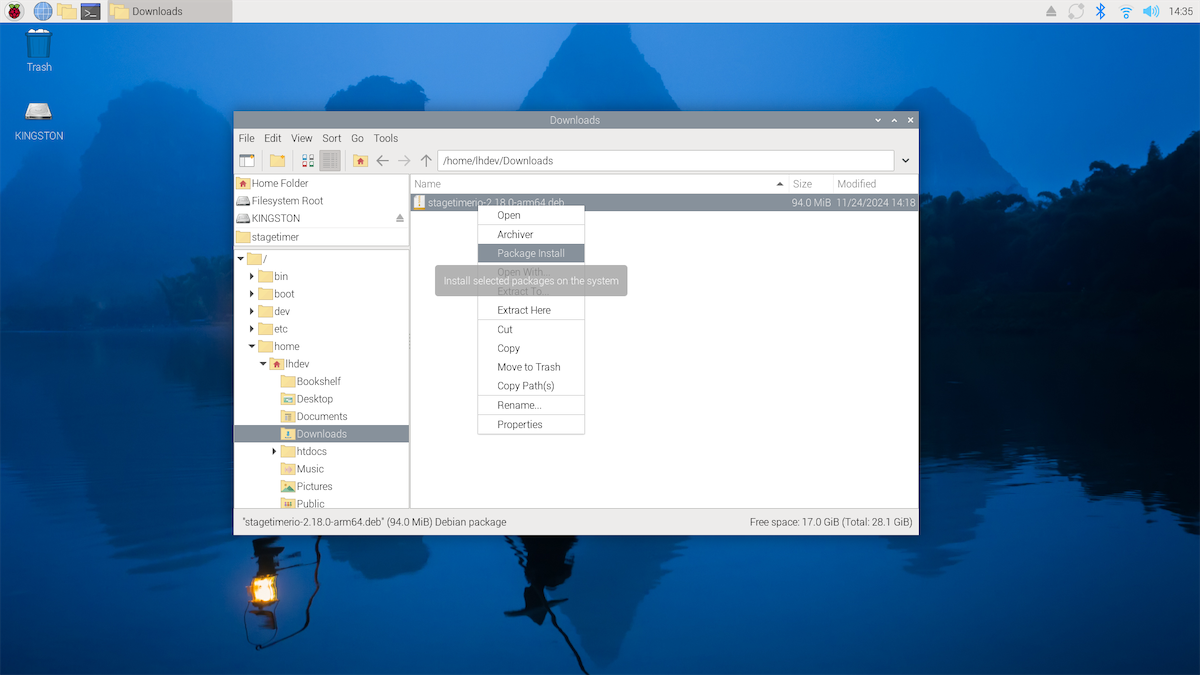
Download the appropriate Linux installer (.deb file) from the desktop app page. Choose between x64 (for standard Intel/AMD processors) or arm64 (for ARM-based systems like Raspberry Pi).
-
Install the package using one of these methods:
GUI Installation (Raspberry Pi and some desktop environments): Right-click on the downloaded .deb file and select “Package Install” from the context menu.
Command Line Installation: Open a terminal and navigate to your Downloads folder, then run:
sudo dpkg -i stagetimer.io-2.18.0-arm64.debReplace the filename with the exact name of your downloaded file.
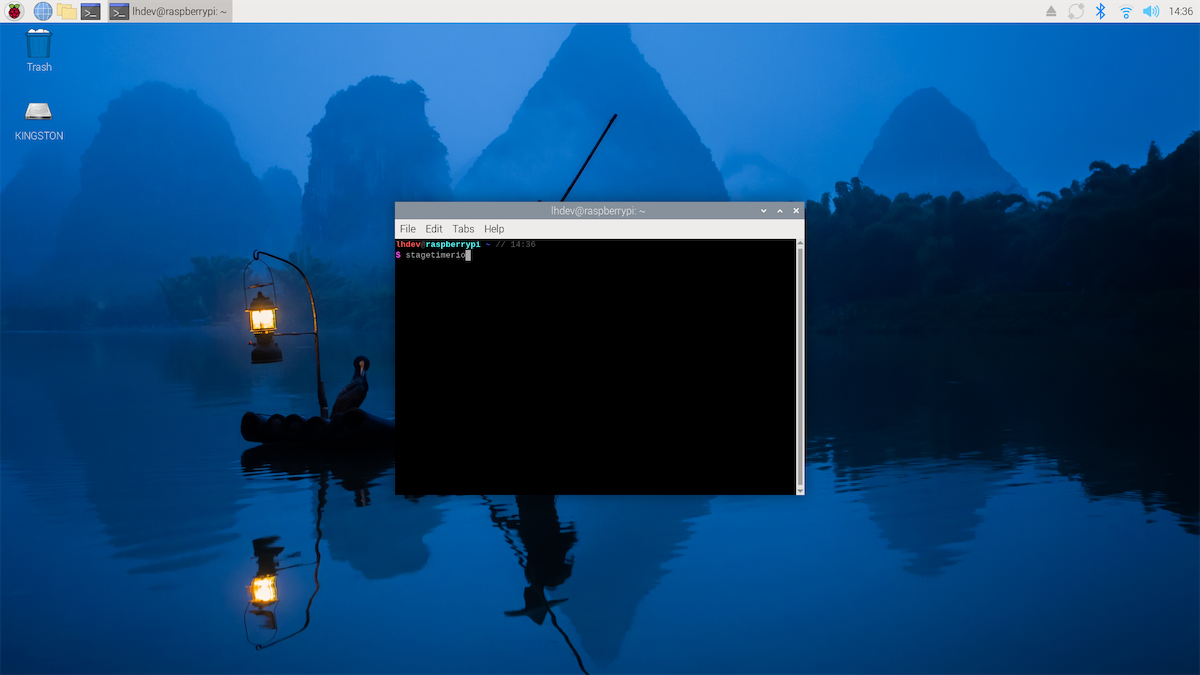
- Launch the application by running the
stagetimeriocommand in a terminal:
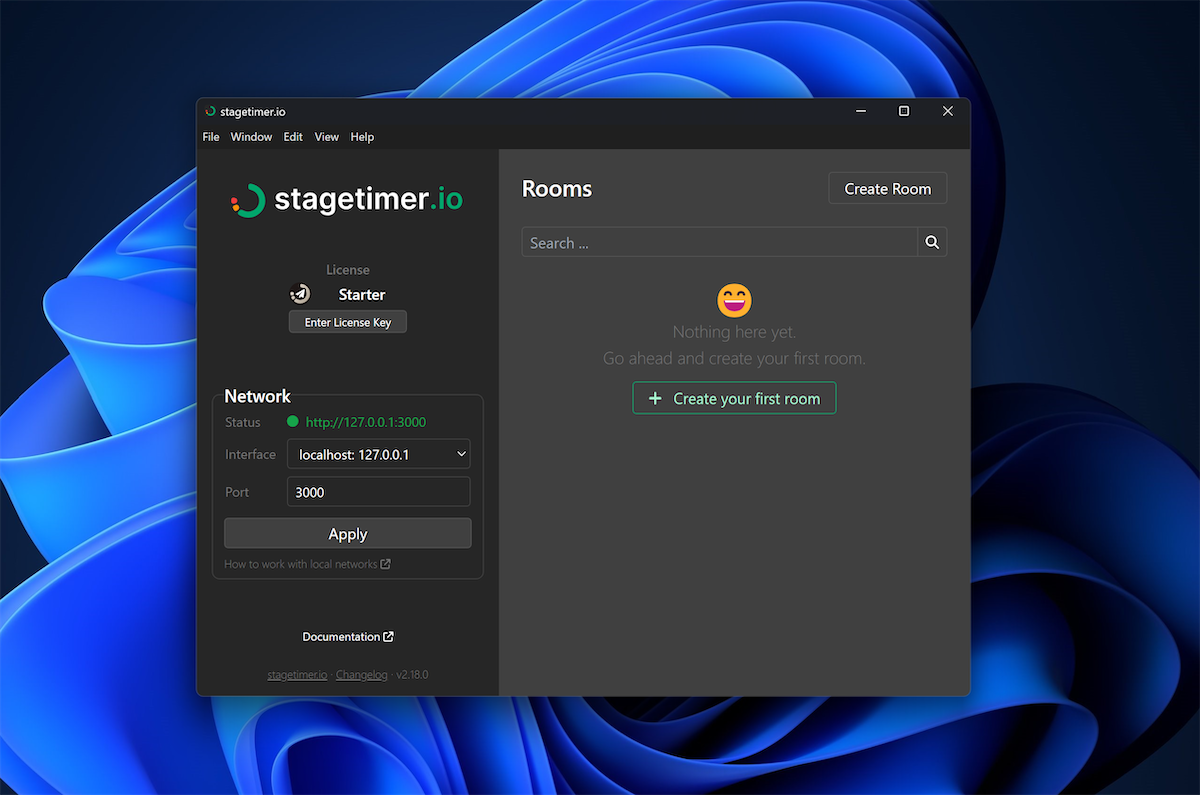
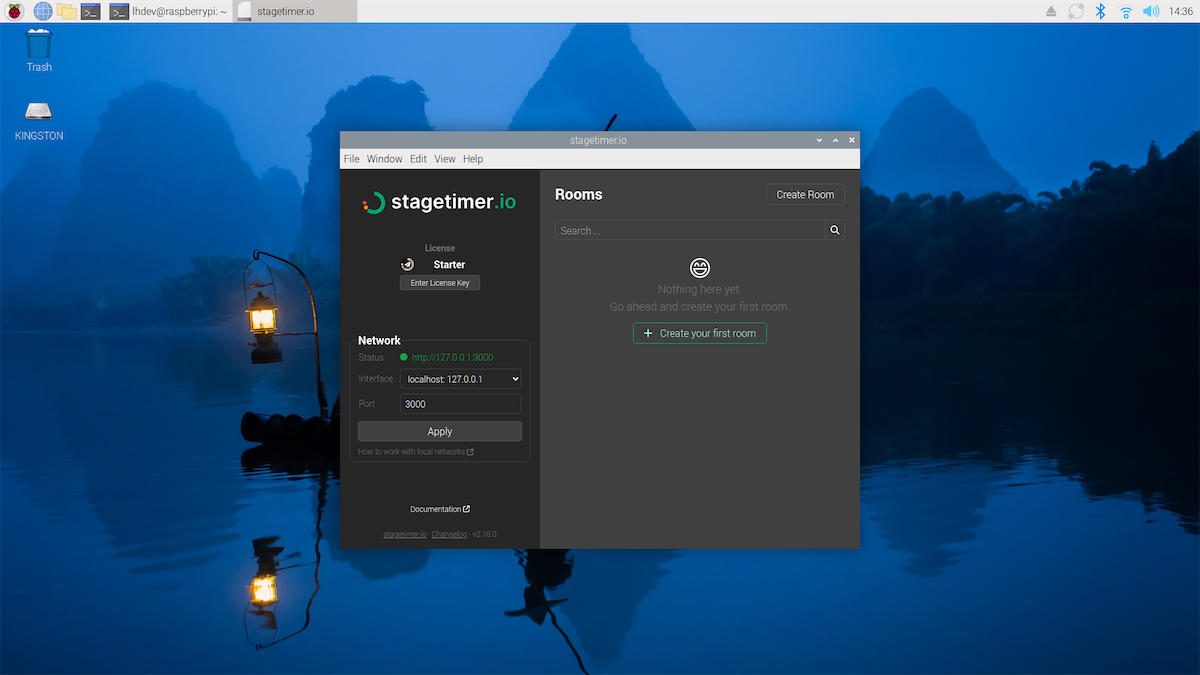
- The Stagetimer desktop app will open, showing the main interface:
💡 Alternative Launch Methods: Some desktop environments will also add Stagetimer to your application menu or launcher after installation, allowing you to start it without using the terminal.
💡 Updates: Install updates by downloading the new .deb file and repeating the installation process. Your existing data, rooms, and license keys will be preserved.
Starting the Stagetimer App for the First Time
The Stagetimer desktop app operates fully without an internet connection, using your local area network (LAN) to connect devices within the same network to your Stagetimer rooms.
If you have a paid Stagetimer plan, you’ll find an desktop app license key in the dashboard of the web interface. This key enables the premium features available online in your offline application.
For those unfamiliar with networking terms like IP addresses, refer to our “Working with Local Network” section below, which guides you through connecting devices on your local network.
Since the offline app operates independently of the internet, it does not maintain a connection with our servers. To transfer setups or room configurations from the web version to the desktop app, see the “Exchanging Data Between Web Version and Desktop App” section.
NDI® Output
The desktop app can send timer displays as NDI® video sources directly to production software like vMix, OBS Studio, Resolume, or any NDI-compatible receiver. No browser source or screen capture needed — timer outputs appear as standard video sources on your local network.
NDI output is available on all plans. Each output with active NDI receivers counts as one Live Connection.
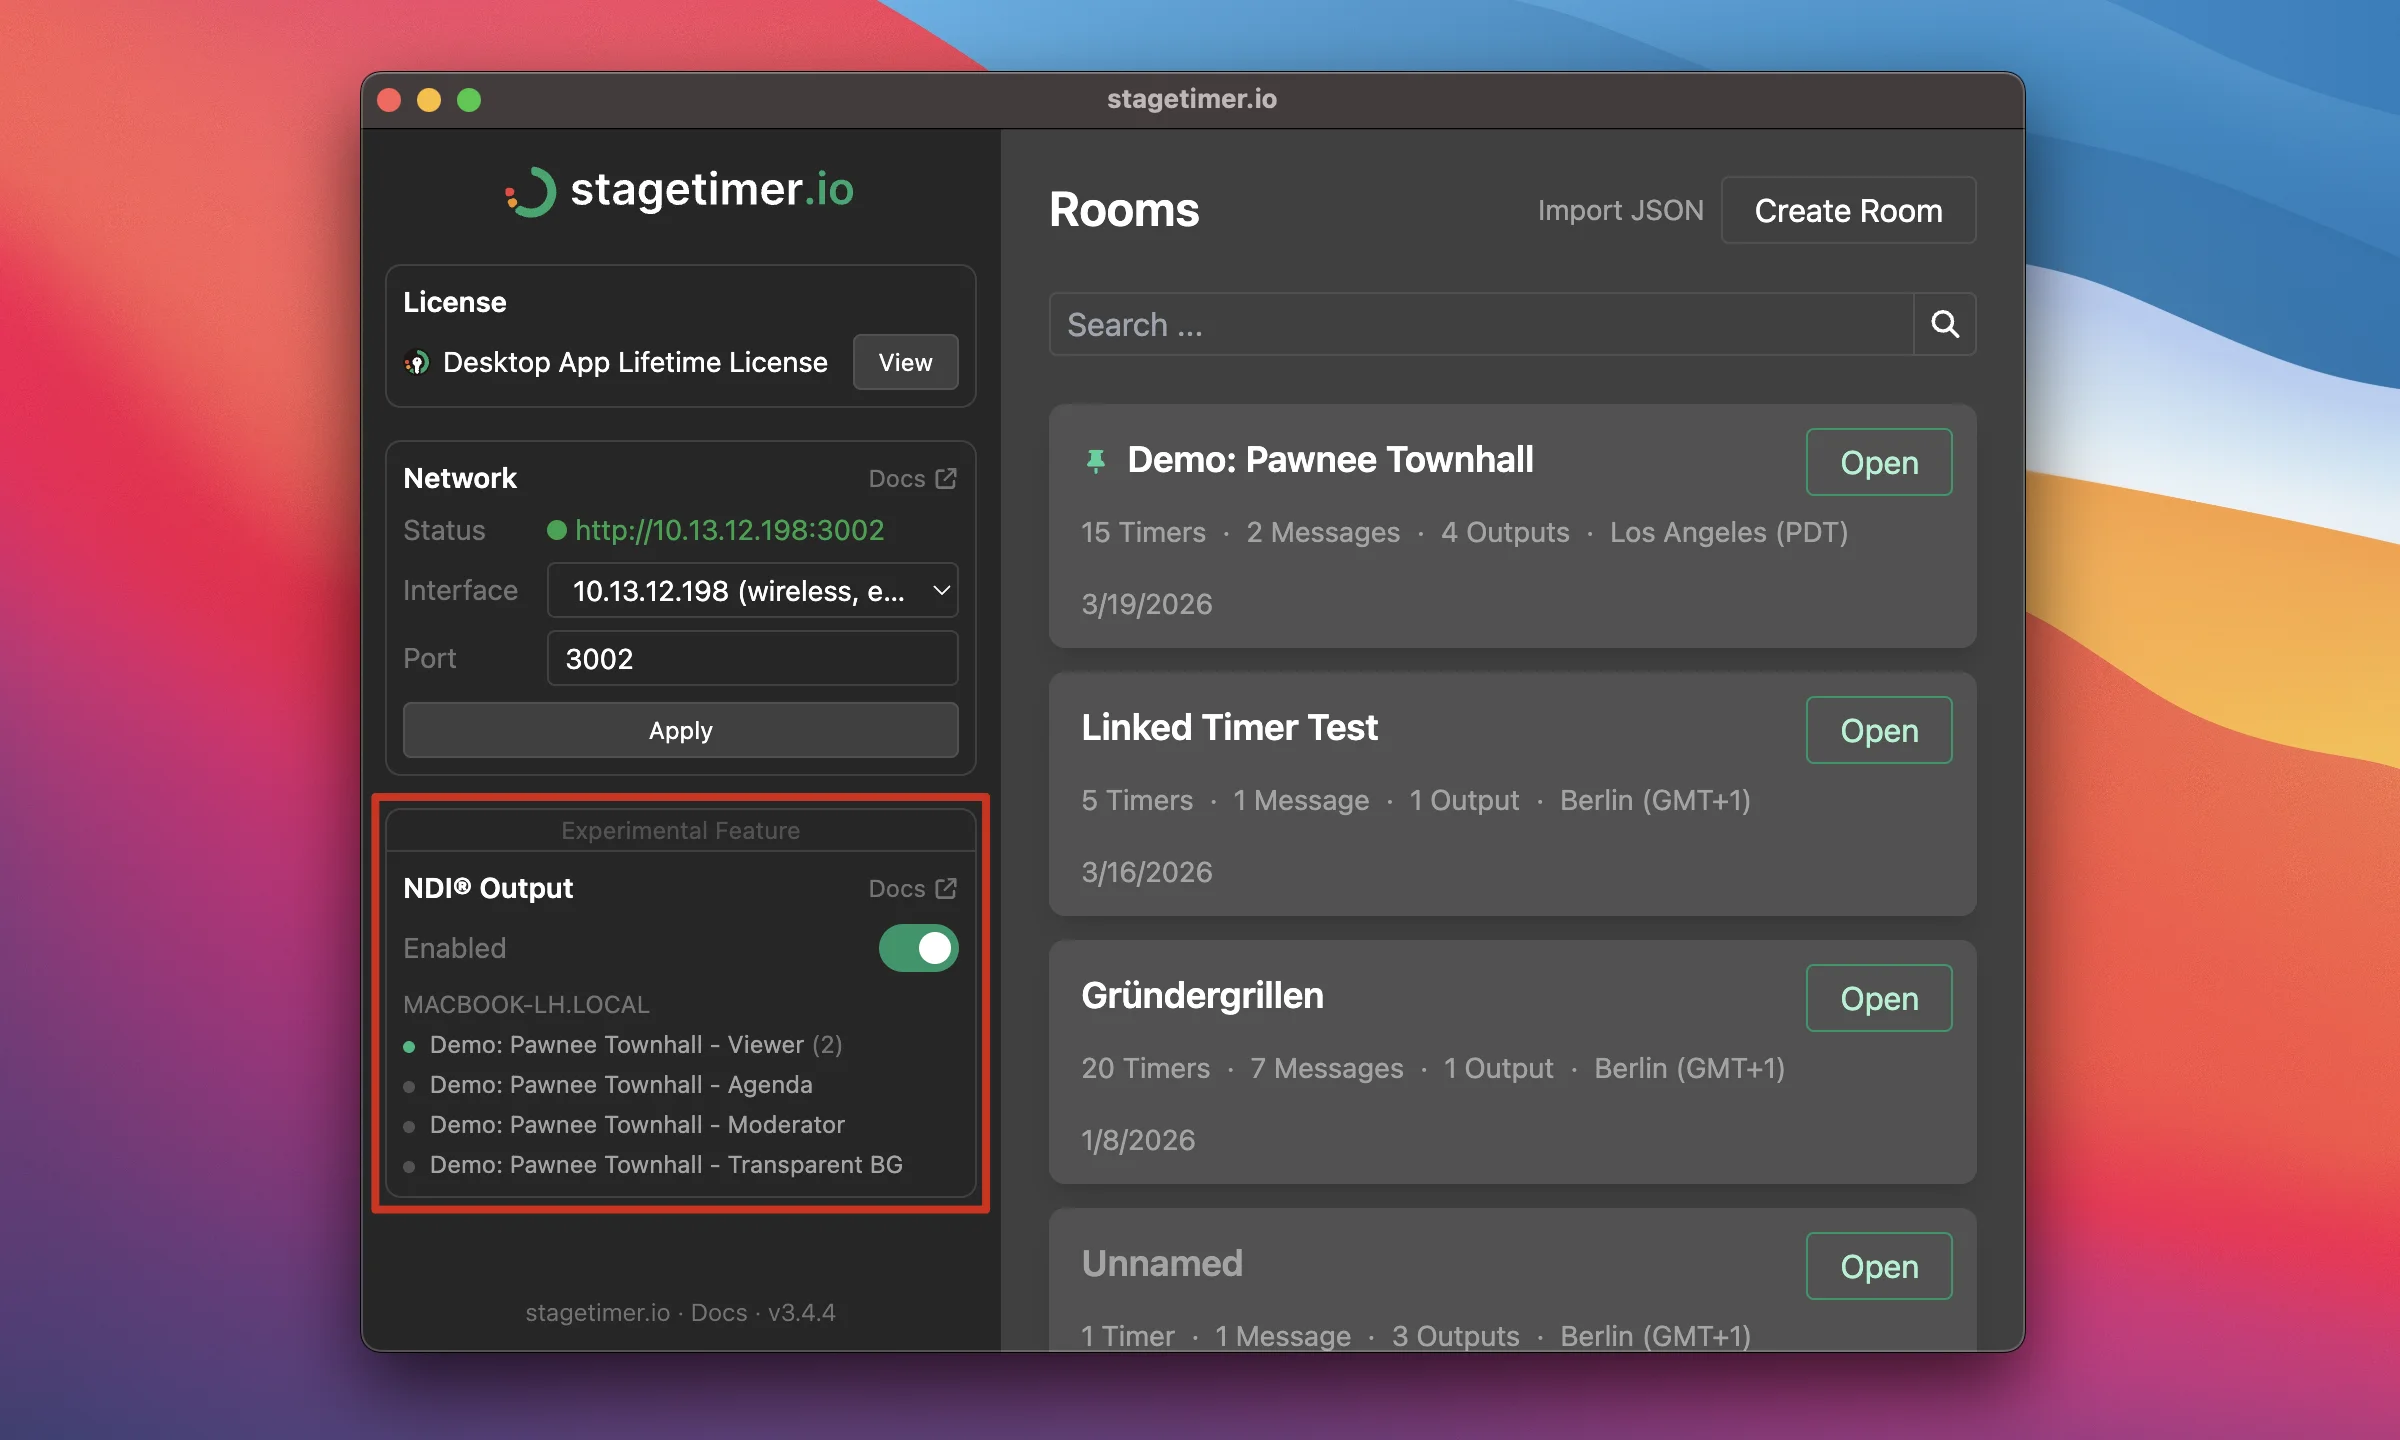
Enabling and Disabling NDI
NDI output is enabled by default. You can toggle it on or off in the main view of the desktop app under the “NDI Output” section. When enabled, display outputs (Viewer, Agenda, Moderator, and custom outputs) for rooms with open controllers are automatically advertised as NDI sources on your local network.
Controller and Operator are not advertised as NDI sources — they are control interfaces, not display outputs.
Finding NDI Sources in Your Receiver
NDI sources are discovered automatically via mDNS — they appear in your receiver’s source list just like a camera or other NDI device on the network. Open a controller for a room, and its outputs show up in vMix, OBS, or any other NDI receiver within seconds.
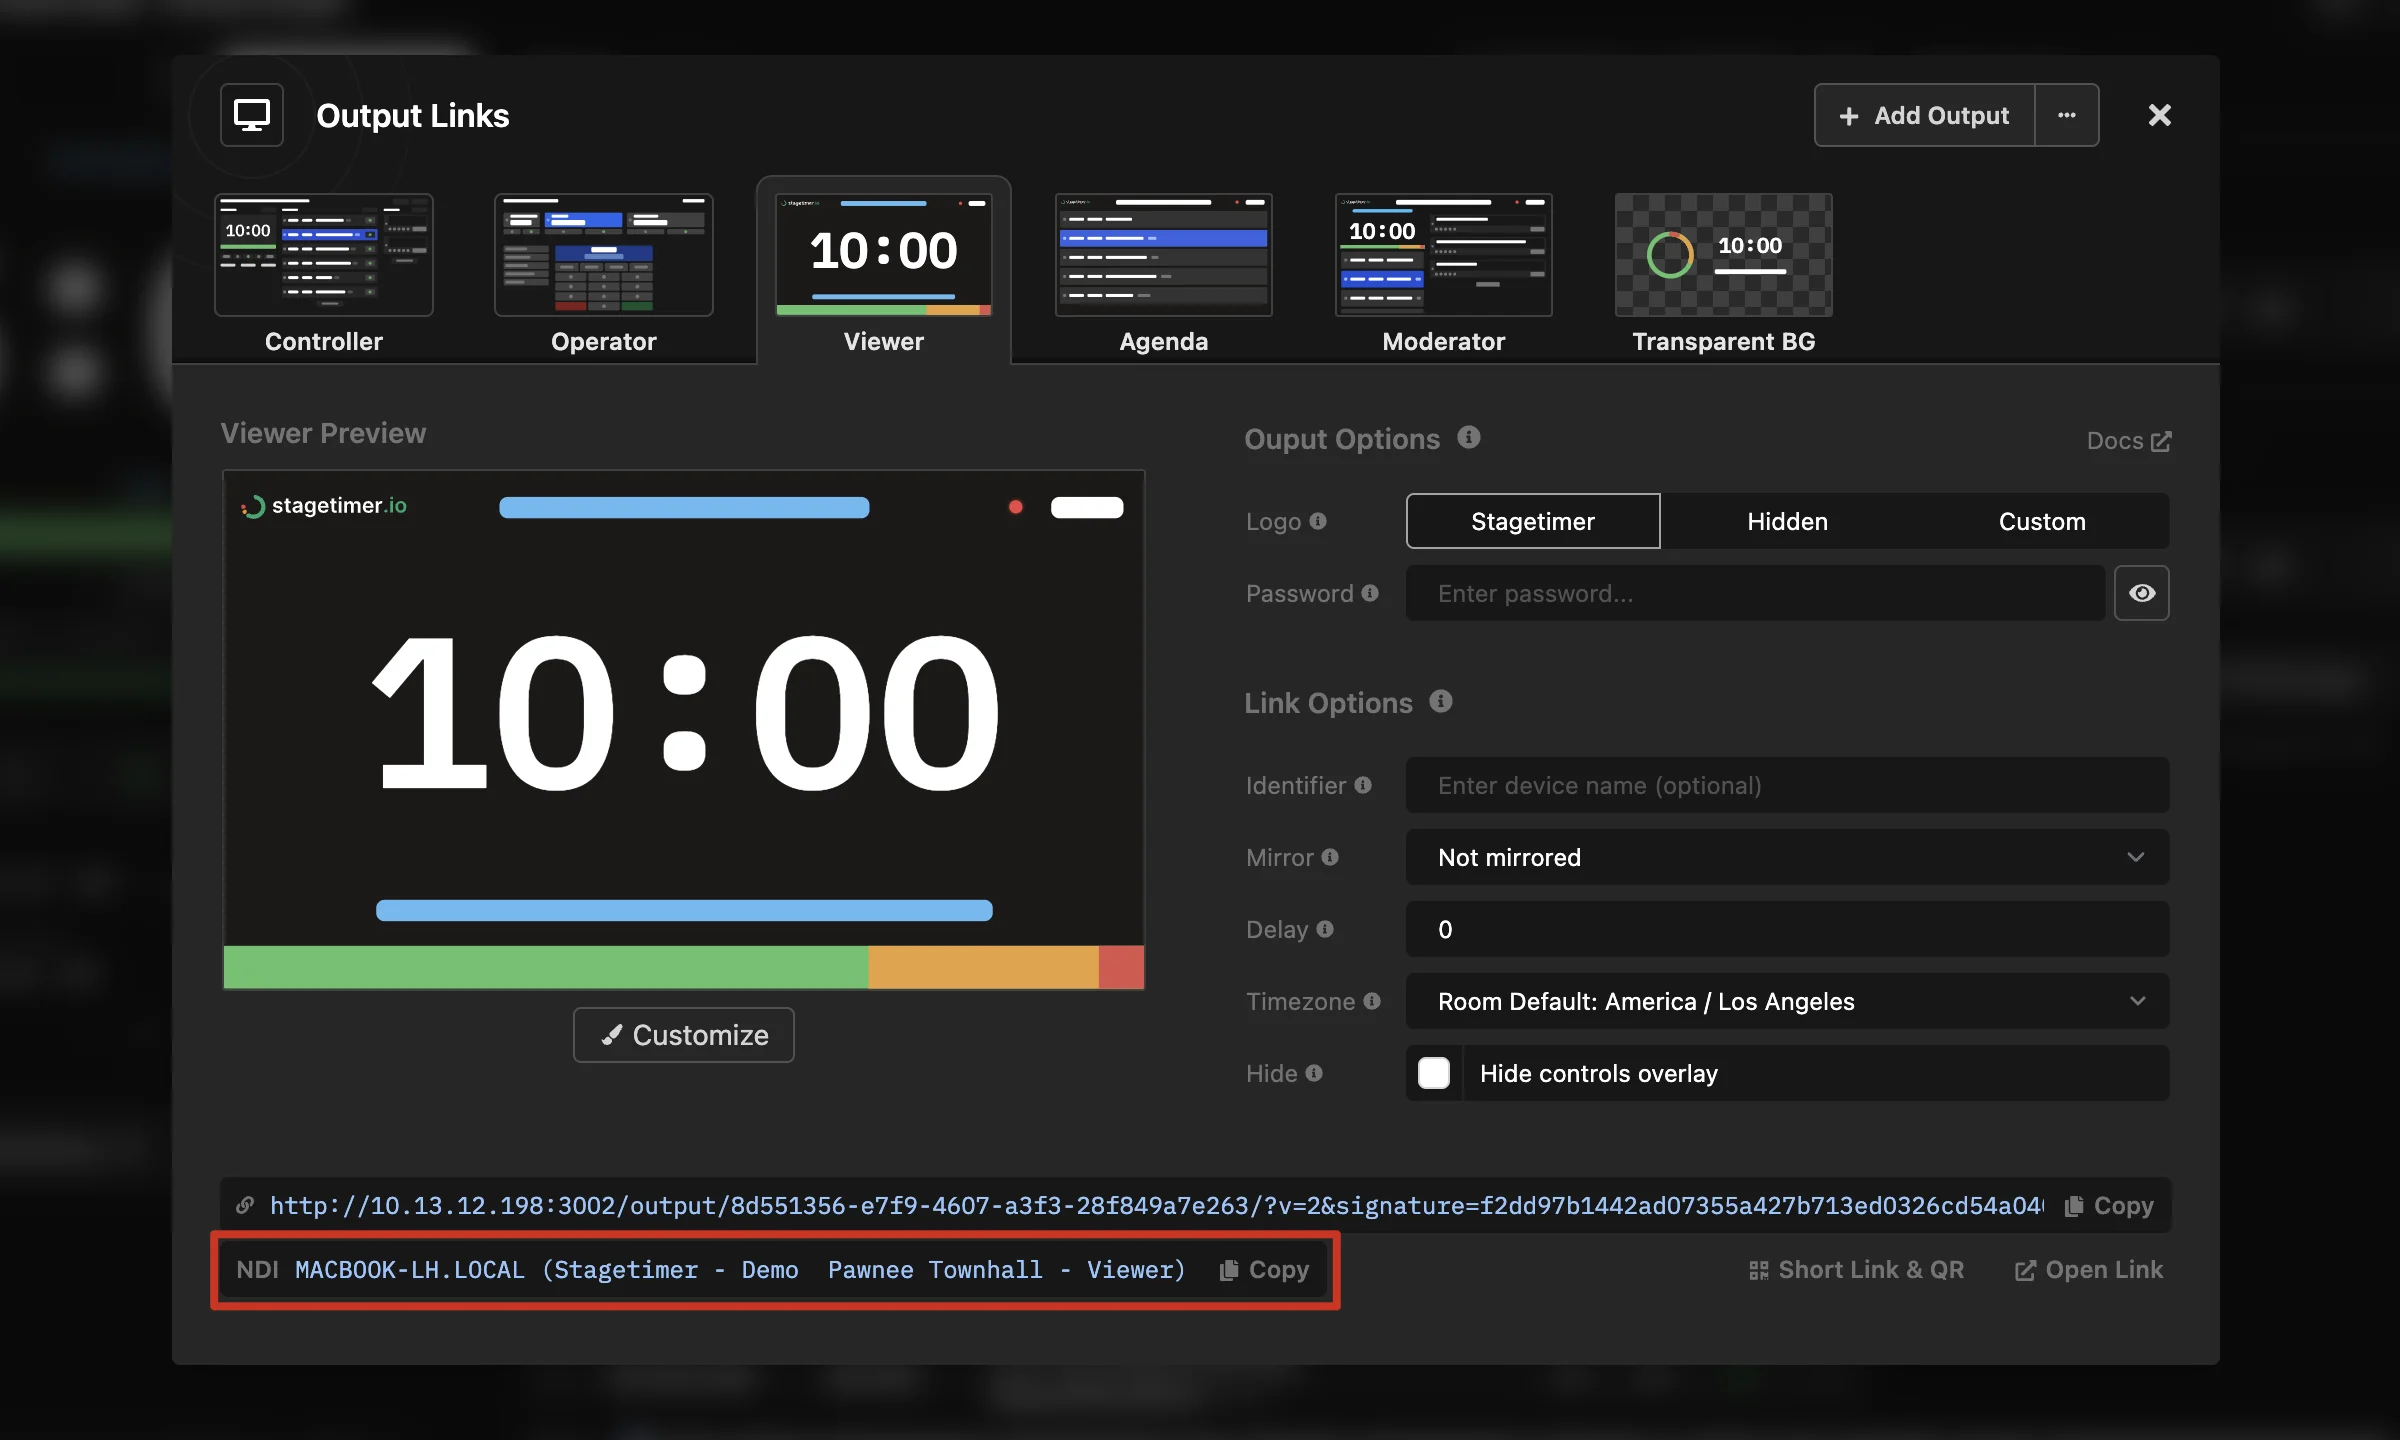
If auto-discovery doesn’t find the source, you can copy the exact NDI source name from the Output Links popup and paste it into your receiver manually.
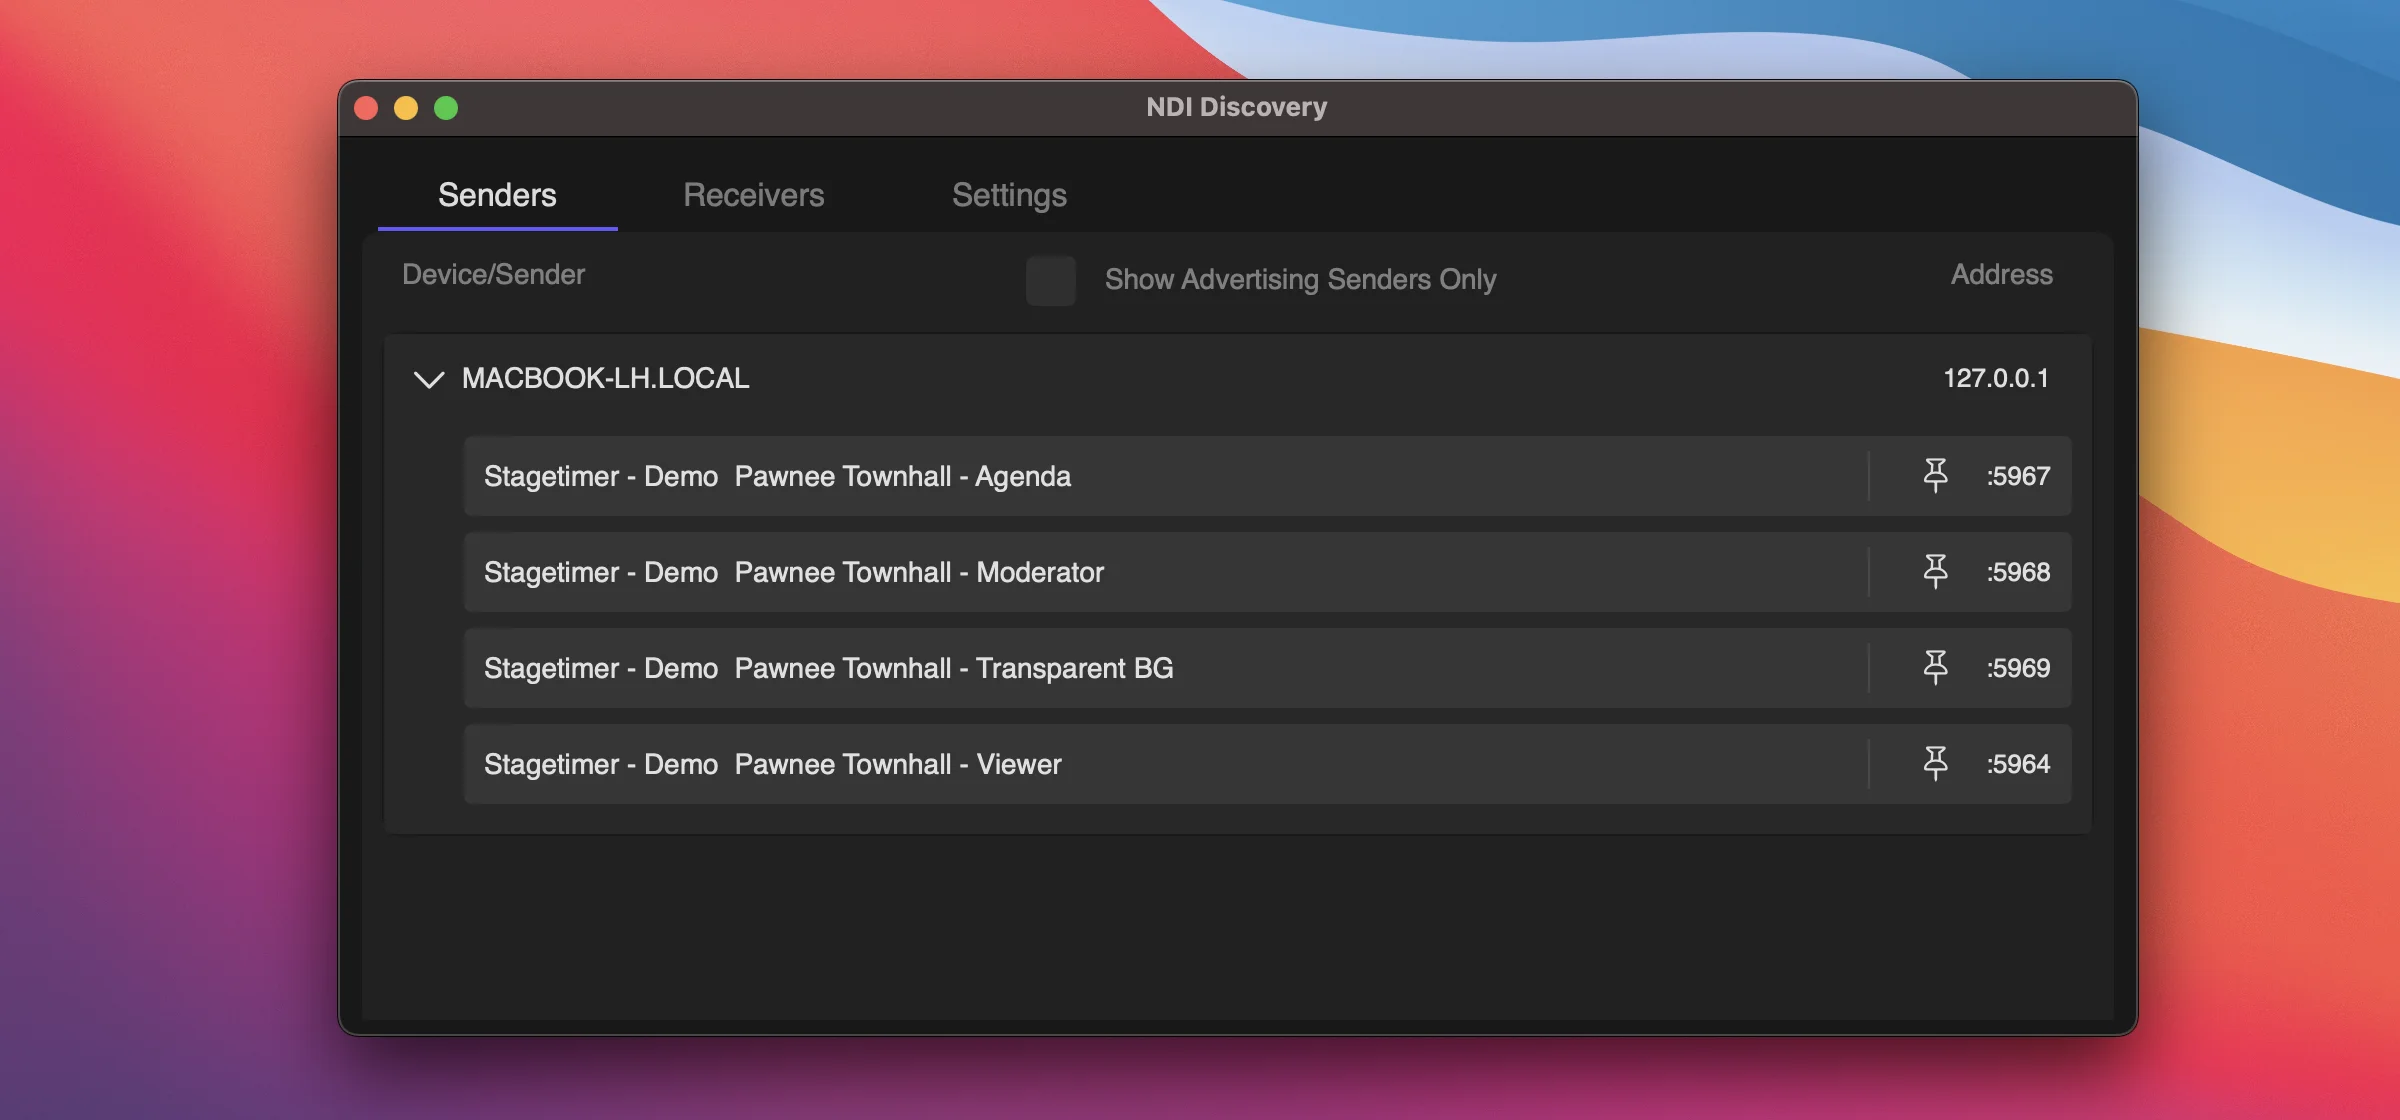
NDI Source Naming
NDI sources follow the industry-standard naming convention:
HOSTNAME (Stagetimer - Room Name - Output Name)For example: MACBOOK-PRO (Stagetimer - Keynote Day 1 - Confidence Monitor)
This makes it easy to identify the correct source when multiple NDI devices are on your network. The room and output names come from your Stagetimer setup.
💡 Note: Renaming a room or output while NDI receivers are connected does not update the NDI source name immediately. The name updates the next time you open the controller for that room. This prevents mid-show disconnections.
Transparent Backgrounds (Alpha Channel)
NDI output supports alpha channel transparency. If your output has a transparent background, the NDI feed will include the alpha channel automatically. This lets you composite timer overlays directly in your video switcher without chroma keying.
Setting a transparent background requires a Premium plan and is configured per output in the output designer. See Custom Outputs — Background Setting for details.
Outputs with solid backgrounds render normally with an opaque alpha channel — no Premium plan needed for that.
NDI and Live Connections
Each output with at least one active NDI receiver counts as one Live Connection toward your plan’s device limit. Multiple NDI receivers watching the same output still count as just one connection — NDI multicasting is handled natively.
For example, if your plan includes 10 Live Connections and you have 2 outputs being received via NDI, that leaves 8 connections available for browser-based viewers and controllers.
💡 Note: NDI sources are advertised when you open a controller for a room. They only consume a Live Connection slot when a receiver actually connects. Advertised-but-unwatched sources are free.
NDI® is a registered trademark of Vizrt NDI AB. For more information, visit ndi.video.
Working with Local Networks
The Stagetimer app leverages your local network to enable connectivity between devices within the same space. Follow this guide to set up your devices on a common network.
Preparations
- The app needs to be running on only one computer within the network.
- All devices should be connected to the same local network, typically achieved by connecting to the same WiFi router.
- In environments like corporate or university networks with additional security protections, consult with the network administrator for assistance.
Step 1: Select the Network Interface
- Open the Stagetimer offline app.
- Navigate to the network settings and select the network interface connected to your router, often an IP address like
192.168.178.xx. - Click “Apply” to restart the server. Ensure the green “Status” URL updates to reflect the new IP address.
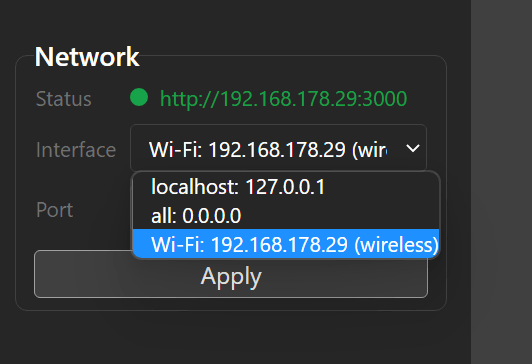
Note: Avoid using the default IP 127.0.0.1, as it is only accessible from the hosting computer.
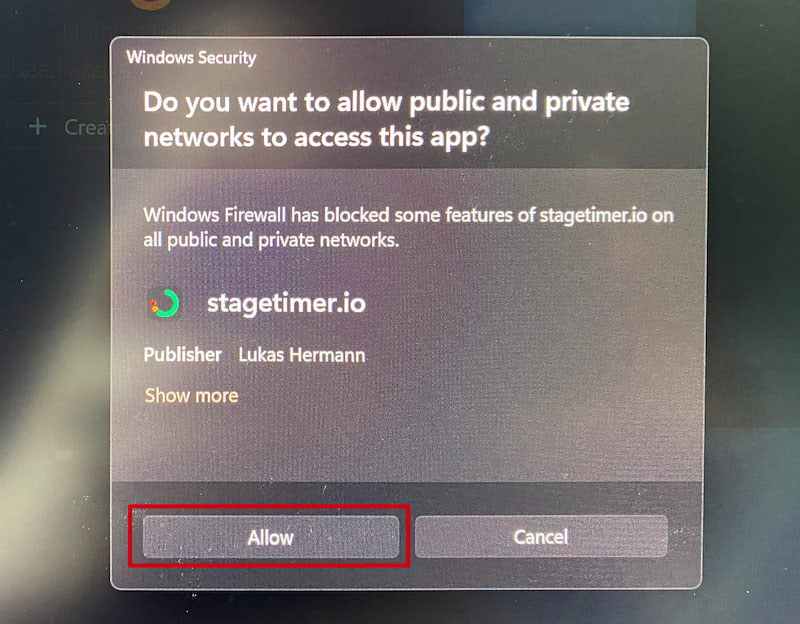
Step 1b: Allow Network Access (Windows Only)
After updating the network settings, Windows may prompt you to allow network access for the app. Ensure both public and private network access are permitted to avoid connectivity issues.
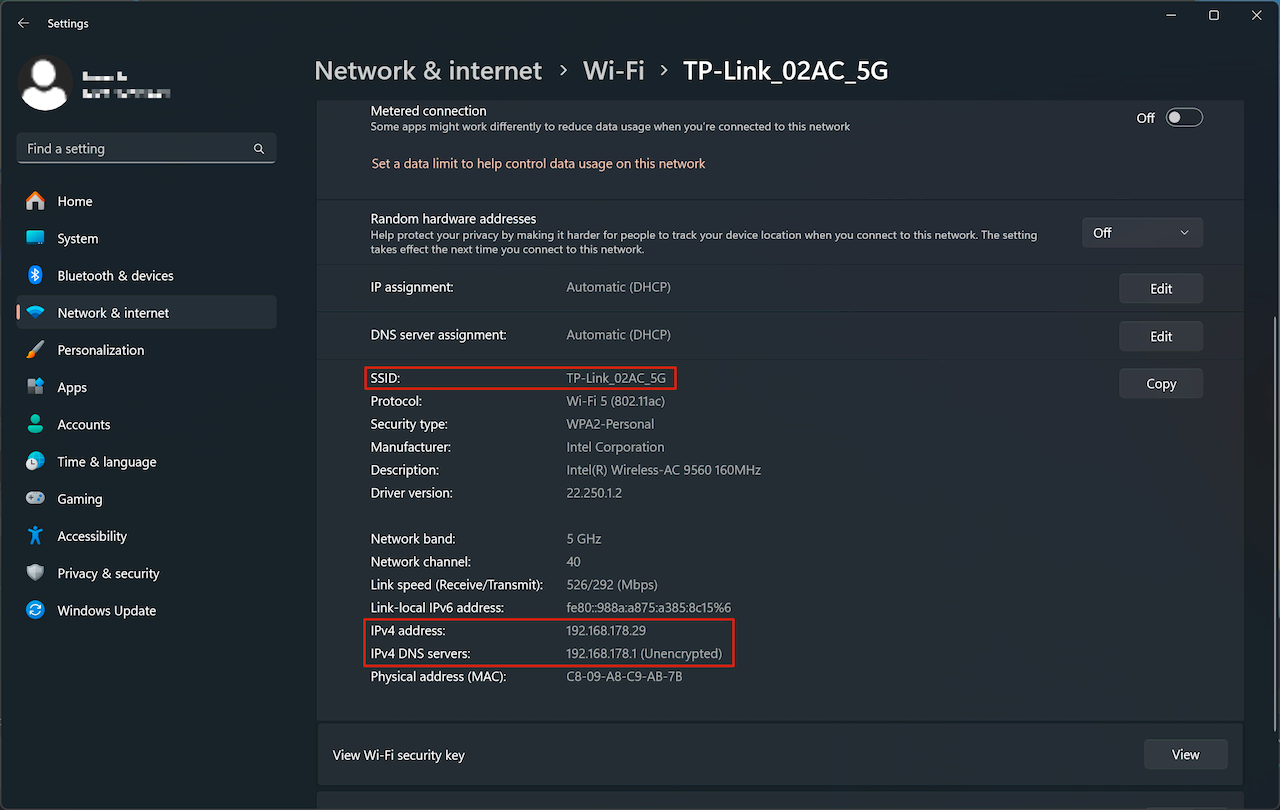
Step 2: Verify Device Connection
Ensure that all devices, such as a Windows computer and an Android phone, are connected to the same router:
- Verify that the SSID (router name) is the same on all devices.
- The IP addresses should be similar, typically matching all segments except for the last.
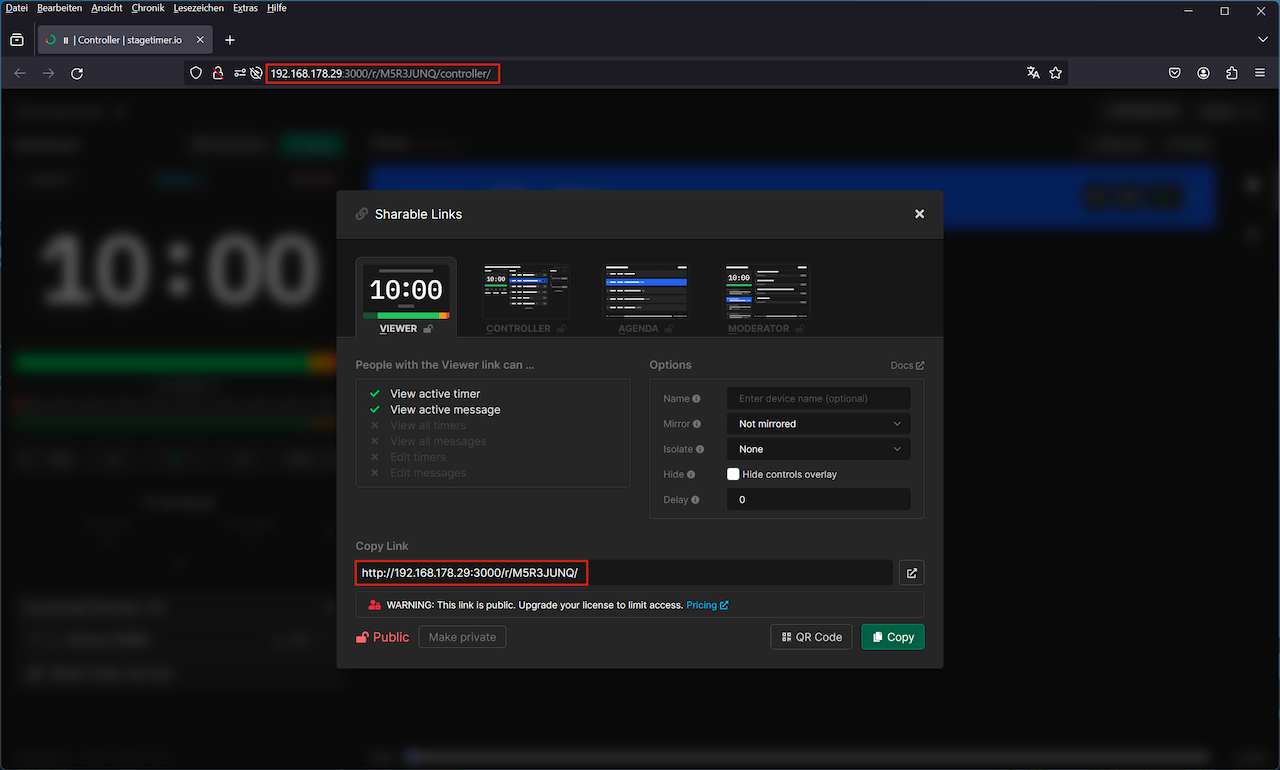
Step 3: Open and Verify Room URL
- Open a room within the Stagetimer app.
- Ensure the URL displayed in the address bar and the URL in the shareable links popup match the IP address selected in Step 1.
Step 4: Access from Another Device
Open the link or scan the QR code provided in Step 3 on your other device (e.g., a mobile phone) to join the room.
Note: Connection issues in settings with stringent security protocols, like universities or office buildings, may require consultation with your system administrator.
Exchanging Data Between Web and Desktop App
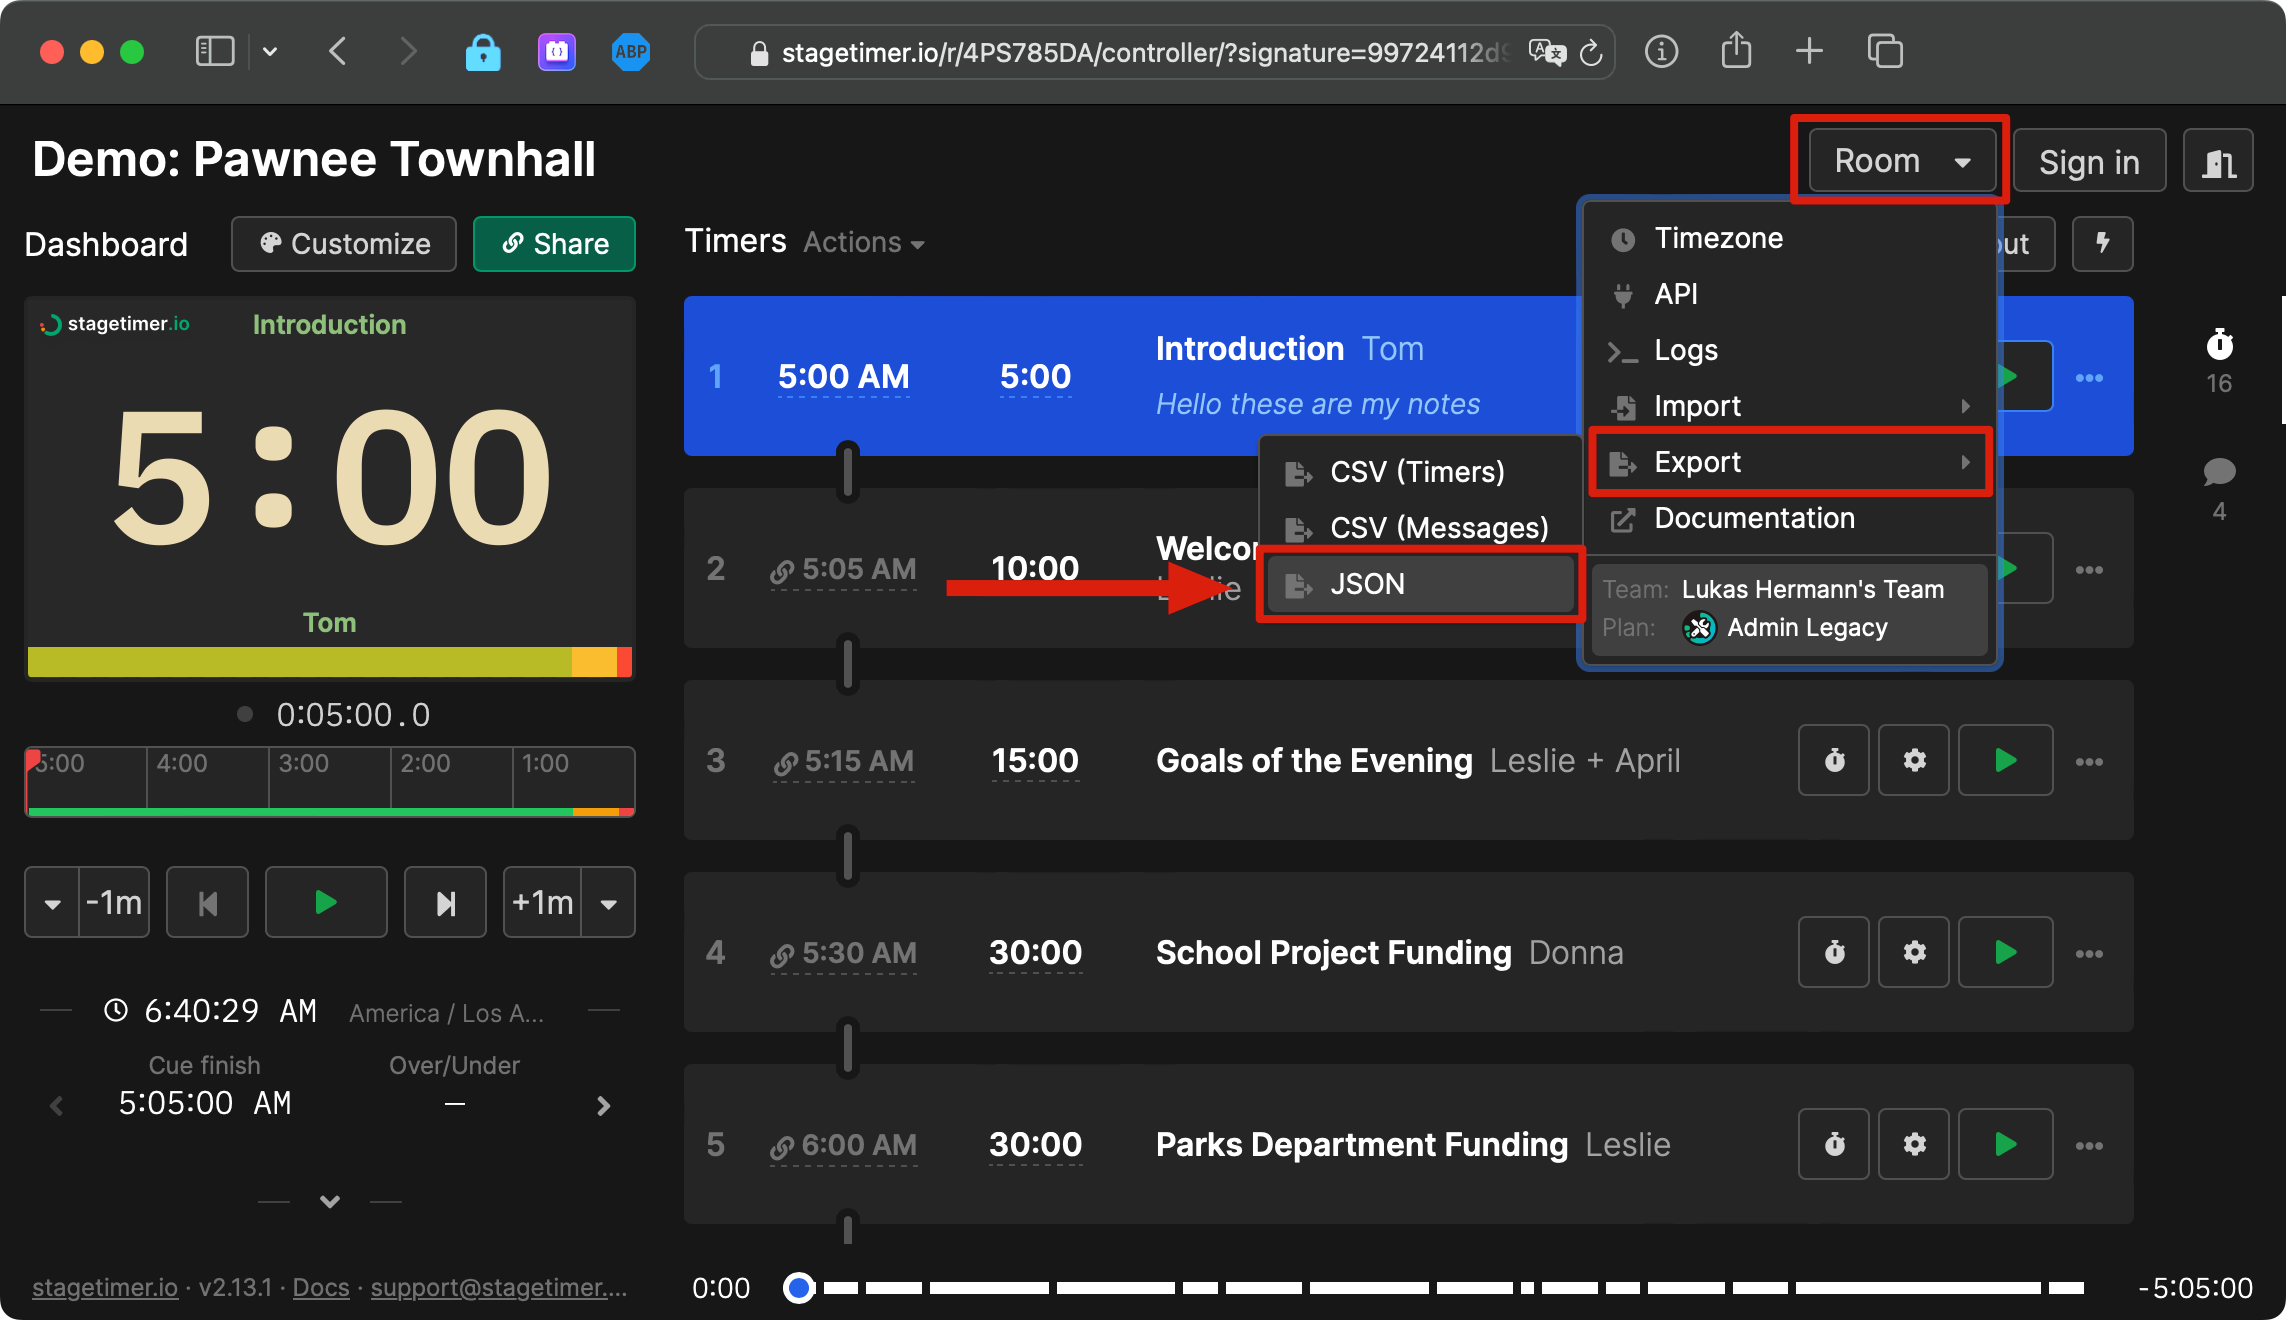
As of version 2.13, Stagetimer supports data synchronization between its web and offline applications. You can export your room data as a JSON file from the web version and import it into the offline app, and vice versa. This process captures all settings, timers, messages and outputs associated with the room.
It is important to note that custom images are not included in the JSON export. These images are typically linked to our servers. If you are using the desktop app in a setting without internet access, you may need to manually re-upload any custom images used in your rooms.
Exporting from Web Version
- Navigate to the room you wish to export.
- Select the “Export” option, found in the room settings menu.
- Save the generated JSON file to your device.
Importing to Desktop App
- Open the Stagetimer offline app.
- Go to the room where you want to import the data.
- Choose the “Import” option and select the JSON file you exported from the web version.
- Upload any necessary background images separately, if applicable.
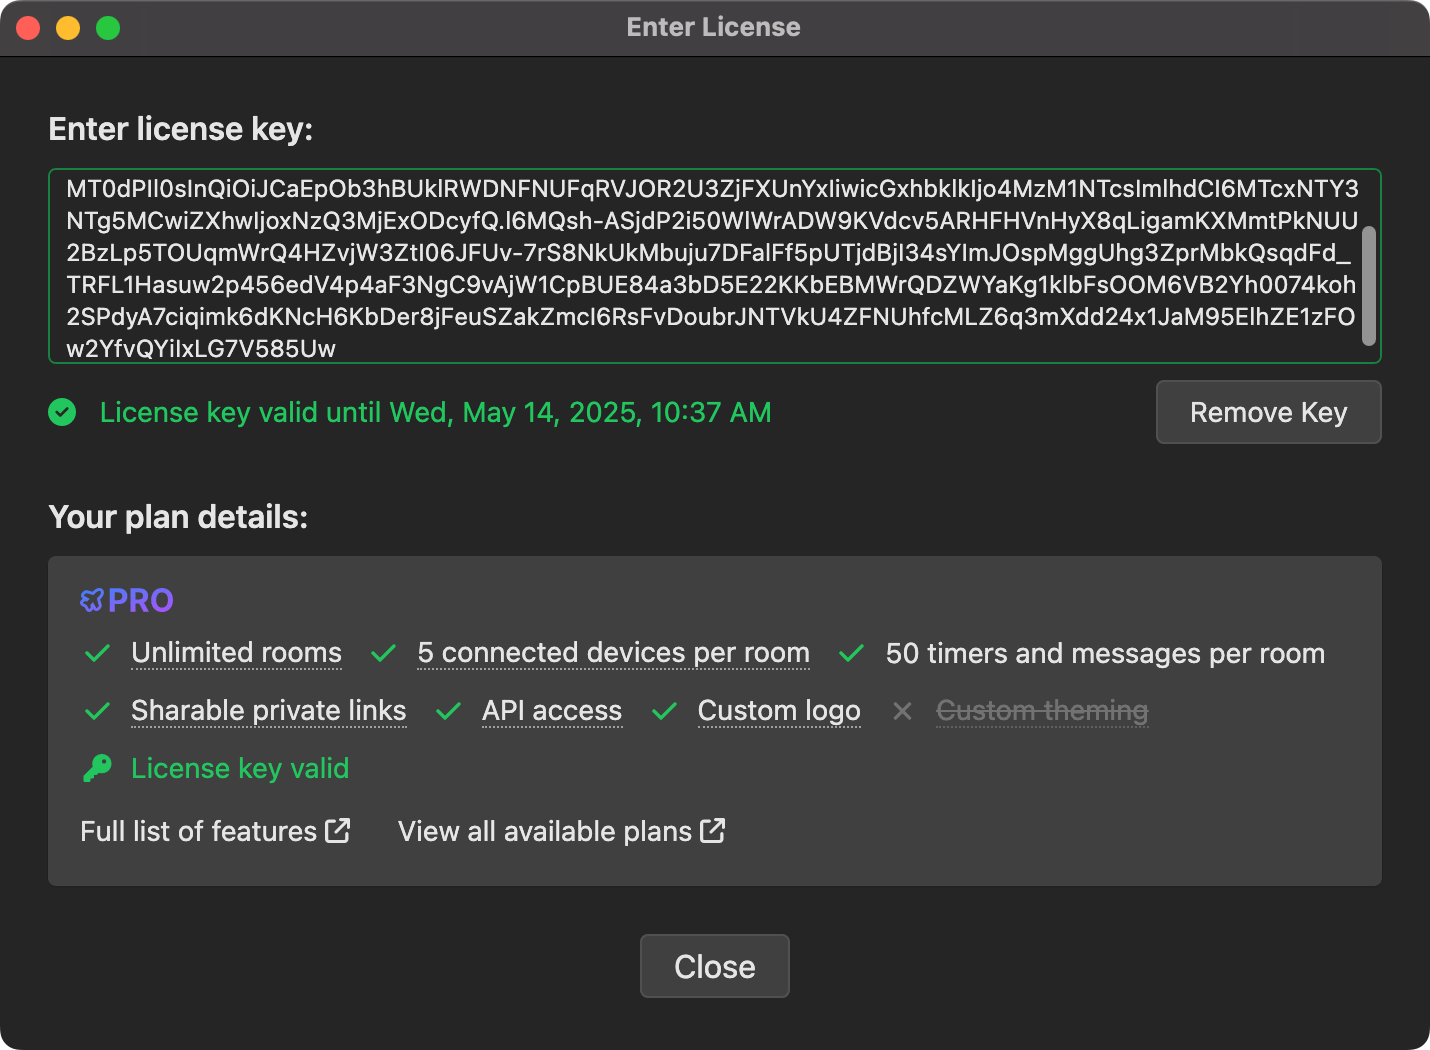
Transferring License Keys Between Machines
License keys for the Stagetimer desktop app can be moved between different computers and operating systems. This is useful when upgrading to a new machine or switching between Windows, macOS, and Linux installations.
Removing a License Key
- Open the Stagetimer desktop app on the machine you want to remove the license from.
- Click “Enter License Key” in the License section.
- In the license window, click the “Remove Key” button.
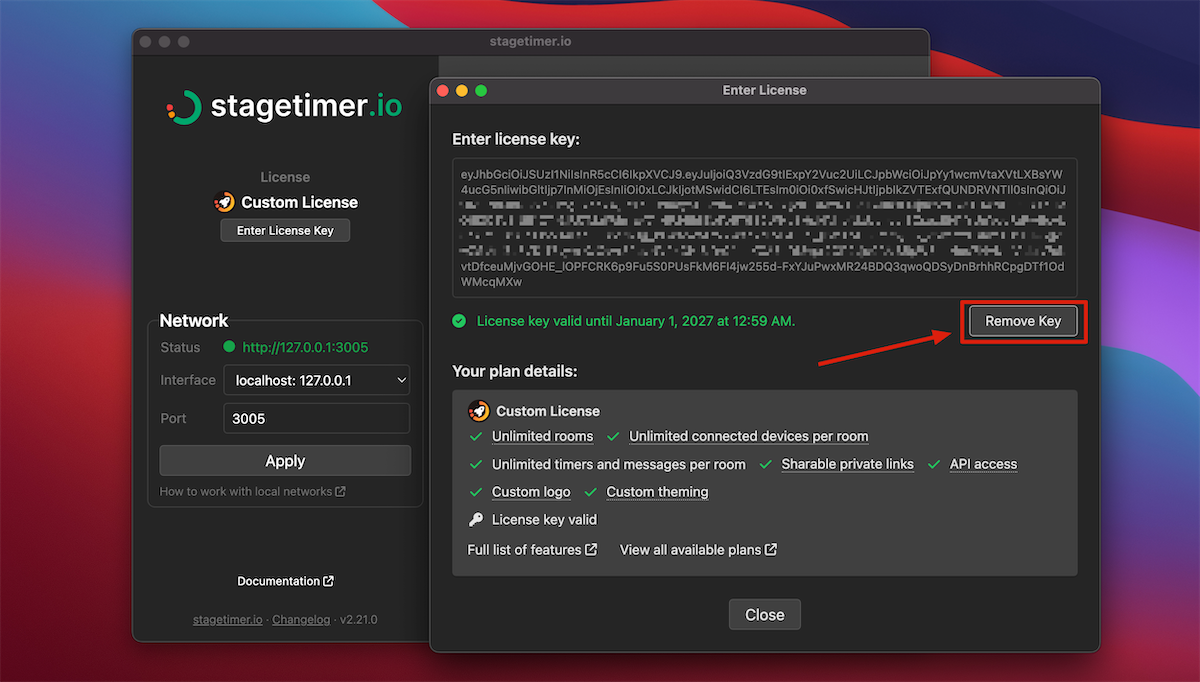
- The app will return to the free/starter version on this machine.
Using the Key on Another Machine
Once removed, you can enter the same license key on any other Stagetimer desktop app installation. License keys work across all supported operating systems (Windows, macOS, and Linux) as long as the key is still valid and hasn’t expired.
Important: Each license key can only be active on one machine at a time. You must remove it from the current machine before using it elsewhere.
Troubleshooting
Site Can’t Be Reached
If you’re seeing error messages like “This site can’t be reached” or “Unable to connect” when trying to access Stagetimer from phones, tablets, or other devices on your network, the issue is likely related to the network interface setting.
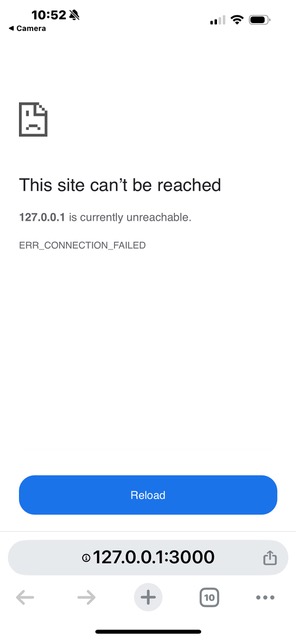
Check the URL: Look at your browser’s address bar. If you see an address starting with 127.0.0.1 (like http://127.0.0.1:3000), this is the problem. The address 127.0.0.1 is a special “localhost” address that only works on the computer running the app—other devices on your network can’t reach it.
The Solution: You need to change the network interface in the Stagetimer app settings to use your computer’s actual network IP address instead of the default localhost setting. This makes the app accessible to other devices on your local network.
How to Fix It: Follow the detailed instructions in the Working with Local Networks section above. You’ll need to select your computer’s network interface (typically an IP address like 192.168.1.xxx) and restart the server.
Network Limitations: Keep in mind that the desktop app only works within your local network (devices connected to the same WiFi router). Devices outside your local network cannot access the app unless you have advanced networking setups like VPN tunnels or port forwarding configured.