Using Messages Correctly
What are Messages?
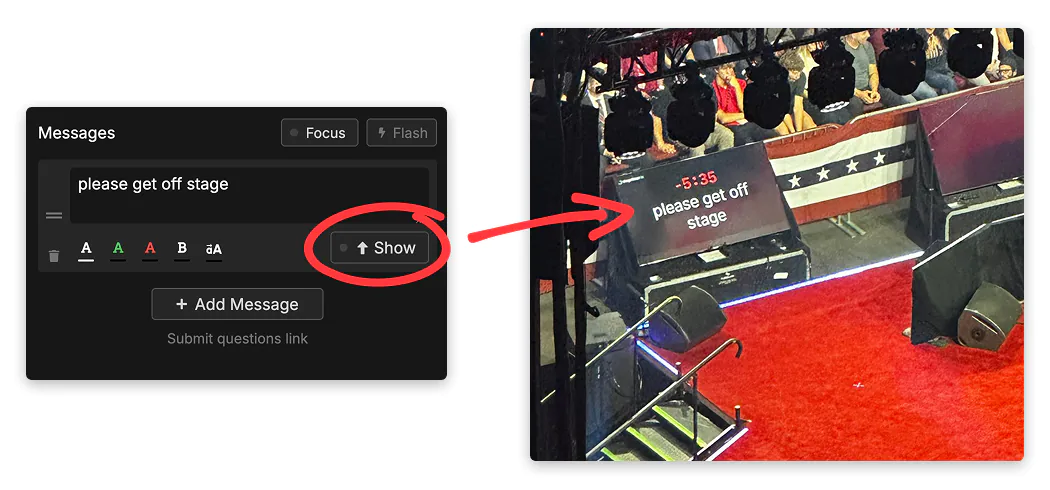
Stagetimer’s message feature makes communication with your stage talent effortless. You can create and display prominent messages alongside the countdown timer on the Viewer screen. When you show a message, the countdown timer reduces in size to make room for the message, which automatically resizes to fill the majority of the screen.
Messages are managed from the Controller or Moderator interfaces and appear on all connected Viewer screens. Only one message can be displayed at a time, and messages stay visible until you manually hide them.
For added emphasis, you can make messages flash (blink several times) or show them in fullscreen (display prominently over everything else on screen).
Message Limits:
- Free users: 3 messages per room
- Pro and Premium users: Unlimited messages
Creating Your First Message
Creating a message is straightforward:
- Add a message: Click the ”+ Add Message” button in the Messages section of the Controller page
- Type your text: Enter your message in the text field that appears
- Show the message: Click the “Show” button to display it on all Viewer screens
- Hide when done: Click “Show” again to hide the message (it works like a toggle)
You can create multiple messages in advance and show them as needed during your event. The “Show” button acts as a toggle - clicking it once displays the message, clicking it again hides it.
Formatting Messages
Messages can be customized with several formatting options to make them more prominent and attention-grabbing.

Available formatting options:
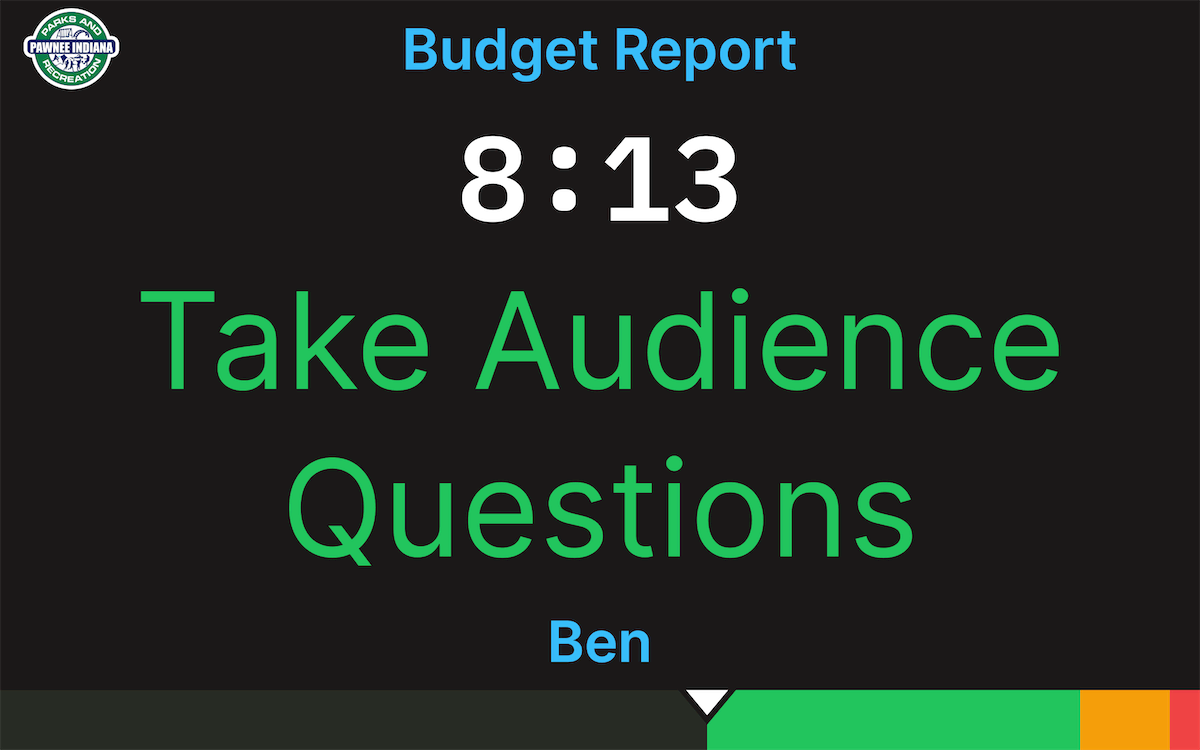
- Colors: Choose from White, Green, or Red text
- Bold: Make text bold for emphasis
- Uppercase: Transform text to ALL CAPS
- Flash: Make the message blink several times to grab attention
- Show in fullscreen: Display the message prominently over everything else on screen (one-click toggle next to each message)
Premium users can customize message colors to match their branding and progress bar colors.
Collecting Audience Questions
Stagetimer includes a built-in audience interaction feature. You can generate a link and QR code that allows audience members to submit questions directly to your message queue.

How it works:
- Click “Submit questions link” in the Messages section
- Share the generated link or QR code with your audience
- Questions submitted through the link appear as new messages in your message list
- Review, edit, and display audience questions as needed
Questions count toward your message limit (3 for free users, unlimited for paid users), so you can moderate them before displaying to presenters.
Advanced Features
Using Placeholders
Placeholders are dynamic text elements that automatically update with current timer information. They’re perfect for creating reusable message templates.
Room Information:
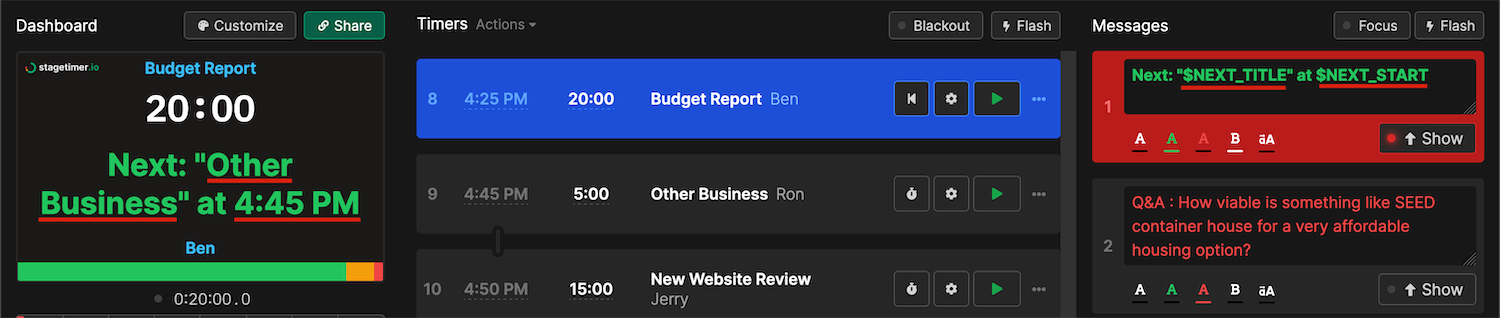
$ROOM_TITLE- The name of your room
Current Timer (highlighted):
$CURRENT_TITLE- The title/name of the current timer$CURRENT_SPEAKER- The speaker field of the current timer$CURRENT_NOTES- The notes field of the current timer$CURRENT_LABELS- All labels assigned to the current timer (comma-separated)$CURRENT_START- The start time of day for the current timer$CURRENT_FINISH- The finish time of day for the current timer$CURRENT_DURATION- The duration of the current timer (formatted as MM:SS)
Next Timer:
$NEXT_TITLE- The title/name of the next timer$NEXT_SPEAKER- The speaker field of the next timer$NEXT_NOTES- The notes field of the next timer$NEXT_LABELS- All labels assigned to the next timer (comma-separated)$NEXT_START- The start time of day for the next timer$NEXT_FINISH- The finish time of day for the next timer$NEXT_DURATION- The duration of the next timer (formatted as MM:SS)
Times and durations are formatted according to your choices in Room Settings (12h/24h format and timezone).
API Integration
The Stagetimer API provides programmatic control over messages, enabling you to create, show, hide, and flash messages via HTTP commands. This opens up possibilities for:
- Stream Deck integration with Companion
- Custom automation scripts
- Third-party service integrations
- Social media feed integration
For detailed examples of API usage, including how to integrate with services like Zapier for social media feeds, check out our API integration examples blog post.
The API allows you to build sophisticated workflows that automatically create and display messages based on external triggers, perfect for large-scale productions or automated systems.